You have not provided information about your setup/controller nor offer that in your profile so we need to know that before we can answer your specific inquiry.
LightBurn started providing Dual Tube Support for Ruida based controllers with the release of version 0.9.00, and that work continues with additional supported Dual Tube features in version 9.03. From the original announcement:
Dual Tube Support for Ruida
This is still a bit of a work in progress, but the first pass of dual tube support for Ruida controllers is included in this release.
For starters, are you connected to the laser in LightBurn?
Do you know if there are any settings in the Ruida to enable the 2nd head, and if those are already set?
As I recall, early on Oz was saying that the 2nd head stuff would show up in the cut settings window if you were connected to a machine that supported it.
Hi ,Thanks for response I haven’t tried it connected to machine, I normally download programs via memory stick. I will try and connect direct to machine and see.
Thanks
i connected to the laser and i can see the options for the 2 heads now. How do i get the second head to fire? in RD it takes the information from virtual array and calculate the distance for the second head to move. Does LightBurn work the same ?
To have access you first need to enable the 2nd tube in the vendor settings of the controller. Once set, you should see control options appear for your cut settings.
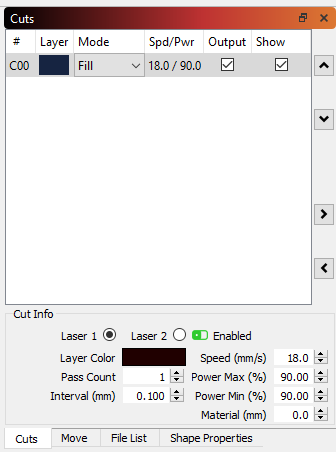
‘Cuts’ main window:
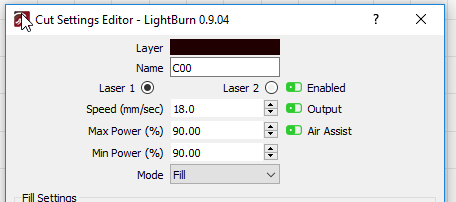
‘Cut Settings Editor’ window:
LightBurn provides for defining an offset for the second head in the device settings shown below.
Are you trying to use both at the same time? Or one at a time? To use the 2nd tube you click the circular button for tube two, then toggle the “enable” switch for it, and the set the power appropriately. I don’t have a dual tube system set up yet, so I’ve been going back and forth with people who do, getting them to verify functionality.
I have been playing about today trying various things and cannot get it to fire laser 2
I have tried laser 1 on its own all works as expected laser 1 fires on its own
tried laser 2 on its own nothing fires ( but follows shape)
tried laser 1 and 2 enabled and laser 1 fires only
If I enable laser 2 only it reads the offset value written in the basic settings before following the program / shape (as if it thinks its firing)
my number 2 laser head is controlled by the z axis
both lasers fire successfully when using the pulse button
I have no idea what you mean by this. The number two laser has a second port on the Ruida controller. CN5 is the first tube, CN6 is the second. How is your second tube controlled by the Z axis?
The movement of the head is controlled by the z axis drive. There is a separate stepper and drive and the offset movement of the head - distance between head 1 is controlled by the z axis on the board
LightBurn should be able to fire the 2nd tube, but virtual array isn’t supported yet, and I’ve never seen a system with the 2nd head offset controlled by the Z. Have you entered an appropriate “min power” setting for the second tube parameters?
I tested it as I thought in my previous post and it works as expected.
The offset setting in the controller works different to the offset function in device setting in lightburn.
I deactivated the head 2 offset using the vendor settings function in rd works and then re-wrote the parameters to the controller with no head offset.
This then disabled the virtual “smart calculation” for the virtual array function and the machine now responds with the second head in lightburn (and rd) as described by you originally.
So as I understand it - the offset function in the controller is the exact distance between head 1 and head 2 ( when the head number 2 is at its home position as close to head 1 as possible)
It then uses this figure to calculate the virtual array and give the most economical way to use both heads on its own. The function is actually quite clever and different to how I expected the machine to function.
By deactivating this function in the controller the head number 2 no longer has this calculation ability and works as instructed on a simple basis by either rd or lightburn.
you can manually jog the position of the second head to the desired distance.
You then select the head you want to fire either number 1 or number 2 or both and the system simply follows the shape and cuts the parts with the selected heads.
This way is more complicated to calculate the material you are using but gives more versatility on how the user wants to use the machine.
This is how I expected the machine to operate before I purchased it and also I gather this is how you at lightburn expected it to also.
I haven’t had chance to check exactly how the offset function in lightburn works yet as I could not get it to function in the way I expected.(and ran out of time)
I will run more tests and report the findings.
Thanks for your help and hope my findings are helpful to you also.
I had the exact same issue running a 2 head setup on Ruida 6442s and z-axis to control head spacing. Mat’s fix and documentation from RDWorks did the trick for me. I have RDWorks 8.01.26, so the details were a little different than the documentation, but basically just told the controller (through RDWorks) that I have 2 Tubes and 1 head (Vendor Param>Other>Multi-Head Auto Layout>Head Num=1).
Now in Lightburn, enabling laser 1 and/or 2 function as you would expect. Before laser 2 Enable had no effect.
Thanks Guys! I’d been trying to figure this out for some time now.
Great news! Finally I am going to buy the software. I thought the dual support was taken out till the offset between tubes was introduced because I tried latest versions in my laptop without connecting to the machine.
So, even after my trial expired, I am finally in for purchase (pretty confident it will work now, or it will eventually).
Thanks for the effort and congratulations for the results. Looking forward to leave RDWorks (even now I was nailing it).
If you like, email us with the trial ID and we can extend it for a week just to let you play with the dual head settings and verify they work as you need. I’m much happier with satisfied customers.