to start out with ive read many of the air assist questions and have got valuable information from them.
the Ultimate air assist by cloudray is 50/50 for me. I do not need the switch to turn on my pump. i have a stand alone compressor and want to feed my 60watt omtech laser that has a interior stand alone pump.
I want to be able to have air assist which i do not due to the interior pump wired directly to the power supply and it just on all the time. I want to disable this but have air assist on via the ruida controller. I understand i will need a solenoid and i like the one cloudray has but sells in a package deal with things i dont need or want. I like the idea of the bypass for lower psi to the nozzel to keep clean with engraving. and when i have air assist selected on my lightburn line layer for cutting, be able to have that pressure higher via a water trap regulator valve. after all my reading on here ive not found someone with same questions unless its been way over my head in technical terms. I feel im on the right track just would like some input from the gurus if possible
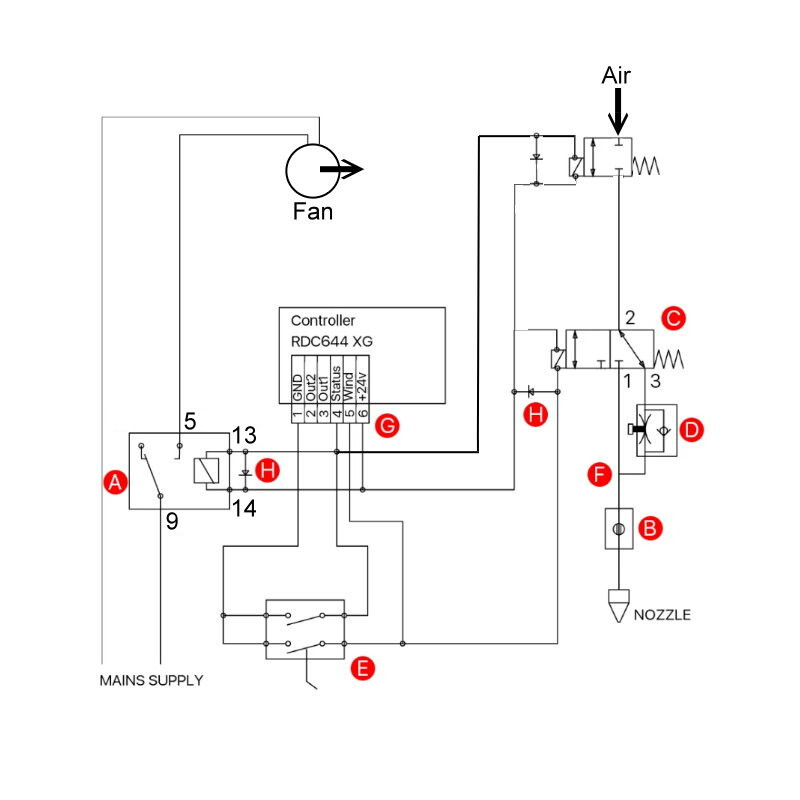
I have a SSR (solid state relay) connected to “Status” of the Ruida. This goes low when the machine goes into ‘run’ mode. So when you start to do a job, it goes low. This turns on the factory internal compressor and the ventilation fan.
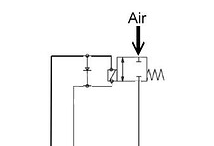
I have a solenoid connected to “Wind” of the Ruida. When this goes low, caused by the “Air Assist” enable for the layer, it picks the solenoid or valve. When it’s enabled I get full pressure. If I leave air assist off in the layer I get the air bypassing the valve that is very low pressure.
Hey jack…thanks a bunch for this info…very very helpful…so you are getting the internal pump to come on when you start your program off the status of the controller and also getting bypass around your solenoid connected to the wind…do you happen to have a diagram for this…also was the solenoid from the ultimate air assist or did you purchase separate from some one else…any information on the ssd would be fantastic if you have it…thanks a million jack
You also need some tubing, push connectors and control valve for pressure adjustment. I used the one with a knob, not a thumbscrew.
I’m out of town, so to speak, so I don’t have most of it in pictures. I’ll be heading home tomorrow and will post a couple of shots that should clarify how I did it.
I’ve got the regulator and water trap already in place…have the hoes on order with the push connects… next is to decide if I’m going to just use a bypass line for the low pressure with the solenoid controlling high pressure from the air assist. Or go your route once I see how you did it… you have been a tremendous help
Thanks David for link to the ultimate air assist from cloud ray…look a good system for its intent. But I’m not using a exterior pump…im using and exterior air compressor and the switch to turn on the pump isn’t something I need…cloud ray needs to make another system for using a compressor and using the status on the ruidia for low pressure from what I’m learning
Indeed, that is exactly what I did but modified the Ultimate Air Assist to accomplish that. Just the addition of an extra solenoid valve. Here’s my modification
The blower air assist that came with my machine was next to useless, Since hooking up my compressor the quality and speed of my cuts have increased remarkably.
The extractor on the machine was also rubbish. I replaced that with a much more substantial unit which I have coming on using the provided relay.
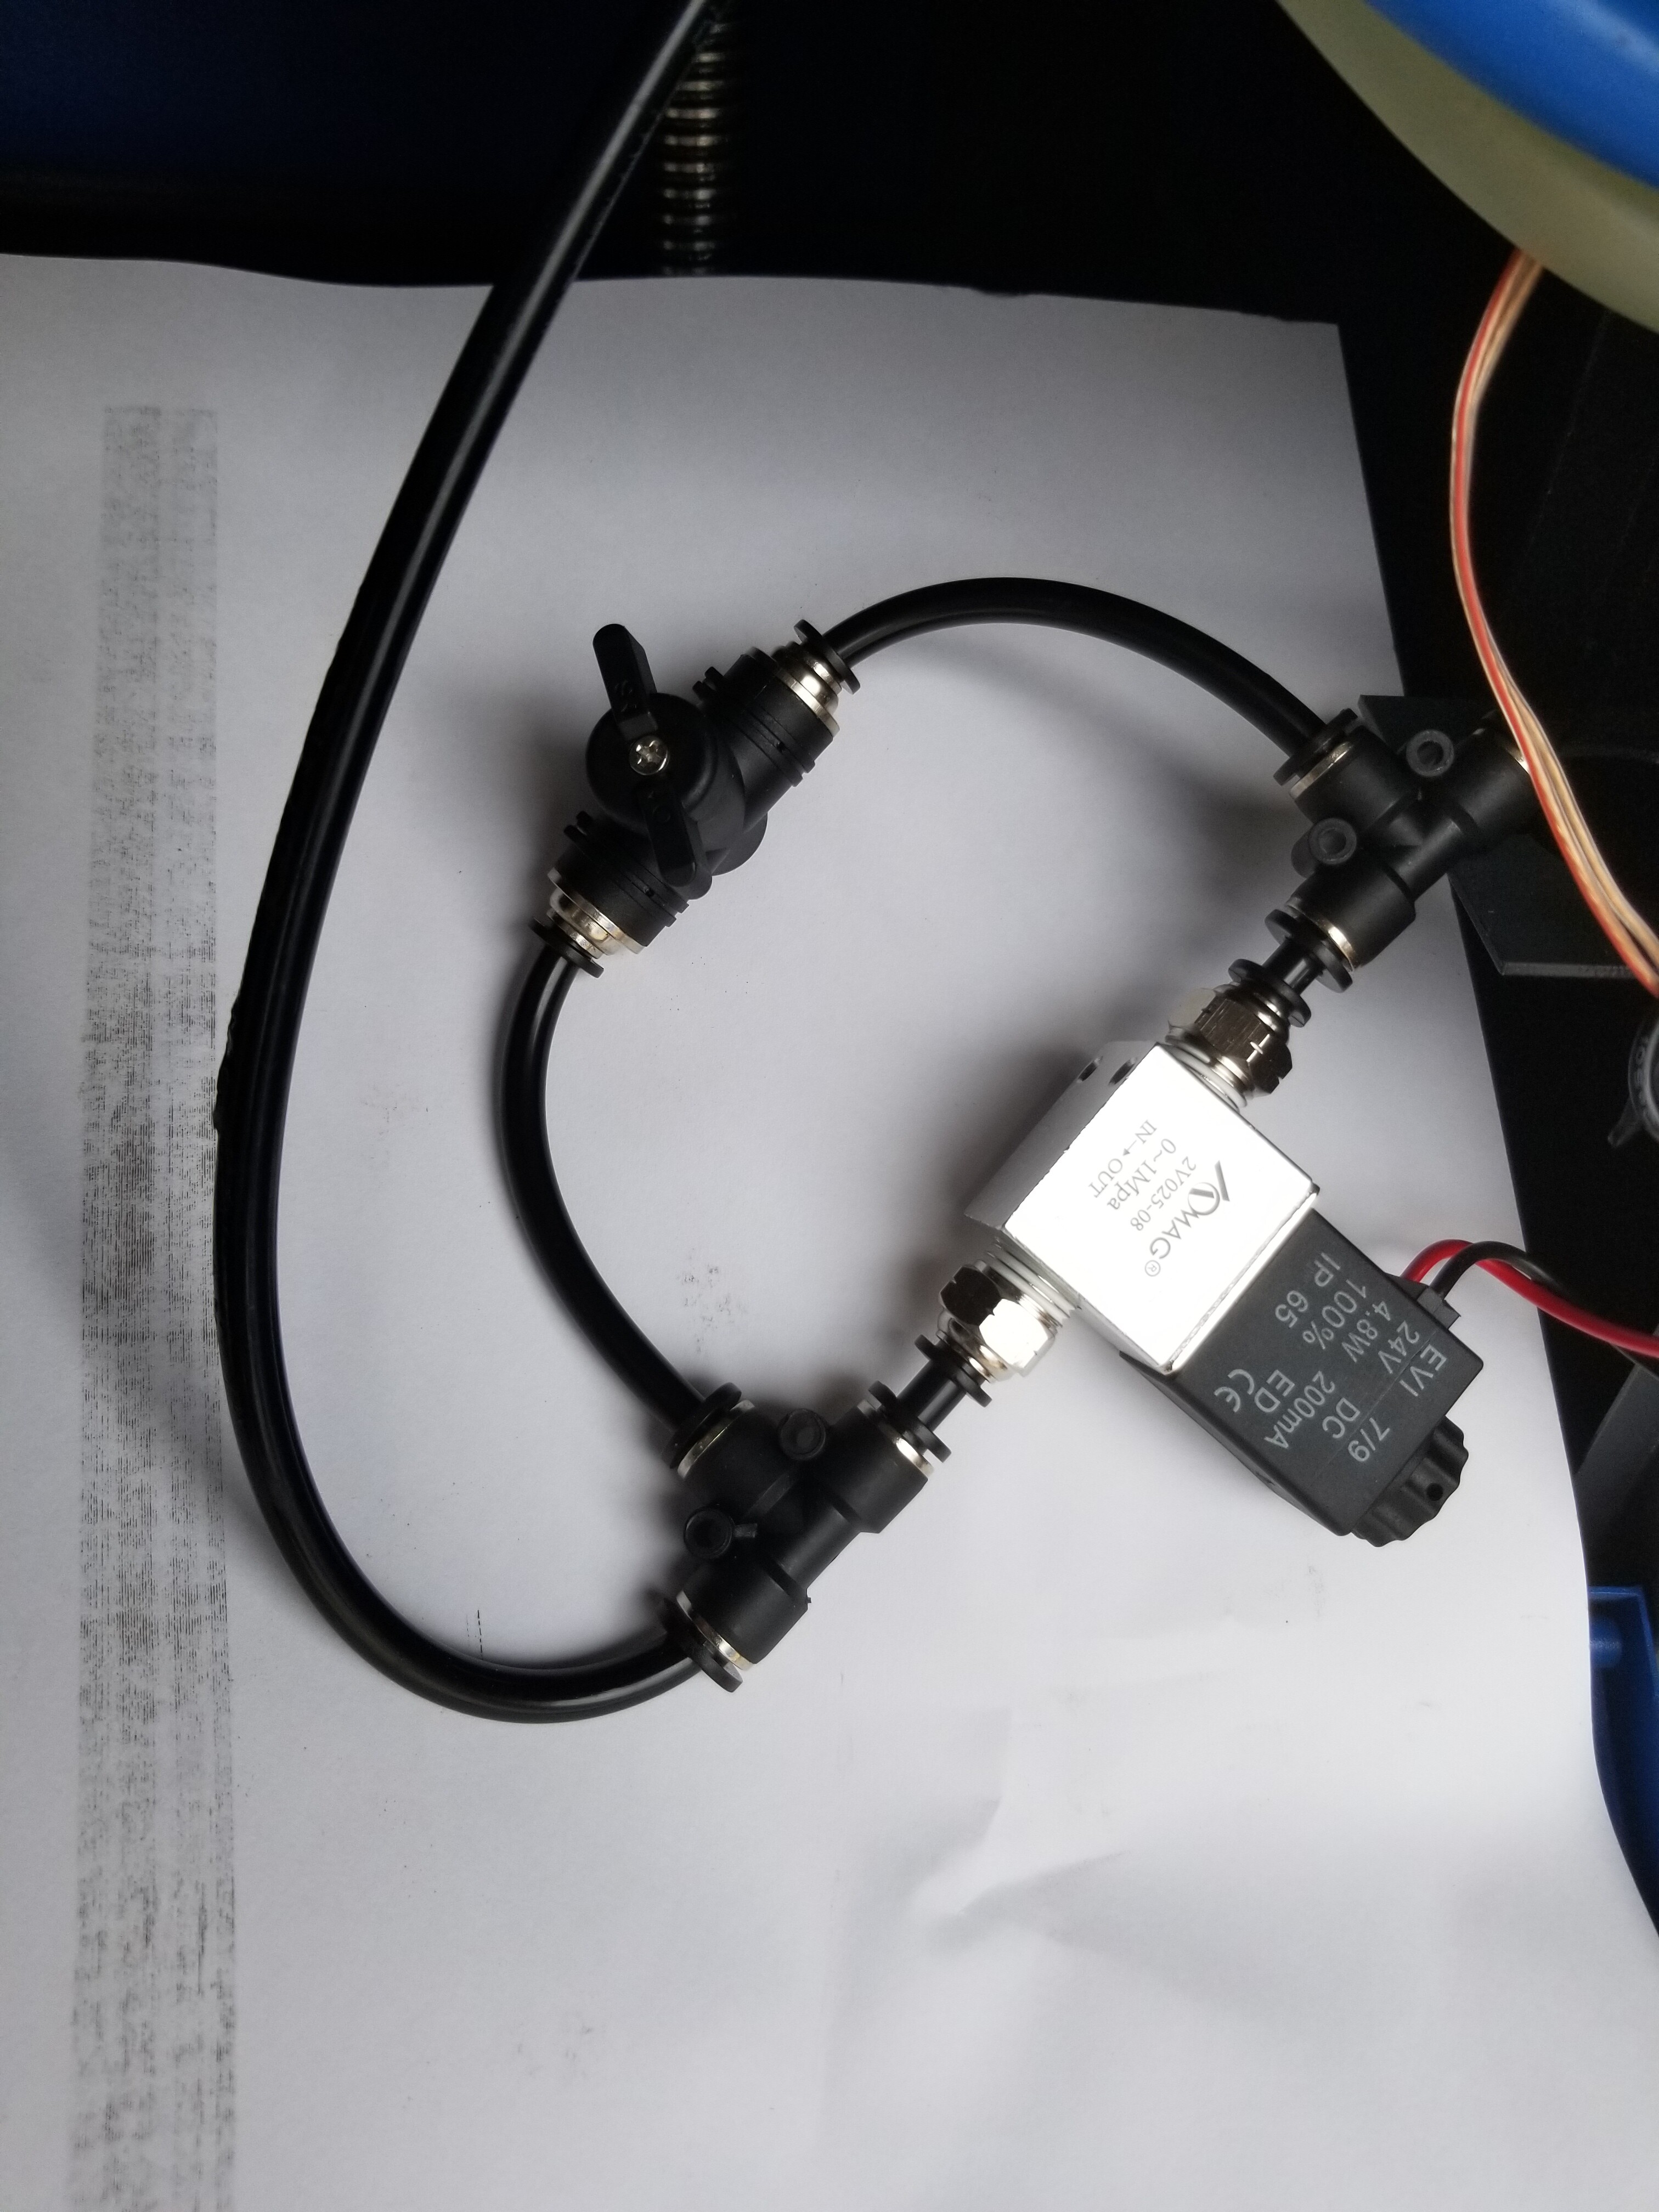
This is the valve and hoses that connect to the solenoid valve. This is connected to the "Wind’ sink on Ruida. The solenoid is NC, the only path is around and through the restriction. When the layer runs with “Air Assist” enabled (Wind go low), it picks the solenoid and bypasses the restriction.
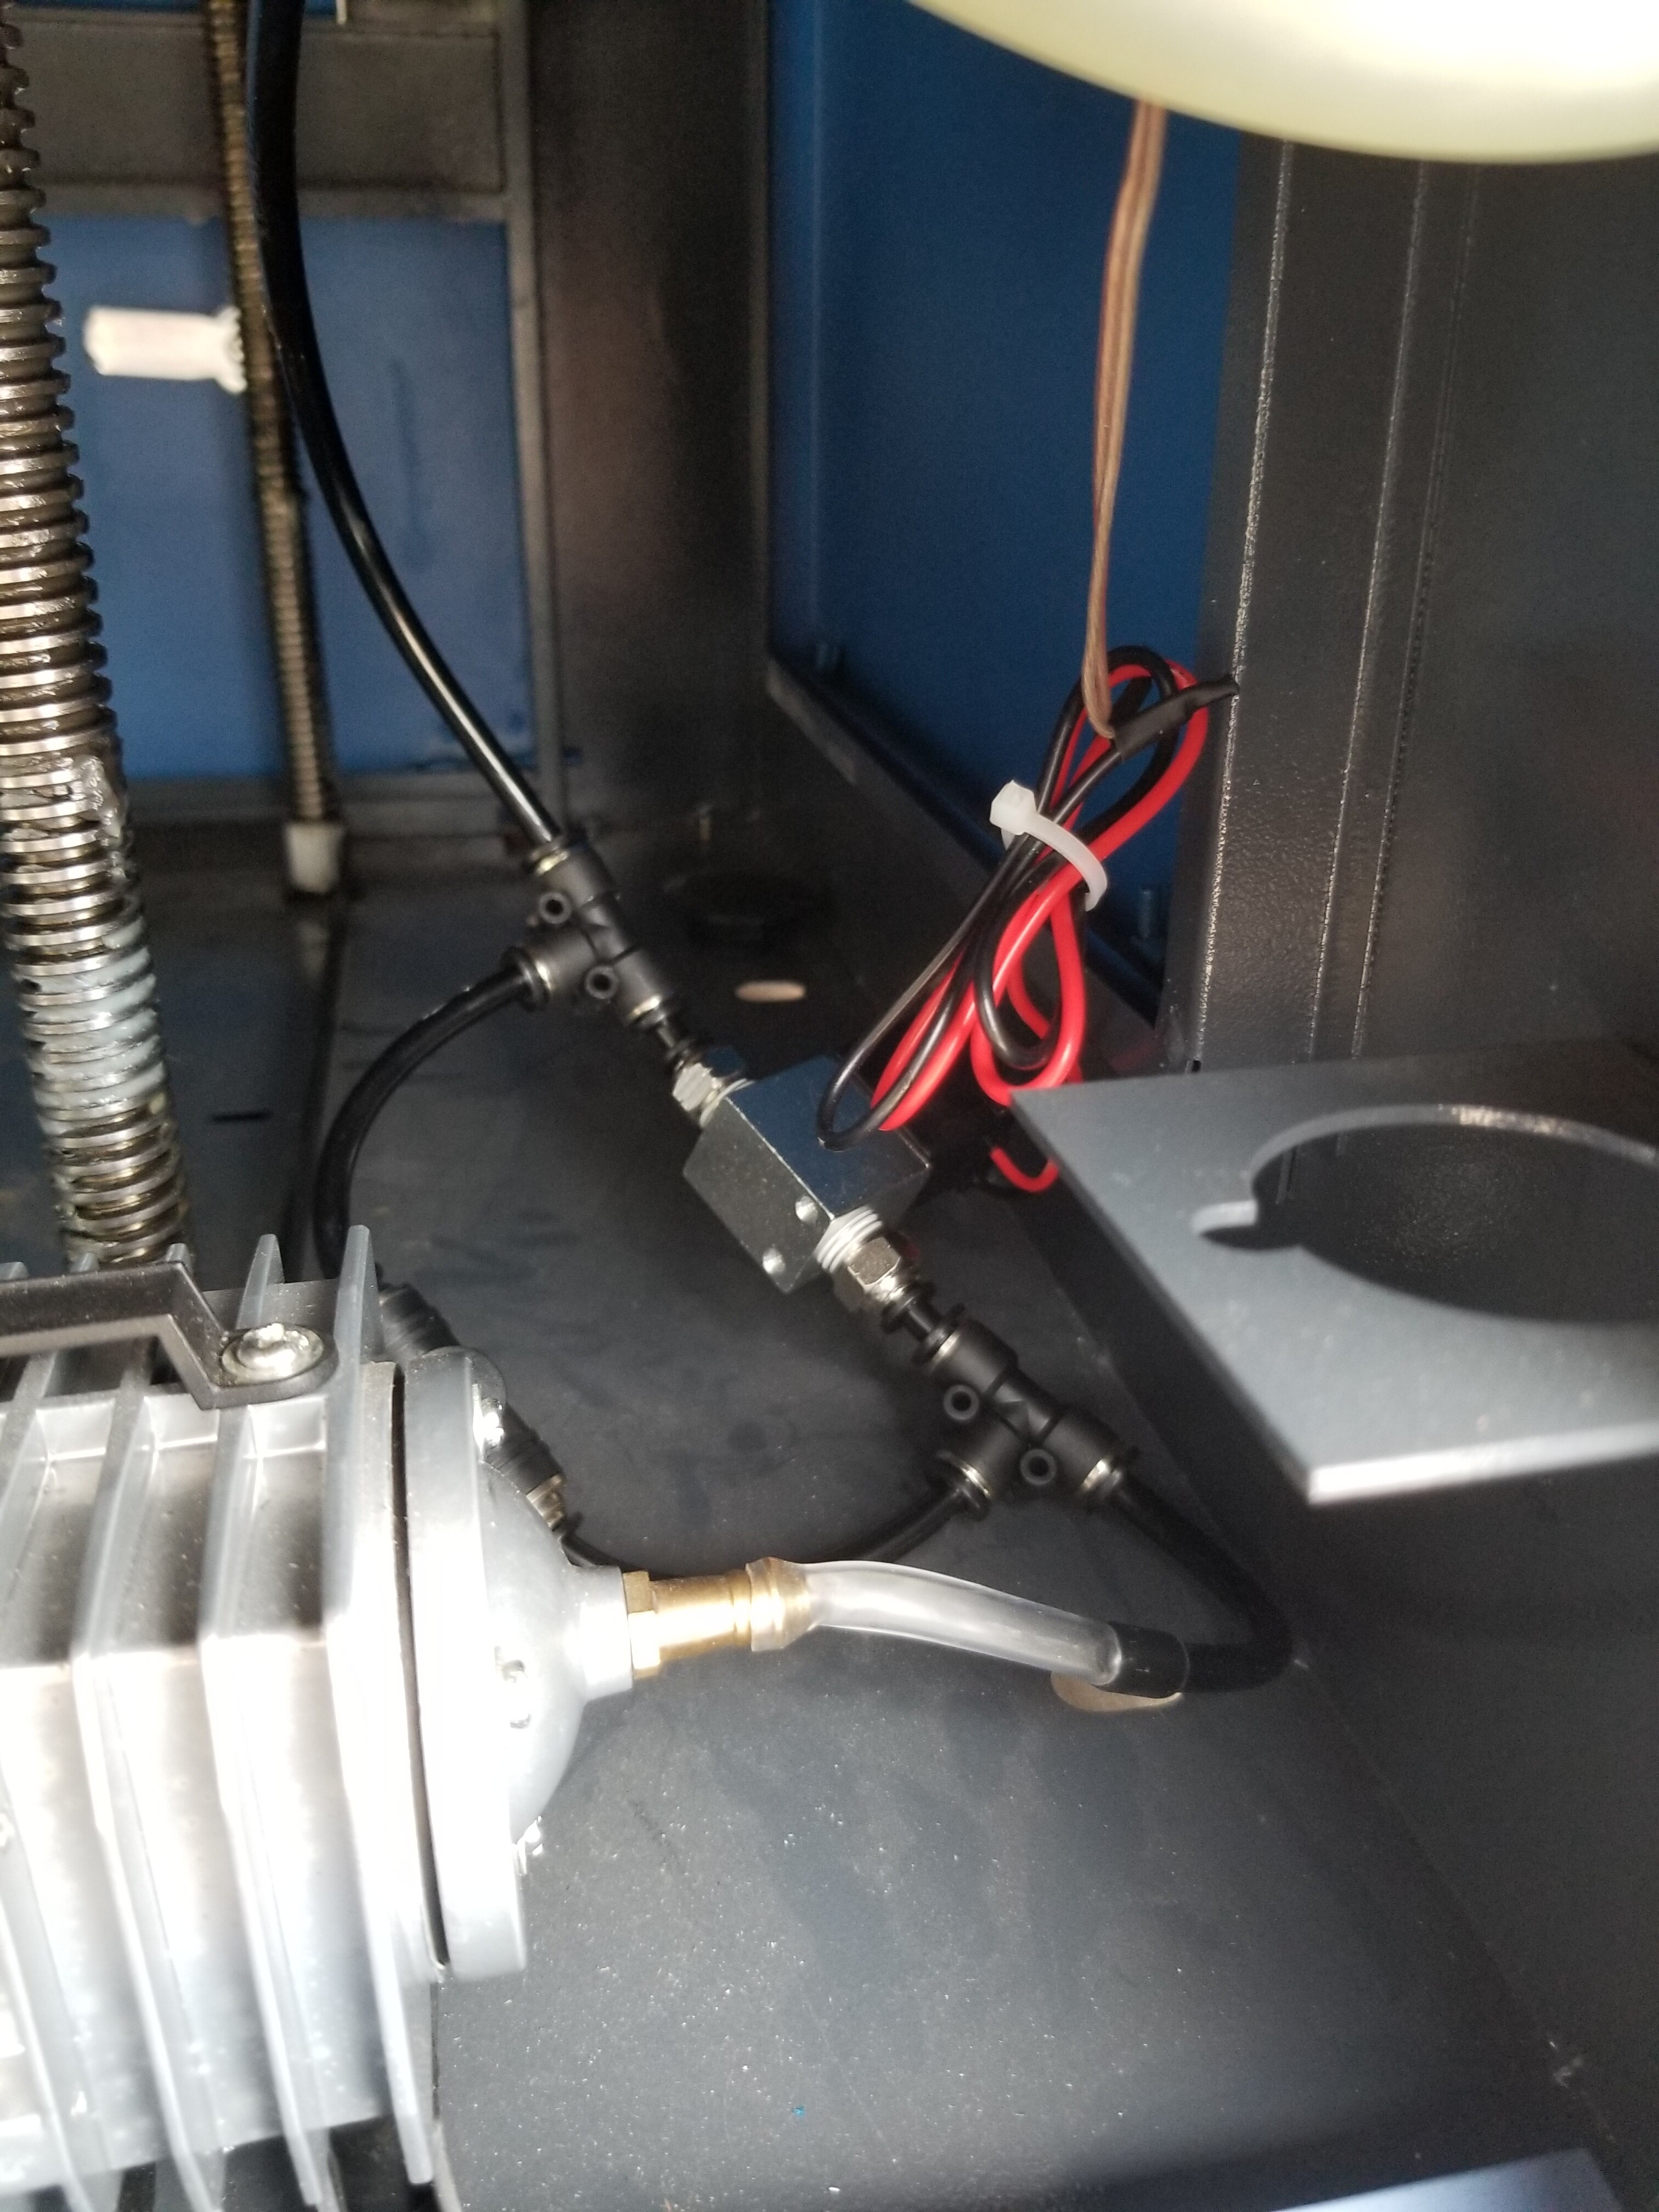
The output of my compressor was at least 1/4" so I purchase some 1/4" tubing to get around the end of the compressor. The 6mm tubing slides inside with some lubrication. The mount on the right is left over from the previous type of air pump. I use it to mount this solenoid, it’s off so you can see it.
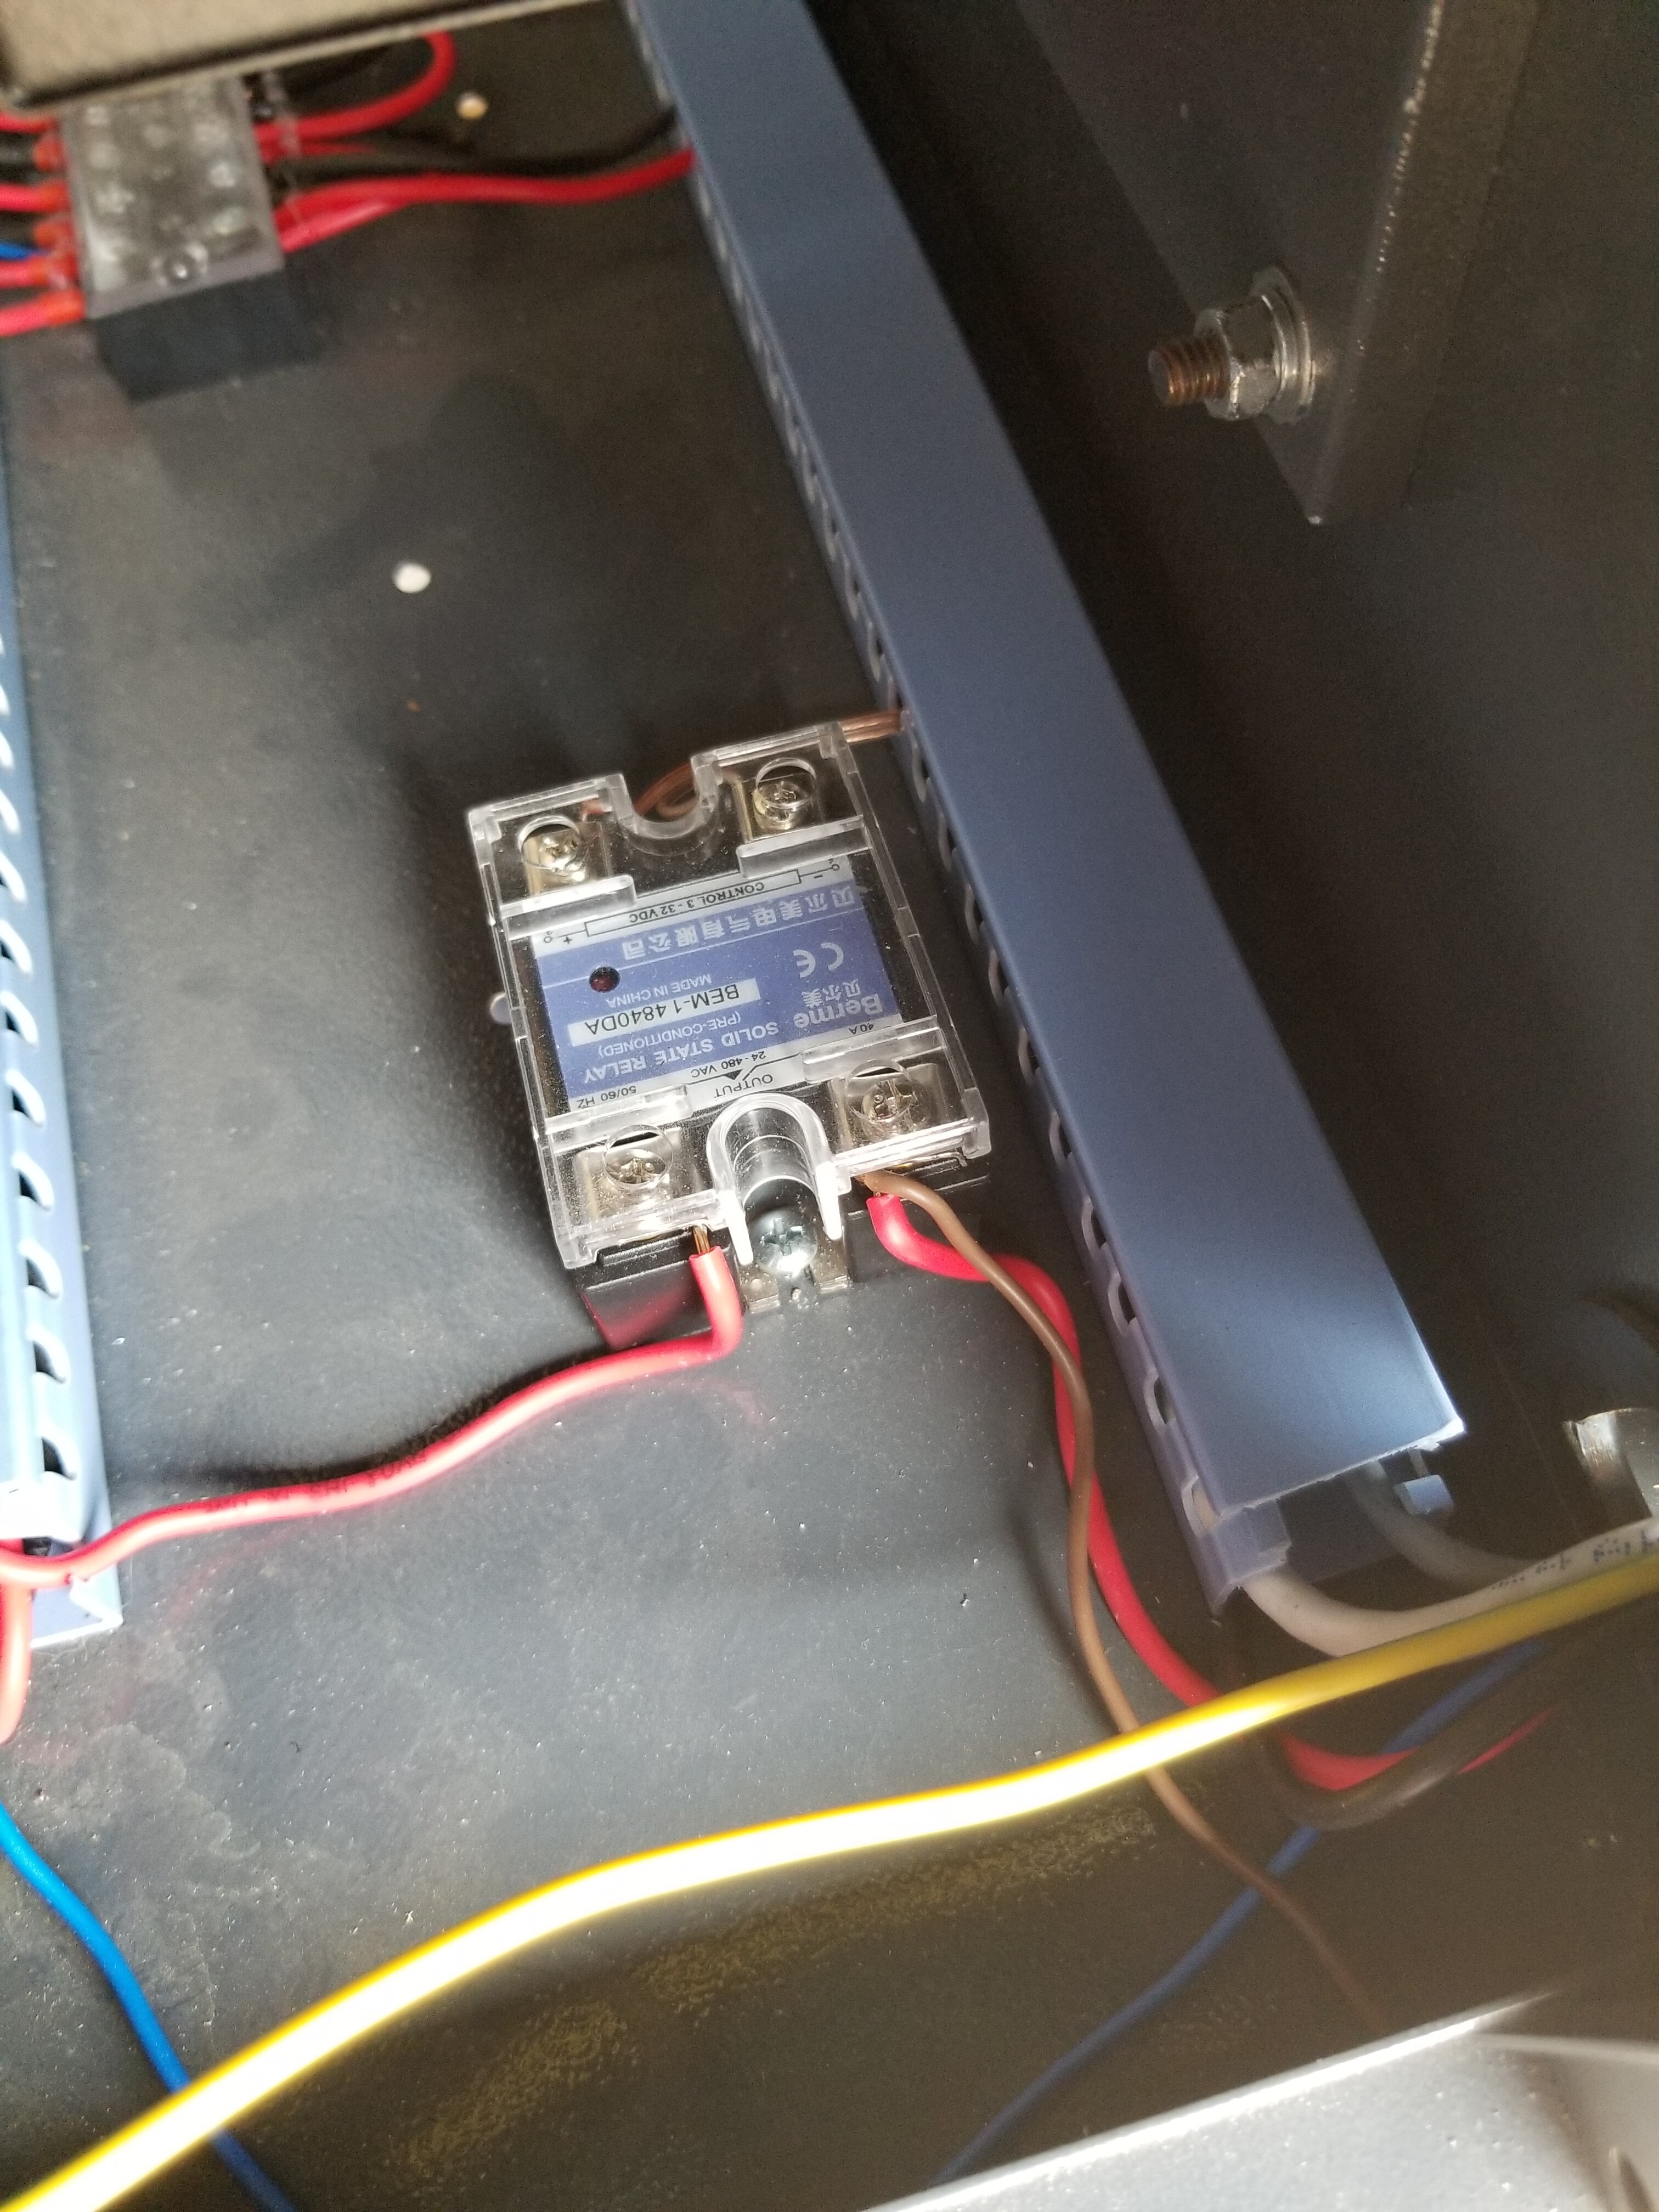
SSR connections are also simple. Only thing is connect the +24v to the plus side and you’re golden. The fan and compressor I just ‘broke’ the hot wires (red and brown) and let the SSR complete the circuit.
The extra solenoid is the one top right in the diagram.
I installed it the opposite end to the control panel (Left as facing the machine) for two reasons really, one because that’s where the factory fitted air blower was mounted Inside the back and also because thats the end my compressor is located.
I guess you meant on my system opps… The target is the pretty much that diagram. Don’t have room at the moment and have sold the house.
I’ve worked around this type of stuff for a long time. I see many photographs of these driving coil items, such as these pneumatic valves. I run mine directly to the controller without diodes, like most of the stuff I’ve worked with.
Mine has been operational for over a month with no diodes and no issues. Of course I’m into my second month of owning one… It’s possible I’ll learn the hard way and eat a controller, wouldn’t be the first time, probably not the last.
Even though it’s Chinese, I think most of these have to be pretty tough to work in an industrial setting. These are targeted at their industry, they happen to be lower cost so we buy them also. The diodes sure won’t hurt anything. I’d love to see the schematic of the Ruida controller, not to mention read the software.
Thanks jack and dave for all your help…the pictures are priceless for many of us that at hands on and able to do this work but might lack some of the tech skills to understand the electronic drawings…this post alone im sure will help many people out on the connections.
Good question, I really don’t know. I’ve worked with solenoid stuff for many years and they were never labeled as plus and minus, since it didn’t matter. They were switched with transistors, so they had protection diodes on the drivers.
These Chinese solenoids (I have a couple different types) are labeled with polarity noted. I have to assume that these do have diodes in them, but really don’t know. If it bothers you put on external ones. It shouldn’t hurt anything.
Current draw of my solenoids are around 200 ma, not that is has anything to do with the diode protection, just fyi.
I’ve been using mine for about three weeks and I did not add any diode protections. I’m planning to take it out and redo the connections, so I’ll try and ohm it out. Maybe a clue. Of course it comes with nothing.


 makes a great upgrade