Try LA Hobby Guy - All Categories
Very good Lightburn videos and a free forum
Hi David, you are in the right direction with what you write. Getting to know the machine, focus setting, power setting and general operation of the machine is the right start (in my humble opinion).
LihhtBurn has made quite a few nice videos themselves, those together with the forum here should probably get you on the right track.
So that you don’t end up ruining the machine, you need to find out if the power scale from the machine matches that from LightBurn. If the machine has an ammeter (milli ammeter), you must find in the machine’s manual the maximum recommended mA for your tube, typically about 16 to 20 mA for 50-60 Watt tubes. If the tube’s power supply is not regulated to the nominal max value, e.g. 50% in LightBurn does not correspond to 50% of your machine. It’s not a big problem - as long as you’re aware of it.
Otherwise, I can only recommend using the machine and doing many tests, ramp tests and general material tests are very practical and give a good insight into how your machine works.
If you run into specific questions or problems, you are always welcome here, there are many of us here with the same or very similar machines that have started in the same way as you.
This (here) is also a free forum… right?
I can use Lightburn at a beginner level; the problem is the machine. Where to start with it
Could you send me some links about the starting videos (hardware, the machine; with Lightburn I get by)
The machine has no ammeter, the laser is 80 W. I am waiting from the manufacturer to send me some documentation (as I said, there is nothing available in the makers room)
What first tests would you recommend? Maybe first finding the focal length? Engraving lines at different heights?
Yes, of course, this is a free forum under LightBurn.
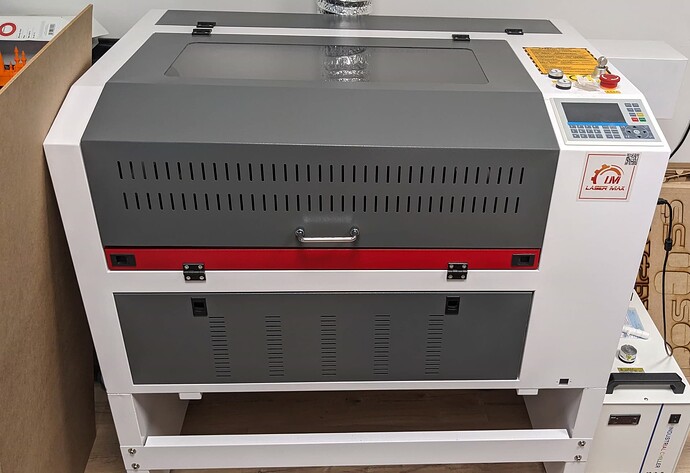
Do you have any kind of manual for this machine?, has the machine been run before, is it connected to power, the chiller and exhaust…?
To start, in the side of the machine there are switches for the controller and power for the laser tube.
I assume that it is a controller that can work together with LightBurn and is also “found” as connected when you start the machine and LightBurn up.
No manual. I asked the manufacturer
Yes, some people has used it; I don’t know who.
It is connected to power, the chiller and exhausting system are working
It seems there was money for equipment, but not for personal
it’s a bit of a shame, but maybe we can find a manual from a user here or online.
Image from ad does not match what you sent.
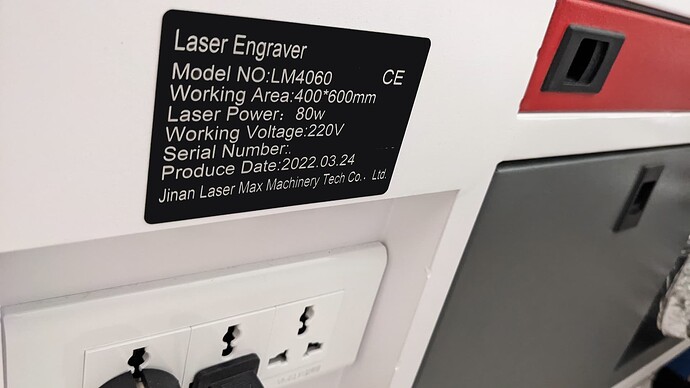
Try to see if there is a type plate on the back of the machine, take a photo of it.
How many Watts is the tube?
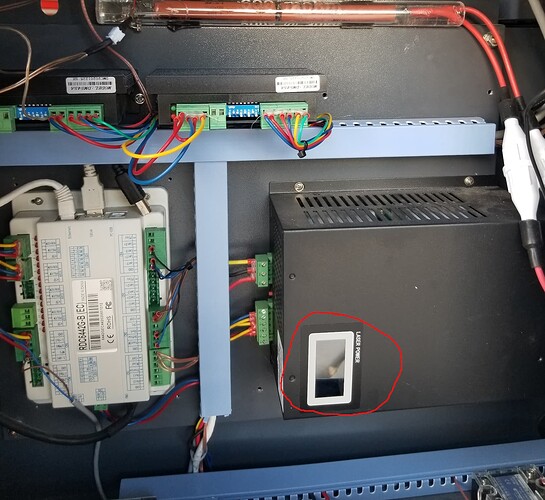
Makerspace should have a mA meter on the machine or they may have limited the output pwm to a certain value within the Ruida controller.
Will they allow you to access the electronics cabinet? Many of these lps have a current meter on them, but it is on the lps itself in the cabinet. This is the view into my electronics cabinet. The circled area on the lps is the digital mA meter…
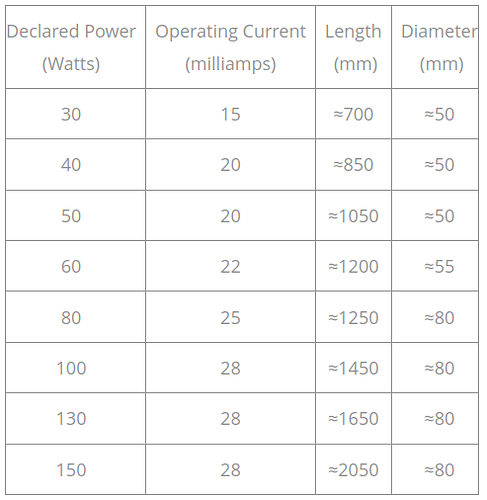
Tube power or watts it can produce is directly related to it’s physical size. This seems to be a pretty reliable guide to tube wattage/current.
An 80W tube is 1250mm in length… the link you sent shows the width of the chassis to be 1300mm, so I highly doubt it’s 80W… Suggest you measure it’s physical length… Even a 60W is 1200mm leaving only a couple inches on each side… It has to sit in the chassis and have room for M1 and it’s anode. The anode is the high voltage end…
Start with a single thing you wish to accouplish and as you work through that you will become not only enlightened, but have a clear understanding of the process…
If you wish to engrave mdf, then focus on engraving mdf and not cutting… that will come along naturally and quickly as you progress.
Don’t think you’re going to throw some material in there and get perfect (or even good) results the first time around… sadly it doesn’t work that way.
Do you have a choice of lenses or are you using what’s available from the makerspace people?
Shorter lenses are more critical focus with a smaller dot, longer lenses have more depth of field for cutting through thicker materials…
I have a 40W machine and I cut 6mm mdf with it… you should be able to cut 3mm mdf like butter… I have four lenses and use the 2" (~50mm) most often…
Good luck
![]()
Here is the label, that’s how I learnt about the model and found the manufacturer (with the front stickers I couldn’t get much)
80W
I will have to go back to the room and see if I can open the back door… I don’t want to touch too much but opening shouldn’t be a problem.
The machine has a “hump” on the right side; according to the specifications is 1800mm wide, I guess the hump is to host the laser.
Actually, I am more interested about cutting. I said engraving because one can see more the effect of changes in power, speed and focal lengths. Yep, I understand it won’t work perfectly at the beginning but now I am overwhelmed because there is zero information.
No lenses available. All by default and I hope the mirrors are well aligned
I just tried to find a manual on the manufacturers website without success.
At my machine there was a blue bag with 2 test samples, some tools and a photocopy of the manual. Could it be that you can find a similar bag, possibly into the machine’s control cabinet on the right side?
If not, you can hope that a friendly forum member with the same machine will help you.
Didn’t notice it has a tube extension on the right hand side… This is the anode end of the tube…
Did you get any information as to the current it’s supposed to draw?
Might want to take a couple photos inside the electronics cabinet for future reference…
When I’m fishing for cut settings, I just draw a straight line and send it to the machine.
Try the line on the material and see if it cuts through. If it doesn’t, use the console to change the power and/or speed, move the piece a mm or two and try it again…
It’s not rocket science…
Good luck
![]()
The machine is in another city. I’m waiting for an answer from the supplier to go back and start with tests.
I understand it is not complex, but I was looking for some guidelines, such: do cut lines from 5 to 20mm in steps of 1mm in height. Then speed and power…
cheers,
Rather than fiddle with the Z axis drive and all the complexities that entails, do a ramp test.
If it has autofocus, do that on a flat sheet, then lower the platform maybe 5 mm.
The typical 2 inch focal length lens will give you decent focus over a millimeter or so, so measure the nozzle-to-ramp distance at the narrowest point of the line, then mark that height on a step gauge (like those). Now you’ve got a good cross-check on the autofocus and a way to set the focus wherever you need it.
From 50 mm/s to 500 mm/s and 10% to 99% power to get an idea of the range, then narrow that down for each specific material.
There’s no substitute for experience and you’re about to become the Resident Expert™!
An expert on residences, is this similar to realtor?.. I thought the housing boom was over… ![]()
@ednisley is right about you kind of learn as you go… In another year you’ll be helping us answer questions…
![]()
Kinda like Resident Evil™, only for kindness.


