Hi guys, I am very new to Lightburn. I am able to create my design, but when I select my areas to cut and engrave the only option I seem to get is fill for engraving. This just ‘fills’ in any letter or frame I create, rather than engrave the outline instead. Any help would be gladly appreciated.
Can you post the file you are working on, also are you using a seperate layer for cutting and one for fill ? you can change them by selecting the colour layers along the bottom.
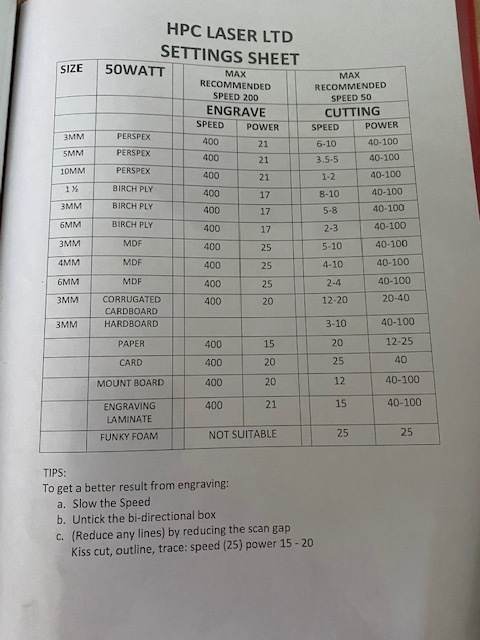
Thank you - I use line to cut, so I take it I need to reduce the settings to engrave rather than cut (and the speed)? For example 3mm Birch. I have a laserscript 6840 and it advises on settings sheet (Engrave and Cutting), for this says 'For cut, use Line and Engrave use Fill. I think the sheet has confused me a little to be honest.
The only difference between cutting and engraving a line is the power & speed used. Typically for cutting you run slow with high power, and for marking (also called engraving or scoring) you use more speed and lower power.
Hi Clive, thanks. I have used the colour codes but my confusion is the ‘Line/Fill’ as the machine I am using comes with a settings sheet that I think I have been ill-advised of? I just want to know I can use line to engrave and cut but now I am unsure of settings to engrave (3mm Birch) - So, for the speed and power. Thanks mate.
You haven’t mentioned the wattage of your machine, so this is a guess:
Try 15 to 20% Max Power, and set Min Power to just above whatever your laser fires at. If you have a high-power laser (100w or higher) it’ll be tricky to avoid charring in the corners.
Oh thanks - yep it is a 50 Watt. I will use the setting sheet I have just use the engrave settings and select either line or fill (very obvious now). It is a shame the settings sheet issued with the machine provider has displayed it as quite rigid rather than actually directing to select line/fill for engrave, and also having said to use ‘line is cut and fill is engrave’. Thanks for all you help!
Hi Clive, yes it is a new machine. Mainly for my partners business, so I am at the helm! So much appreciated that you have sent this. I do have a very short guide video but not as good as this mate. Again, thank you so much. I may have questions at a later date. Thanks for reaching out!
I’m 5 weeks in myself, there is a lot to learn but your in the right place, no question is too silly, if you don’t know, you don’t know, but when you know, you know
If you need help just shout, a great bunch of people on here to assit you with what ever you need
Ah okay, yes I know what you mean. I am focusing on a couple of projects mainly stuff that support’s my partners business, so slowly trying to perfect them as master templates that can be adapted. Then perhaps experiment with other things (I am trying not to be too hasty as it is a great toy!). I get it, when you know, you know, I can see that now.
Will do Clive, much appreciated, speak soon mate.
Dave.
Hi mate - what a perfect example! Thank you. That’s how I was looking at it, and simply looking at the lightburn software in that way, especially as amount of functions, settings, etc…
Already, with just a few replies already feel this community is very supportive. Yep, I will absolutely do that.
Looking forward to the adventure!
Thanks again! Dave.
As you align these more often, you will develop your own style. I always shoot the close distance first then I can make a few shots at max distance without moving the machine…
Hi Jack - that’s amazing thanks for the advice! How do you adjust the distance? I have to align my laser so the 2 dots merge by raising the laser bed on my machine, so if I change the distance the laser won’t align, I am assuming?
Cheers, Dave.
You have to create them from scratch. It’s pretty easy, make a circle the size you need. Two short lines will center in the circle and then make a ‘convenient’ tab to hang on to it. Once you have the basic outline, use the array option.
Notice I use perforations to make it easy to remove and not just fall out.
I’m not sure I follow you here… are you off in the Z direction?
Generally the ‘bed’ is not where the mechanics are mounted for the mirrors.
I learned quite a lot about alignment with the changes I made on my machine, so
I’m suspicious about some ways of doing it and what the person expects.
Not sure about the Z direction. Basically when I prepare any material to be cut etc, the laser shoots what it seems like two tiny beams then depending on the thickness of the material I am able to focus the dots to merge as one by lowering the bed surface - pretty much like a microscope, as I cannot raise or lower the laser housing itself.
I see what you mean about your pattern, and the perforation idea, is clever and very useful to know!