Hello again!
I finally managed to find time to dedicate to the project during these holidays. (It took almost a week to complete this. Note that this is two projects in one.
I’m here to show the final result and thank everyone for the help I received. I think the image shows a little bit of each contribution I received. This was actually a project that brought together a little bit of each opinion/suggestion that was given that aligned with what I wanted. The idea of the photo frame wouldn’t leave my head, and I knew it wouldn’t be “complete” if I didn’t include it in the project. “My quirks.”
It’s nothing out of this world, but it’s something unique, and I’m already satisfied with that. (It remains to be seen if whoever receives it will like it, which is the most important thing :D)


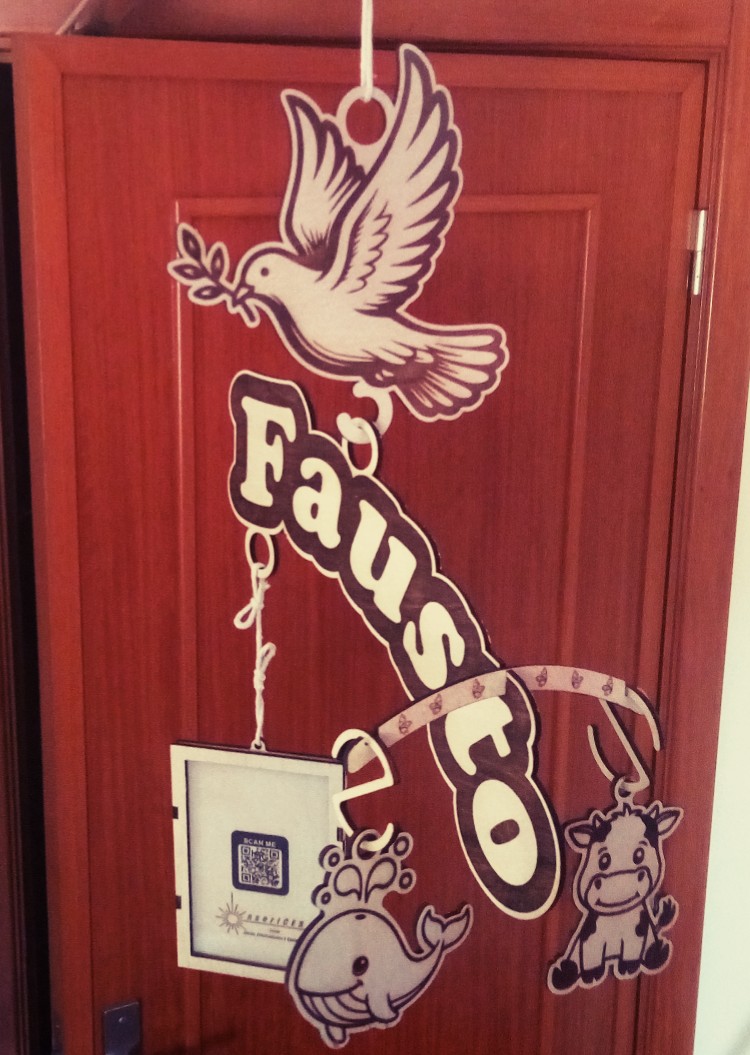
This is the “Fausto” file project.
BatizadoFausto.lbrn2 (441.7 KB)
In explanation:
The material used was 4mm linden plywood, although the store calls it birch. From what I’ve researched, birch is darker and harder than linden. Since I’m not a woodworker, the cutting settings I had for linden previously worked very well.
Despite being on vacation, I had no free time, full of small things to do that take time, and one of them was this project.
I decided to speed up the process; for example, the “Fausto” piece took about 6 ou 7 hours to complete. So I speed up the process by increasing speed and power according to the material test I had done, but this has many variables, and as such, the result is that the tone of the “Miguel” piece became lighter (as did others). Well, it is handcrafted and as such cannot be perfect. O:) (Coming from someone with a perfectionist streak, this might be worrying. :D)
I won’t explain layer by layer, but I’ll just highlight the “most” prominent points in the project.
Layer 02 (red) is a template for 0.16mm clear acetate (if my memory serves me right) that acts as glass for the photo holder but is much lighter.
Layer 03 (green) is the half-cut for the acetate that allowed me to crease the acetate without breaking it. At the end of the project, I remembered that I could have used and tested “Perforation Mode” instead of using “tabs” and cutting settings that can always cut too much. Maybe in a future project I’ll remember in time.
Layer 04 (pink?)
Since the pieces are engraved on both sides, I used this layer to draw the targets that guided me using the “Print and Cut” tool, which I finally got to work properly after adapting a red laser sight to the head of the laser module.
Layers 07 and 10 (magenta and Lightburn color  )
)
Another thing I took into consideration was balance. It’s not meant to be perfect, but it was an aspect considered. Since I don’t know the formula to calculate the balance of something misshapen (not symmetrical) (there must be a more technical and specific term, but I either don’t know it or I don’t remember it), I used the “Ruler” tool to evaluate the area (since these are “closed” objects, the tool calculates the area), taking into account the same material, equal area = equal mass (weight).
These layers only served to record the sum of the “mass” of the various pieces to find a theoretical point of balance. On the side where the distance to the fixed point (which has a technical term I don’t remember) is longer, the weight is lighter. But this was always theoretical, never meant to work perfectly. Basically, as long as the lighter weight wasn’t on the shorter side, that was the important thing.
I believe I haven’t forgotten to mention anything important.
Feel free to comment. As long as it’s not to insult me, all criticism is considered constructive.