Please explain how would I complete this cut using lightburn camera…

The camera could help you align that, but I’m not sure it would be as accurate as you’d want. When doing large jobs with my CNC machine, I used registration marks on the job to line up the work so the two halves align exactly.
Like this:
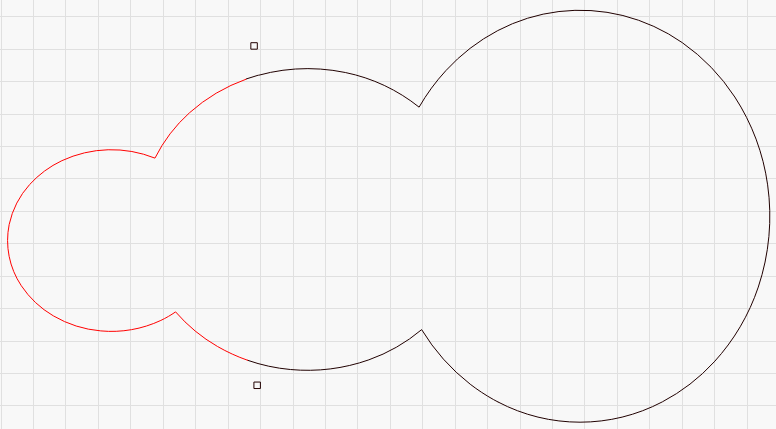
I’ve split the job by breaking the cut into a left & right section. The two small black squares are the marks to align the two halves. Make two files - One with just the black layer, and the other with the red layer and the two black squares. Cut the black file first, then load the 2nd file with the red vectors and the black squares.
Select the top square and click Arrange > Move laser to upper left of selection. Use the red-dot pointer on your machine to line up the black square you already cut with where the laser head is now. Do the same for the other square, trying not to move the top one. Repeat this once or twice until both squares are exactly right, then cut the 2nd job.
Does this make sense as I’ve explained it?
You could do this with the camera too, instead of using the red-dot pointer to line up the two halves, just place & rotate the 2nd file so it lines up with capture of the first one, but it’ll likely be off by a 1/4 to 1/2 a mm. On something of this size that probably doesn’t matter though.
Thanks for the reply Oz. I understand what your saying about how to line it up, now how do I split the job by breaking the cut into left and right sections? I did a quick search in this forum on left and right sections but didn’t come up with the answer. Can you explain this please?
You will need to use the ‘Edit Nodes’ tool to break this into 2 parts. Have a look at this for more on how it works.
1 Like
In node edit mode, you can Insert a new node by hitting ‘I’ while hovering over a line, and you can Break the curve at a node by hitting ‘B’ when hovering over a node. (I don’t think Break existed when the video above was created, which is why I’m specifically calling it out)
'B’reak doesn’t move anything, it just makes a duplicate of the node, so the shape isn’t continuous any more. The hotkeys for node editing are here: https://github.com/LightBurnSoftware/Documentation/blob/master/CreatingNewVectors.md#node-editing-tool-
1 Like
I realize this is slightly off-topic, but is there a way to display the node editing keys during node editing? I have the memory retention of a gnat and often have to find the right video or right Google link to find the keys. Even a pop up mini-help menu that appears when hovering over the tool button would be wonderful. I write them down and then lose the note when I need it again.
1 Like
There isn’t at the moment, but the next release is adding context-sensitive F1 help, so if you hover the mouse over the Node Edit button, or the edit window while you’re in node editing mode, it’ll launch the documentation at the page for that control, complete with the hot-keys list.
1 Like
Thanks Rick… I had watched this earlier but didn’t know about the "B"reak function. Now something new to play with!
Thanks Oz… The new mouse over help will be awesome as well…
This topic was automatically closed 14 days after the last reply. New replies are no longer allowed.