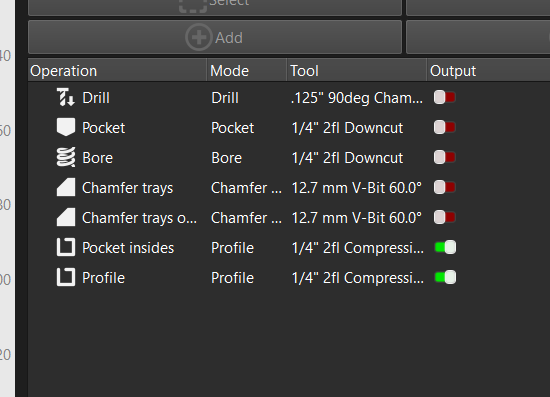
I built a project in millmage with 2 different tools.
It does not stop to ask me to change the tool. At the beginning it told me that I have 2 different tool and ask me if I want to continue anyway. I said Yes.
What is the settings that I am wrong?
I built a project in millmage with 2 different tools.
It does not stop to ask me to change the tool. At the beginning it told me that I have 2 different tool and ask me if I want to continue anyway. I said Yes.
What is the settings that I am wrong?
If you have two separate tools in a job, the most reliable workflow is to run your job tool by tool - to do this using MillMage for direct control, enable and disable the switch under ‘Output’ for each operation in the Operations panel.
You can use a @p in your tool change gcode configuration to call a MillMage-controlled toolchange (via the Device Settings window) - but it’s generally safer to just run the job tool by tool, perform your tool change, re-set your Z0 with your probe block or manually, and then run those next operations.
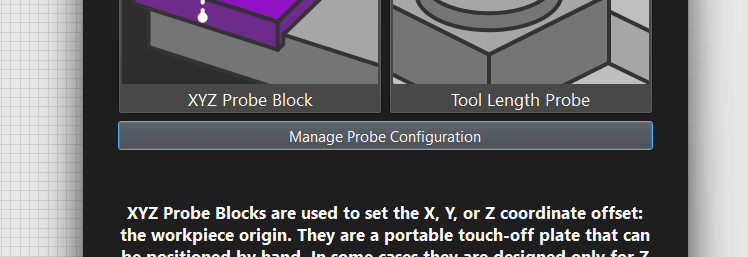
If you have a tool probe on the table of your machine, or a toolchanger, those are different workflows. Those flows and settings need to be configured per-machine in Device Settings and the Manage Probe Configuration panel
All is explained here: Tool Length Probing - MillMage Documentation
One tool at a time is like using a 1980 software.
I am used to GSender with GCode generated by Carbide Create. The software stop, ask for a new tool. Provide the option to use the Probe easily and then continue.
I see no good reason for not being able to do the same in Millmage.
I have a 3020 with a small $10 blue probe bought on amazon. Working easily with GSender.
Please help me find the correct setup and GCode instruction for the Settings in Millmage.
I want the system to stop, ask for the tool change, help me mesure the bit with the small probe that I put under the bit and then continue.
Unless you have an automatic tool changer, you are pretty much stuck in the ‘80’s.
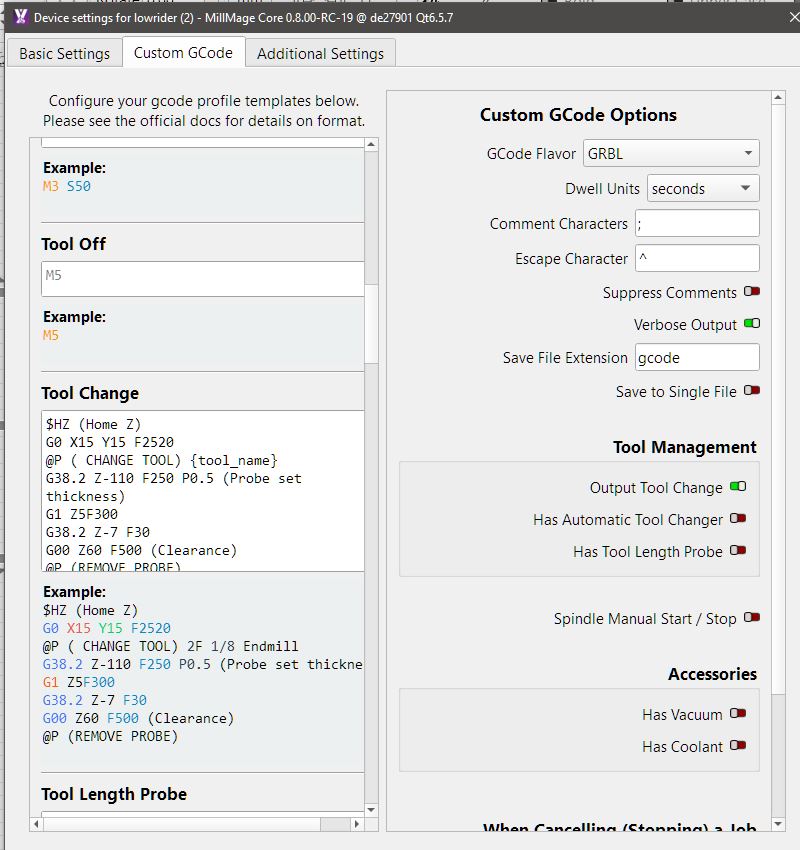
I was playing with it yesterday. Here is my Custom GCode Tool Change text:
M5 ; Stop Spindle
G0 Z0 ; RETRACT
G0 X10 Y10 ; SPINDLE TO FRONT CORNER
@P Please insert T{tool} {tool_name}
It works like a charm!
H O W E V E R, I still have work up a procedure for actually changing and setting the tool position in the spindle. I am sure if you have the Tool Probe capability, it would be soooo much easier.
I am giving an ARRL TechCon 2026 presentation tomorrow on lasers, including a shamelessly demo of Lightburn, so it will be a few days before I can experiment more.
Well, thank you for doing this, @MikeyH. Greatly appreciated, friend!
this is what I use on my lowrider with fluid nc
in the tool change box, I leave tool length probe box empty otherwise it dose 4 probes
being using this method since RC2 works sweet as.
$HZ (Home Z)
G0 X30 Y30 F2520
@PP ( CHANGE TOOL) {tool_name}
G38.2 Z-110 F250 P0.5 (Probe set thickness)
G1 Z5F300
G38.2 Z-7 F30
G00 Z60 F500 (Clearance)
@P@P (REMOVE PROBE)
at start of job it will ask if you want to probe , i click ignore
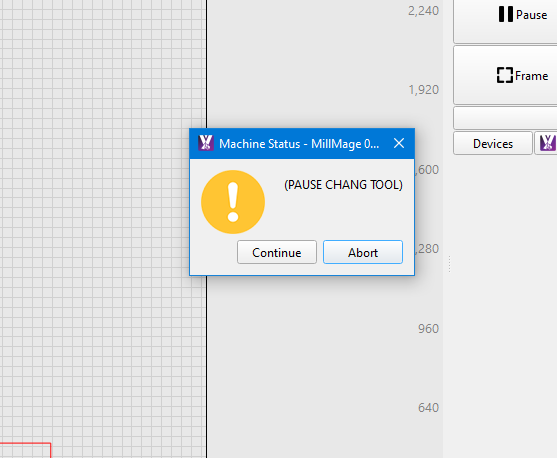
Tool change moves to coded position, stops spindle. You change the tool and hit OK(?) and it moved to the next position. I know you know this, based on your GCode.
Only thing I see is the @PP in the message line. Without you telling us how it fails, I can’t think of anything else.
Your $HZ bothers me. That shifts Zzero to the Home position from the part surface top or bottom. I would expect it to cut air on the second tool. I do not have the touch probe, so does the probe cycle reset Zzero for the material surface? I am learning from you here. ![]()
the @P @P is typo and so is @PP , need to get new key board some keys stick ![]()
now you got me wondering if I typed it wrong in my cnc laptop, that might explain the random things yesterday
its the blind leading the blind than, I just wing it at times and if it works i just leave it
So I just copied the recommended code from the lowrider forum which i was using with estlcam into MM, I did have teething issues , the @P was a M0 originally which didn’t work, caused issues than I found it needed to be @P. there are other codes that i was using in estlecam for start etc , put them in operation start box , not a good idea , threw its toys out and wouldn’t work at all haha.
Does it cut air on 2nd tool , No it cuts perfectly , maybe that $HZ could be removed, Ill just leave it cause Z gets right up out of the way before going to tool change position
Umm maybe the way i have it set up and working isn’t 100% normal or correct , but it works so ill run with it , if i get time ill do video so you can see
Interesting! A flakey keyboard could explain a lot. I recently replaced one that would skip or repeat at random. I initially thought I was forgetting how to type. ![]()
If the code is working, good. If it ain’t broke, don’t fix it.
I trust you, video not necessary. Unless you just want to impress me. ![]()
We can always learn something from somebody else, no matter what their abilities.
The home Z is fine but probably not necessary as long as it was homed since startup. It will ensure that Z is level (assuming you have dual endstops with configured offsets) even if some steps were skipped with the previous tool.
There is something technically incorrect here though. That first G38.2 is setting Z0 based on the thickness of the touchplate since it has the P parameter specified. That second G38.2 does not so I don’t believe that is doing anything. It’s not uncommon to probe as a fast speed and then re-probe at a slower speed for accuracy. I would add the P0.5 to the second G38.2 as well so it’s actually zeroing Z. Sometimes people will do a G38.2 and then zero with G10 or G92 but that is incorrect also because when the probe touches, it still has to decelerate so it moves a tiny bit past the point where the probe touches.
This is at least true for FluidNC anyway:
Cheers for that, ill just leave it as a fail safe for me
re the p0.5, that makes sense,im always stuff something up in code ![]()
I used to only have the 1st part , than was playing around with MM probe and seen they had the double probe so copied and pasted part of it
do i take out the 1st p0.5 or just leave it also
$HZ (Home Z)
G0 X40 Y30 F2520
@P ( CHANGE TOOL) {tool_name}
G38.2 Z-110 F250 P0.5 (Probe set thickness)
G1 Z4 F250
G38.2 Z-7 F30 P0.5 (Probe set thickness)
G00 Z30 F50 (Clearance)
@P (REMOVE PROBE)
Yes, I would leave the P in the first one too. Otherwise that G1 move after it is going to move up farther than it can. Alternatively, that could be changed to a G91 relative move but I’d just stick with what you have.
yip if it aint broke don’t touch it , cheers
Hi,
I was running CNCJS on a raspberry, and recently I purchased MillMage Core 0.8.00 for my small GRBL CNC.
I try to write a ‘Change tool’ macro similar to the one I used on CNCJS. My issue is to create a pause and to display a message.
I tried to use ‘@P’ but I am not successful.
Are you able to display a message with this command like this one ?
https://forum.lightburnsoftware.com/uploads/default/original/3X/8/3/83d1f292bb29eb77eec716277d5d4f6f4e7624d6.png
are you trying to write it as a macro or under custom codes in tool change
if its as a macro i cant help,
this is where my tool change goes
maybe try putting your code in there
your macro show the @P command for pause, and this command does n’t work at all for me.
Do you use just millmage or do you have an additional software ?
here under is my config:
I see U R using MillMage rc-19. Any other difference between your config and mine ?
I think the @P is a Lightburn command that initiates a sequence of events. You have to turn the Tool Change on and the other 2 switches off to get it to work.
My settings R like that but It doesn’t work ![]()
If @P is a build in MillMage command, I suspect a but in
the final millmage 8 core version.
Who use this release ?
It works for me.
Can you describe in detail how it is “not working” for you? Include what appears in the Console window, and any screen captures (WinKey+CTRL+S) that might help.
Hi,
It works ![]() .
.
I am new to MillMage and I was trying to use @P in a macro.
I used to have prompt (like @P) in macros with other milling software
But… @P works only in Control mode
So issue is solved for me, but I was expecting to use @P in macros or Control mode ![]()