New to LightBurn yesterday. Would really appreciate some help. I have an imported BMP file exported from Illustrator CS5 placed in the center of a 1.75x1.75 square. When I run the file it engraves it off center, down and to the left? Any thoughts?
BOSS LS1420/Ruida Controller/using Absolute Coordinates
Usually when I have a file that burns off center there is usually a tiny square or circle I don’t see.
Thanks for your reply Jeff. There were no additional elements that I noticed. I am assuming I cannot attach images within the Forum? Could I be using the wrong start from option?
Just drag and drop the image. Copy paste also works. Just make sure it uploads all the way before hitting the reply button.
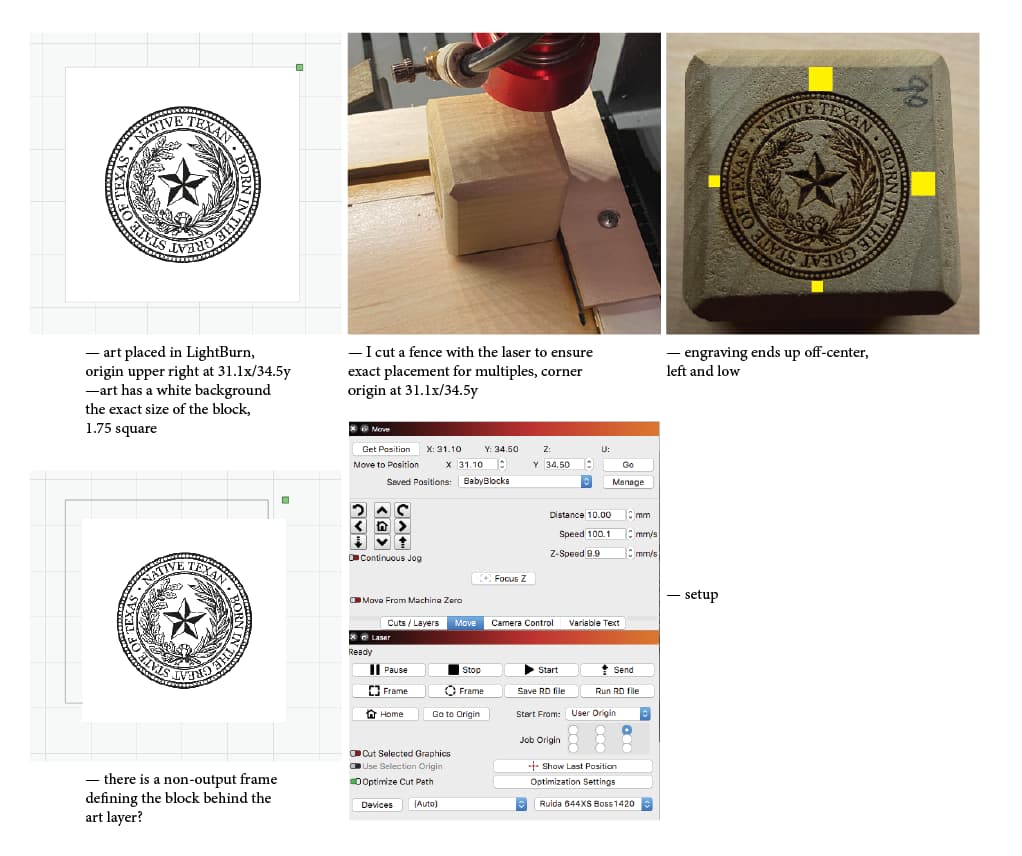
In the laser window you have it aligned to the upper right. Are you centering the laser to the block or starting in the upper right?
You also have start from “user origin”. I’m not familiar with that. I always use “current position”.
I feel like I have tried all the ‘Start From’ positions in the drop down menu. I want the art centered on the block face. I appreciate your input. I know this is a pain. Maybe I should go back to RDWorks . . .
If you have a jig and set design why not use Absolute Coords? This would allow you to indiscriminately place the workpiece against the jig and run the job without any other alignment. You’d need to align the design to the appropriate location on the workspace just the one time.
That was my thinking in using a jig/fence, PY. I feel like I have the math right in the art setup, centered on a white field the exact size as the block face . . . export from Illustrator as a BMP and imported into LB. Using Absolute Coords makes sense, I just cannot find the incorrect variable.
Select the object representing the block face, enable “Cut Selected Graphics” in Laser window, then run frame until the frame perfectly goes around the block while placed in the jig.
When you import your bitmap align it to the center of the block face object. Retest frame with the image selected. If you need to do this with multiple bitmaps then you may want to lock the block face object so that it cannot be moved on accident.
With Absolute Coords you should now be set to run the job with precise repeatability.
Sorry, newbie for sure:
So, I have two layers, one is the non-output frame/outline, the other is the engraving art layer.
“Select the object representing the block face” = is this the non-output frame/outline around the graphic?
My problem is I cannot see the laser bed from where my iMac is located . . . framing from LB is different than pushing the FRAME button on the laser, right? I need to get LB on my Powerbook so I can be nearer to the laser.
“import your bitmap align it to the center of the block face object” = is this the art layer?
I am grateful for your patience.
PY, do I even need the the non-output frame/outline?
It’s not required but if your workpiece is a different size than your design then it’s nice to be able to represent the exact outline of your material.
I think in this case you have sized the bitmap to the exact boundary of the workpiece so may not be necessary.
Yes. This is what I was thinking. You’d have to enable output I believe for the framing to work correctly but then you could disable it. Note that if you use “Cut Selected Graphics” only those items you have selected will be sent for burning.
It’s not necessarily the same thing depending on what you’re doing on the LB side. It should be the same for a given selection and sent job, however. What you could potentially do is send a job with the outline and use that to frame from the controller which should be the same. Or even just send the full bitmap if it’s the same size as the outline.
This would much more convenient, especially for the initial alignment and adjustment process.
If this is the case then using Absolute Coords might be a little more difficult for the original alignment but should work repeatably for a batch or even if coming back to this design at a later date.
Even if you had to walk back and forth though you could probably nail the alignment in a couple of iterations as long as you had rulers or calipers on hand, at least for something rectangular like in this case.
thank you for your time, I will experiment some more tomorrow and let you know . . . I have been using RDWorks for several years and wanted to switch to a Mac-friendly IU but the learning curve may be longer than I expected . . . the RDWorks was pretty straight forward . . .
PY — the other anomaly was that I felt like when I framed the file that it matched the block but when it ran, the art was off center . . . that was the puzzling part.
That’s curious. I always thought of LightBurn as being heavily inspired by RDWorks at least for its base function and layout. Then completely worked over for ease of use and power. I suspect the initial learning curve may be from the areas where the products differ when they’re otherwise similar in terms of base concepts. Once initial learning curve is overcome, though, I think you’ll find LightBurn having a very smooth and accelerated learning pace because of its consistency and user centric design.
I would set it for current position and then click the center circle in job origin. Move the laser to the exact center of the cube and press the origin button a few times on the Ruida controller. I’ve had it happen a few times where everything was set up correctly and it burned in a different location. Clicking the origin button seemed to help
Thanks, I will give it a try tomorrow. Have a great evening.