I basically engrave photo’s and text with a Mira 7 Pro.
I’ve been successful at import photo’s, making the file, engraving the photo (so far)
But with a blank grid to start, if a choose the “Text” tool, choose the font, Type the text (which I see on the grid) (click the text so that it is shown in the box, save it to a file, send it to the laser… I get nothing. Apparently, although it made the file, it is blank.
I can draw circles or other shapes, and they will show up, I can draw a circle around the text, the circle will show up, but not the text. In most cases, I DON’T want a shape with the text. And even though I can see the text I type, Lightburn will say “Object Missing” when I make the file.
Can you show a screen shot of your workspace with the text in it, and the cut list showing?
I’m not sure what you mean by ‘Click the text so it is shown in the box’, but I’ll document steps here to do this, and hopefully you can spot what (if anything) I’m doing differently than you.
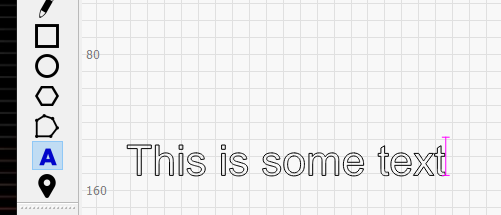
Starting from a blank page (I have just opened LightBurn) I click the A on the left toolbar, then click somewhere on the page to place the cursor, and type some text:
At this point, if you look at the cuts list, the text is still “pending” - I haven’t finished creating it yet (as I’m still editing). If I click somewhere else on the page, click the ‘Select’ arrow, or just hit Esc, the text that I was editing is ‘committed’ and an entry shows up in the Cuts list.
At this point, if I save an RD file, click Start to send to the laser, or Preview, I can see the text. In current versions of LightBurn, doing any of these things will actually commit the text for you first, so you don’t need to do that yourself. If you’re using an older release of LightBurn it might still be necessary.
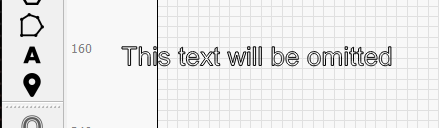
One other thing comes to mind: If you are using Absolute Coords as the ‘Start From’ setting, the latest release of LightBurn will exclude anything that is out of bounds. If the text crosses the bounds of your work area, that could cause it to be omitted:
Thank you so much for your timely reply! I read you’re reply several times… it turned out to be a FILE SAVING problem. Though I was saving the file, I was saving the file directly to my “Desktop” which was a different place from my “Photo Folder” on the Desktop. Apparently, that might be a no-no.
Just for the heck of it, I put the new text I created IN the FILE FOLDER on the desktop (with the successful photo imports) and Imported (which I had not done previously… thinking I could send text straight to laser to be printed because it said I MADE a file.)
Anyway Oz, I’m in a huge learning curve that I’m sure won’t be over for a long time to come. This Problem solved for now - until next time. Again, thank you.
We’ve all been there - I’ve only been a laser owner for about 3 years myself, so I actually remember a good deal of the learning curve. Happy to hear you got it figured out, and we’re here to help if you get stuck.
Still trying to get familiar with fonts. Having trouble with sizing font properly. Do all the font’s start a specific default size? How do you change the angle of font (like you want it to go in a circle) or other shape? Is there a teaching video you might direct me to that will get me up to speed on fonts?
I need to master engraving fonts both on simple thin wood squares and on anodized metal tags.
For text on a path (like on a circle) follow along here:
There’s a tutorial from another user that’s a little slower paced here:
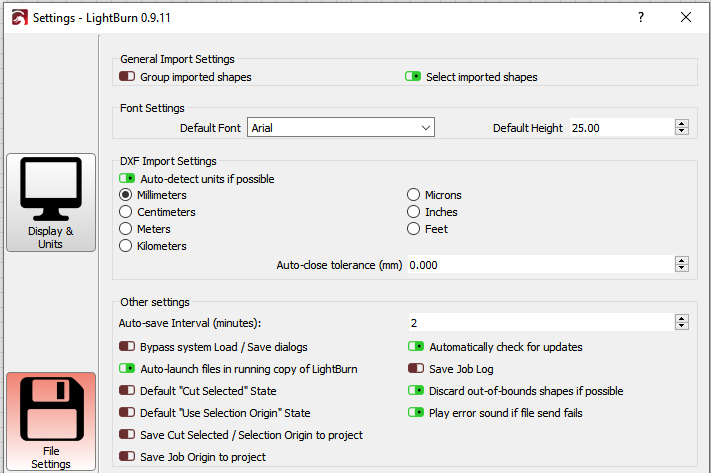
The fonts in LightBurn default to 25mm high as a starting point, but you can change that in the settings. Go to Edit > Settings, and click the File Settings button (the big floppy disk) then the font defaults are at the top: