LMAO… I think I can find some bricks. Does your 80w OMT actually have an 80 tube? The reason I ask is my 60w OMT has a 50w tube rated 60w. I didn’t have any to test it when I received the unit, but I do now. About the only advantage I got with upgrading from the K40 was a larger bed size, which I like. I need to see if the 80w can be controlled via the ‘stuff’ in my 60w.
I gess I am going back to the shopping cart for a 3", I am supposed to have a 2.5" in the laser now but who knows.
I have the 60w omtech 28x20inch also, I am maybe 4 months into laser cutting.
What’s your water temp? If you’re over 25C, you may notice power reduced. I have the $500 water chiller, but it’s set to ambient. I avoid lasering if it’s above 80F in my garage. Next summer laser goes to basement, or I guess winter too.
I upgraded to an external air compressor today using the cloudray kit, and I am so annoyed I didnt do this sooner. Zero staining on face of wood near cuts, tighter cuts, faster cuts with less power, less charing on the cut edge itself, and almost eliminates flare ups below material. I notice much less smoke out my (upgraded) exhaust, and almost no smoke inside the machine. This is better for the machine in many ways. I am still experimenting with cutting PSI vs engraving PSI (lightburn can change on the fly) but I will report back.
Before the air upgrade, my OEM air pump was slowly dying and I was wasting a ton of wood. I could get through 1/4 birch ply 8mm/sec 55% power.
Keep the mirrors clean. Cotton swab with alcohol, dont even have to remove the mirrors. Make sure the lens is clean and free of voids. It should be perfect, get a 2.5" backup lens on amazon from omtech so you can compare side by side. Obviously make sure the mirrors are aligned.
I have only tested 3mm 5 layer aircraft birch and 3mm 3 layer baltic birch so far with the new air setup. Tomorrow I will test out 1/4 baltic birch and report back what settings so you can compare.
I have not actually measured it, but the stickers on it proclaim it to be a EFR model F2, and the test current listed on the sticker and the physical dimensions of the tube lead me to believe it’s “genuine”.
I am also looking to upgrade my 60 to 80. I imagine the difference is the tube itself, the laser psu, and the extension box on the right side of the machine for the longer tube. Do you think the existing tube brackets are fine as is?
Throwing in some info on where to get high quality lenses and mirrors. The company is called American Photonics. Link: americanphotonics.com . They manufacture them here in the states and can answer almost any questions related. I used to use the Cloudray but switched and the difference was staggering. You will pay more but well worth the extra cost.
Hank is correct. The machine should perform much better than it is and before you ‘upgrade’ figure out it’s problem. It will only complicate correcting the problem if you start modifying it.
If you are set on a lens upgrade, I use the Russ Sadler (his videos) - lightweight head (picture of mine) design, along with the tubes, there are many configurations with a limited amount of parts. Makes swapping lenses a snap.
Clive, reading through the commens, I got to thinking… Now I’m not sure if I should have placed my post in with yours. The title appropriate with my concerns. I appoligize and in no way wanted to take the attention away from your issues. Sorry my friend.
I’ll try to keep this in order and have a couple of questions 4 U. My setup is in a bedroom. I have a ‘chiller’ so the best I can do is ambient or a small amount lower. I wish I had made not of the water temp when I did those power tests. Once I get into several projects my temp will be some between 25c and 26c I usually stop if/when I get into id 60’s. I haven’t gone above 65c and usually stop for a while. I am thinking of getting a ‘cooler’ (refrigerated) but with a future compressor and a ‘cooler’ + laser, computer etc.etc. I am concerned about breaker amp’s for this area of the house. Different issue.
I am using the provided air pump which is really not sufficient. I do have a heavy aquarium pump I got for my ex. k40. I will try that before moving up in the world with air. Would you share what compressor you ended up with as well as the air controller kit. Wondering if this was the kit. https://www.amazon.com/gp/product/B07KYM6279/ref=ox_sc_act_title_1?smid=A2M1Y79D9F74M8&psc=1
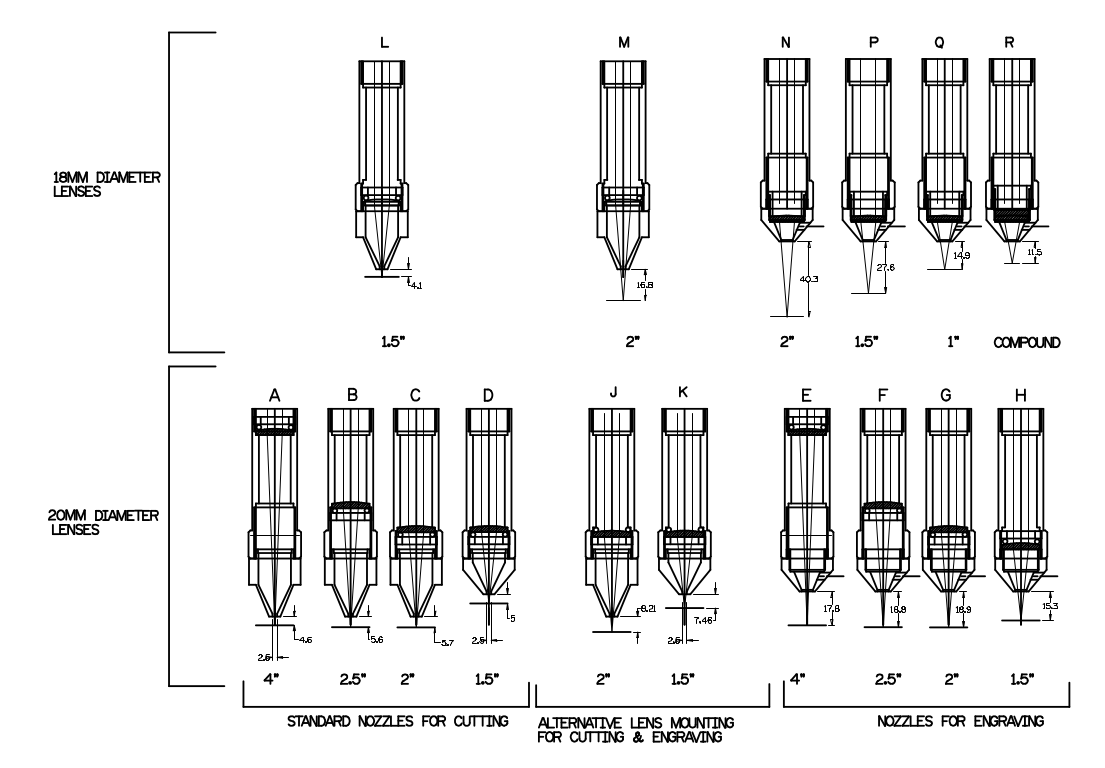
As for lenses. I think I am going to get a 2" for general use with 3mm projects and then the 3" which will hopefully get me to cut at least 1/4" and hopefully 3/8" material with this 60 (50w) laser. I hope skipping the 2.5" is not going to create more issues for me.
With more testing and adjusting things the Ten-High 4" simply won’t work - the problem might be no air. The deepest that it will cut on 3mm baltic birch is about 1.2mm deep and no matter what I do without air that is the max.
This may help some others reading these comments. As shipped/received from OMT my 60w (actually 50w) blue/white cabinet laser had some problems. I’ll cover 1 for now. I was 3 to 4 months into use the laser and simply could get a good cut from one edge of the bed to the other. I did notice the cuts were getting dirtier and wider in different areas. In the beginning I had to keep my projects to a 5 or 6" square area and those would come out pretty good. My main problem issues at that time were the small area that I was constrained to. I realized the bed was not level with the gantry. In the front right area of the bed I would and still do get what looks like a ‘C’ with a dot in the center with a single pulse and a second light ghost mark to the side of the cut line for a distance. Then that ghost line would stop. Moving away from the front right I would not get that dotted C mark. I was thinking for some reason in the front right of my bed the head ‘3rd mirror and lens’ would go out of alignment and I woud get a bounce or reflection below the lens and base cone.
I found that the bed was up to 9mm out of level.
I ended up making 4 ‘stilts’ and put them on the bed in the 4 extreme corners of the bed and proceed to level the bed. I am now about .5 to .75mm out of level. I called that good.
I was also using the slant board to focus/re-focus the the lens. At first I used OMT’s 7mm focal length focus piece they sent. The slant board showed me the focus height was between 5 and 6mm rather than the 7mm. I got to thinking and worked out a little focus tool. made a 1mm step test then a .5mm step test. This tool marks like a ramp test but then every 5mm it puts a 90 degree wide, side mark along the side of the ramp. Very easy to determine the focal distant of my lens. It turned the best and cleanest cut/engrave was 5.5mm and did made a visible difference from the 5 or 6mm. I ended up using the 5.5mm length.
I don’t cut any wood, but I can tell you my kerf in acrylic is .008 up to .010 and this is measured with comparator and sizing parts using kerf offset. I haven’t had any trouble with spot size using any lenses. even 7 inch focal was around .012" I realize the kerf in wood is going to e larger due to afterburn much like foam. Be sure and try your lenses both directions…just the planar. it will have a better spot from one side. you could have a problem anythng from bouncing off the nozzle, asymetric spot, bad tube, bad collimnation, or some motion resonance causing scatter.
You could run some tests in acylic blocks and get an idea of your beam quality and density to dial that in and tehn deal with other issues once thats sorted.
I dealt with a bad tube for over a year. it would engrave great, but never did cut right and then one day the cooling head on the lens end of tube fell off mid job. I taped the cooling head back on and ran it for two weeks while the replacement came.
Wondering what you cut/engrave.
With the 2.5" stock lens I get what seems to be a good cut & engrave. Smoke damage some. I started taping everything and now the majority of the smoke damage is minimal bit edge soot is somewhat of an issue. However, I don’t much have anything to compare with. I have seen one kit from USGears and their laser work is, to me, incredible, such fine engraving along with clean cuts and very little edge burn or soot. I’m sure their equipment is way out of my league.
I cut 3mm b. birch and 3mm acrylic. A little faux leather, leather & fabric. Wanting to cut clean 1/4 & 3/16 material. My kerf with supplied lens 2.5" is .22mm. I’ve been using the planar flat side down. I’ll try changing it back to they way it came, convex down. Thanks.
Yes, i got the Cloudray kit like the one in your link.
Compressor? Ingersol Rand 2340. No, i didn’t buy it just to use with the laser. I’ve had it many years.
Yeah, my bed was horribly unlevel also. I loosened the belt and adjusted the jack screws in the corners until it was level.
If you’re getting a dot with a C around it, then your beam is probably clipping the inside of the cone. That’ll be a real power killer.Sounds like your mirrors are not adjusted right yet.
Thank you for the links, I will follow those. From my little experience I think working with the stock 2.5" lens I have pretty good results on 3mm or less items. … just dawned on me who Russ Sadler is, yes I have watched a few of his videos. Your link has given me a lot of learning to catch up on.
Thank you for taking the time to make this post. To me it’s valuable.
There was some comfort in hearing your bed was out also. hehe. I’ve put in lot of effort with aligning the lenses, but I have always thought/wondered if there is a problem within the head itself. I’ll go back and look at alignment once again. I did get a good power reading at the front side of the 3rd lens but the meter absorption pad covers the complete head. I’m going to make or buy a reverse laser focus unit. I have 20 or 30 red dot laser units here. Great for getting me and the wife to park the car in the correct spot in the garage.
I did buy a kit from OMT for auto-focus, however, after I received it I was told they don’t sell the belts with extra length. I’ve found belts but no information how to join the two ends to make the loop. Frustrating.
Mike I talked with OMT specifically on this. Tube 60 to 80w. Evidently there are different diameter tubes with same wattage. I was told if I bought the same size diameter tube it would fig in the same brackets without modification bit I would need to update the power supply, I don’t remember if anything else had to be upgraded. However, another LB forum member said I should be able to move up to an 80w with what I have now. I would probably make the tube extension out of 1/4 inch black acrylic. Not sue if anyone offers an extension box. Please post if you upgrade the tube. I will do the same. I am thinking of selling this 60 and going to an a/f 80 or 100w. Got to understand this lens issue before anything else.
@nods Mike thanks you the advice. I thought I saw where they ‘glue’ the lenses and that put me off looking at their offerings.
The lenses are machined out of a solid block of material. I would call them and pick their brain. I have a 150w CO2 laser with a 4’x8’ working surface and there are some challenges with that size. I did upgrade to the latest Rudia controller and bought 1.5, 2.5 and 4.0 lenses from them. It takes some time to dial in the mirrors and lenses but once done what a difference. Be careful on your upgrade if you have a chiller you want to make sure it can handle the new power and I wouldn’t have the tube extend beyond the housing without a proper enclosure.
I spoke too soon, no way the 80w will fit in the existing brackets, but they can’t be that expensive.
I noticed my alignment was off, and after a few hours I discovered the tube is not on the same plane as the laser head center height. I don’t think you can adjust the head height, so i’ll be realigning everything tomorrow.
Then… I can benchmark the 1/4 ply with the new air setup vs my old settings with the oem air.
Is yours currently manual focus, with a hand crank in the corner? (no motor)
Because that’s what mine is. I’ve gathered up most of the parts to convert it.
The cheesy belt on mine broke a few months ago. One day I went to adjust the bed height and it clearly skipped a tooth on one corner when I cranked the knob. I adjusted it to tighten it up and it was fine for about 2 days then was loose again. WTF? When I examined the belt the cords were poking out through the rubber and it all stretched and obviously no good.
I wanted a longer belt so I could add motor drive, and I also wanted to add additional idlers to give the belt more wrap around the corner sprockets. The stock 90° wrap on those little 16 tooth sprockets only engages 4 teeth.
MY belt is 5mm pitch, 15mm wide. Original belt was 2800mm. I got a new belt that’s 3255mm which gives me plenty to work with. I got the belt from this place in Florida which shipped it in a couple of days.
Don’t know if that’s the same pitch and width as yours, but you can probably find a suitable belt at that place