Does the Rotary on U axis function only work with the 6445G or has anyone been able to get it to work with the 6442G? When I search I find both controllers, but as far as I can tell only the 6445G works. My new rotary requires significant changes in driver settings over my Y axis, so I would like to install another driver with the rotary. Making it work on the U axis would be sweet, but I have a 6442. Any success?
Do you mean you must adjust more than just the steps? Does your new rotary’s motor / gearing not play well with the speed, acceleration, holding torque, etc?
I believe the only firmware developed for supporting this was made for the 6445. I don’t understand why this is the case. The only difference (according to Ruida’s documentation) between a 6442 and a 6445 is the HMI (the control panel).
There are a few more differences. The 6442 is a single tube unit, the 6445 supports two tubes. There is a different amount of memory, but I don’t remember the exact specs. The physical display for the 6445 is about 50mm wider. Most of the U vs Y for rotary is in the firmware. The latest firmware version I know of is .22 for the 6445, but it’s been a while since I’ve talked to Ruida, so there could very well be newer. The 6642S and the 644XG use different firmware. I want to say .67 is the last one I got on the 6442, but I’d have to go hunting for it.
So that really throws out their model number decoding that they published in the manual doesn’t it? I thought there may be more differences than the display. Thanks.
The model number decode is the start, like picking the year and color of your next vehicle. Do you want a two wheel drive or a four wheel drive, is that true 4x4 or just an AWD. Then you go on to select the innards and everything gets complicated.
As far as I know, the 6445G is the top model for capabilities for Ruida, but it’s been a while since I did my upgrade from a Top Wisdom POS.
Firmware up[grades can be a bit tricky if you have a generic Red and Black, because Ruida doesn’t post the updates because manufacturers are allowed to tweak them for their machines. You have to scour other sites, or ask Ruida directly. Depends on who you get a hold of there what kind of response you will get, the English / Chinese translations and time differential can be a bit tricky as well
I have to correct myself, the 6442 and 6445 have a different number of axis they will control, the 6445S and 6445G are the different number of tubes. I believe the 6442 is a two axis one tube controller, but please verify that.
My 6442G has been flashed with the .67 firmware. That was the latest I could find. I am currently in a holding pattern waiting for my new rotary.
Putting the rotary on a different driver has been on my mind for a while. I have a roller rotary that I would prefer to use, but its performance is inconsistent. Engraving the same image file on the same object will produce different results. Sometimes the image is accurate, sometimes it is squished (when it is squished, it is the same size consistently). I have not been able to figure out were the problem lies, but suspect driver settings over missed steps or slipping.
My chuck rotary is always spot on, but too small for 1/2 of my work.
I used to have a 6442 on my first machine. I can attest that a 6442 is a four axis (X, Y, Z, U) and two tube controller.
1 Like
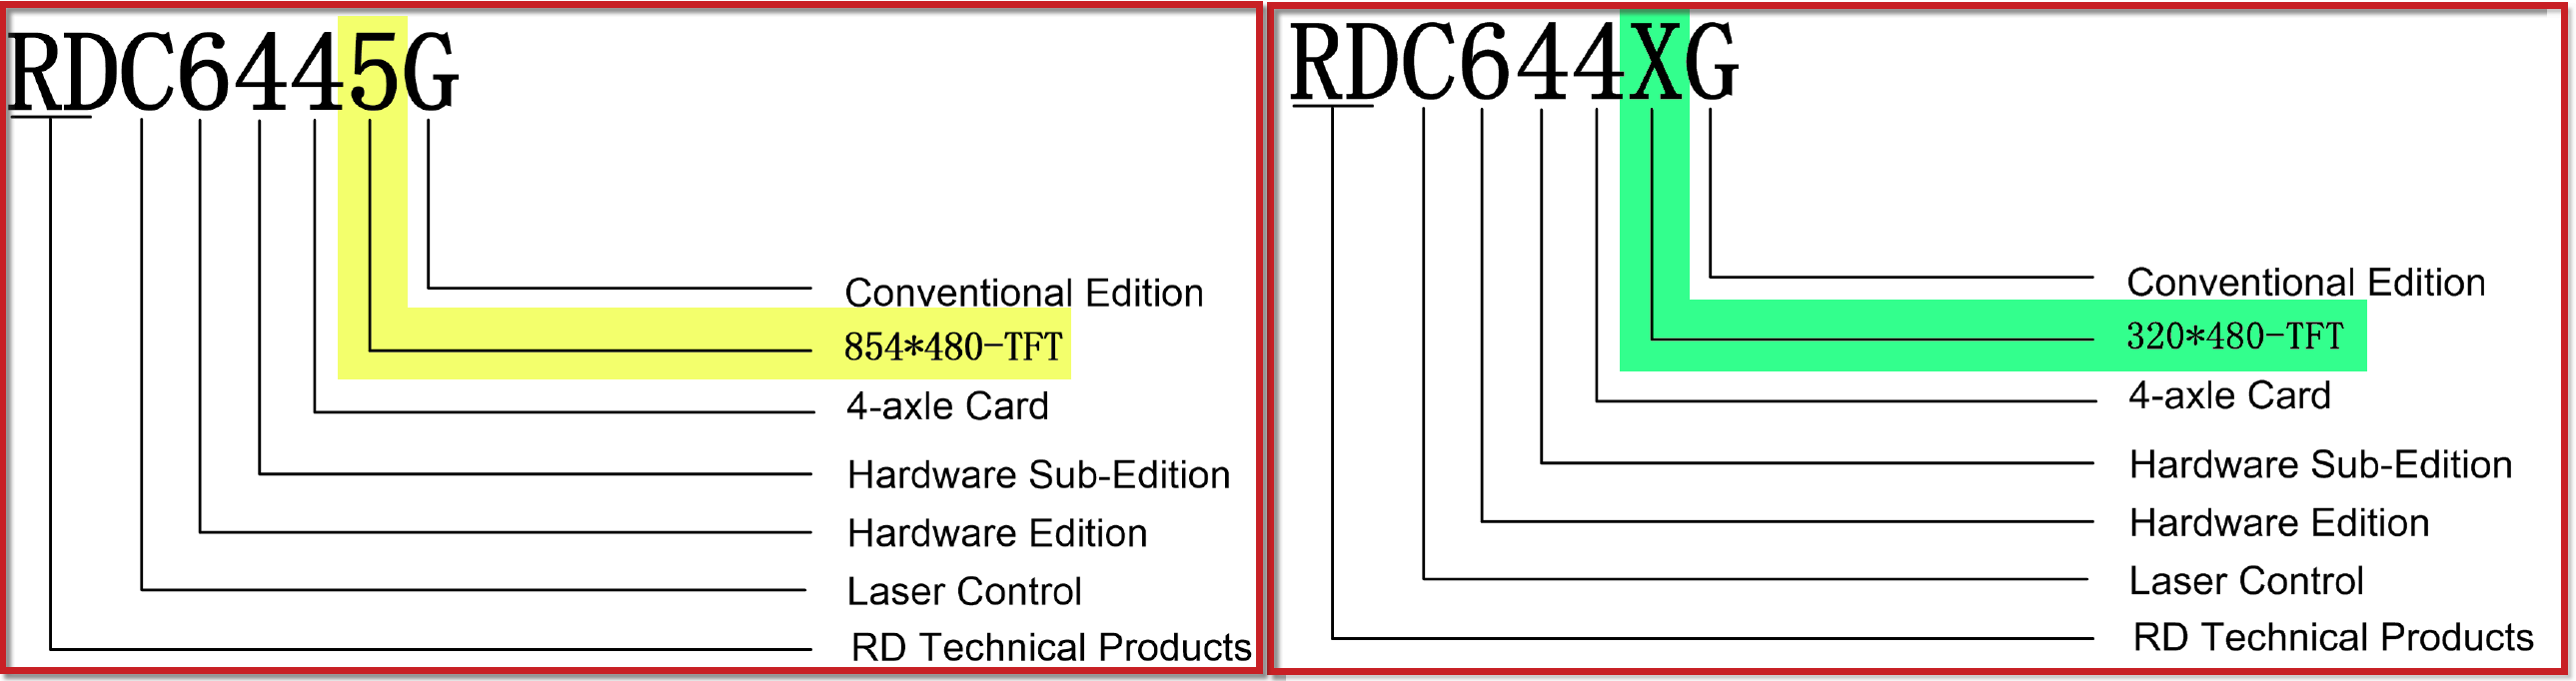
According to Ruida’s documentation, these are identical controllers only having different HMIs. The technical details of both controllers are identical. They are both referred to RDC644X.
RDC644XG
6: The sixth generation of controller
4: Controller version number
4: 4-axis card
X: (a variable representing a placeholder for the type of HMI / display type which could be)
- 1: TTF character screen
- 2: 3.5-inch color screen
- 3: 5.7-inch color screen
- 4: 7-inch touch screen
- 5: 5-inch color screen
The G represents the controller to be a standard function controller while optionally available (and what seems to make all of the difference here as the last part of a 644X controller) is:
- GT5: 5" color touch screen
- G-DFM-RD: high-resolution camera, panoramic large-format shooting, feature positioning and automatic edge-finding cutting functions
- U (or U-DFM-RD or UCO2): Dual Coordinate system
- (possibly others as well e.g. the “S” that you mentioned, I have seen that model as well)
I don’t know if this is the case as Ruida has some newer and more advanced controllers such as:
It’s been over a year since I upgraded, hence the warning to double check my info.
I purchased a 6445G with v15.01.27 firmware and rotary is on the U axis. Now I just need my new driver to arrive. The swap out was simple. Just moved the plugs and transferred my settings from the old controller.
When I get my new rotary and controller, how do I determine steps per rotation? I understand that the test button in rotary settings will no longer work.
I just received my new Rotary and driver. (RUIDA6445G)
It is rather large. While it seems to be working well, I am wondering if I can get it optimized.
The Stepper is a Leadshine 86CM45 which is direct drive on a 125mm chuck. The driver is a Leadshine DM860. It is set to 6amps and 5000 pulse per rev.
Initially I set the driver up and hooked to my controller on the Y axis. I determined 6350 steps per revolution to be the best. I then switched it over to the U Axis and did a test burn square on a large wooden dowel, leveled to the gantry. I then tweaked the step length in RD works until I got a perfect square. A few test burns of tumblers came out fine. It seems to work well. My concern is the movement seems a bit jerky when doing a burn. Though it is smooth when moving using the control panel. Another thing is that it does not seem to have a lot of holding power. I can turn the chuck by hand fairly easily as it provides little resistance. My other rotaries I can not rotate when they are connected and powered on. Should I be concerned?
Can someone provide insight to setting pulse per rev on the driver? I tried other settings and the stepper just moans… 
I would think you should use the settings from the Y axis, assuming it worked there. I don’t think the controller cares which axis you use, it’s job is rather straight forward.
My motor are locked if it’s not running. I don’t know where this is controlled in the Ruida or if it’s the drivers and there is no indication on the driver.
It depends on if you are using a vector or image. I usually run image/fill so it will move around rather slow and let X do the fast movements.
I have done some small vector graphics for a friend. It was very difficult and ended up slowing down the acceleration on Y to 20mm/s. Helped but I had a hard time holding it down.
I have a PiBurn rotary and I’m still learning myself.
![]()
One problem solved. I miss-read the On/Off position of the dip switch… Had everything reversed. Chuck won’t budge now. Small steps… Heading in the right direction.
When I looked at my driver I bought, I had to look multiple times to get on and off straight. I think I finally resolved that on was towards the pcb. I guess if I read from right to left I’d understand it better…
Great that it’s resolved… What I tell most people, it’s configuration…

Anyone out there with experience configuring a driver?
My rotary is 125mm chuck with adjustable angle (it is quite a beast) direct drive with no gear reduction. It has a leadshine 86CM45 stepper with a DM860 driver.
Currently I have it set for 8000 microsteps (range is 400-51200). Is there an optimum setting for smooth operation on a laser? I don’t need speed. More or less micro steps? Also half or full current?
Any insight would be appreciated. I have google articles and can’t seem to find a definitive answer.
From the DM860 manual
Current Settings
For a given motor, higher driver current will make the motor to output more torque, but at the same time causes more heating in the motor and driver. Therefore, output current is generally set to be such that the motor will not overheat for long time operation.
–
My understanding is how close of an accuracy do you want to maintain? Most of us want to maintain the best, but physics sometimes gets in our way. Higher steps, more accuracy.
Mine are set at 2,000/rotation and I have no problems with accuracy. The gearing is 2.5 to 1, Lightburn is set to 5,000 in the rotary steps. That’s how many steps to make 1 turn of the wheel driving the object. You only need to know the size of the ‘wheel’ for lightburn to compute the right values.
What I’ve found more restrictive is how fast I can accelerate the Y axis and keep the object in place. Mine are set to 20mm/s and that may be too fast for vector engraving.
![]()
This topic was automatically closed 30 days after the last reply. New replies are no longer allowed.