Machine config-> y home (above/below)
On the HMI panel
Machine config-> y home (above/below)
On the HMI panel
Hi Jack
Thanks for your email.
If I can explain the limits in the way I have been instructed.
X- and Y- Limits are for homing. These are the limits used when the machine resets and finds calibration for position 0,0
On the controller this is activated in the vendor settings by “Enabling homing” on the X & Y axis. The controller is then bound by movement of the dimensions set in the controller for the length and breadth of the work area set in the vendor settings for X and Y axis.
For example, if your machine size is X=1300 and Y=900 then after homing and resetting to 0,0 you will not be able to move the axis past the coordinates of 1300,900 and this will keep the laser head travel within the area of the machine without hitting the sides… UNLESS your machine is out of calibration, loses or gains steps on the stepper motor or is knocked off its calibrated position or the homing limits fail. This is where you may want to use additional limit switches on X+ and Y+
The additional Limits X+ and Y+ are used for “finite limits” they are used for bounding limits of your work area. This is activated by “Enabling Limit Trigger” in the vendor settings.
The position of these limit switches would be at the absolute end of travel for the Axis, they would be only activated in the conditions that I highlighted earlier.
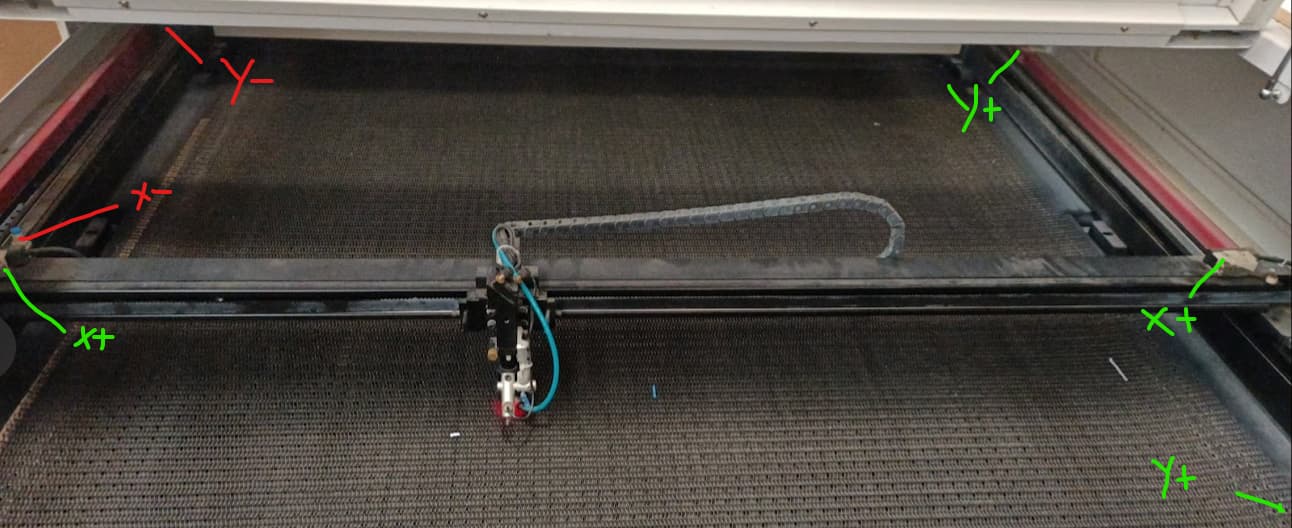
Here is a photo of one of my customers’ machines that I worked on this week, it is not the best photo but it shows in RED X- Proximity Switch and a Y- Proximity Switch. these are where the machine moves to when resetting and calibrating 0,0
The limit switches in GREEN are the lever limits for the axis, they are outside the bounds of the work area but positioned so that the head will be halted before they reach the maximum travel for the axis. There are two N.O. (normal open) lever switches on the X gantry and also two on the Y .
Hope this clarifies that part of the issue. In the end you were right about it as an emergency. I’ve only seen that in very expensive machines.
I’m still looking for more information. Maybe it would be nice to add those limits, I’ve banged it around a few times 

That picture only raises further questions- why are the two in the right corners both y+? Why is there an X+ and X- on the left?? I’m guessing he just sketched this out quick and didn’t double-check? I don’t want to overthink this.
Meanwhile, Lightburn says I’ve got “Lmt pol” all wrong, it’s not selecting active-high/low. Ruida is fixed expecting active-low. Rather, it’s supposed to select homing to Y+ instead of Y-, but I didn’t observe that, and I did try. My notes seem to have that combo covered, and it didn’t work, but maybe something else undocumented, like it won’t take effect without a power cycle?
The second (limiter polarity) controls which side of the machine the laser moves to when looking for home,
The red marks are the standard limit switches. The green set are the Lim*+ limits and are outside the normal limit switches.
Not the same setting as “Limiter Polarity” which reverses the ‘active’ level on the pin.
I think grbl handles this differently as I remember mine would trigger an error if any of the limit switches were triggered during operation. The Ruida seems only interested in them when it’s homing.
![]()
Ah, I didn’t see my switches act as e-stops under any config so far, but clearly that’s because I was never running a job, or even jogging when a switch tripped. Just trying to home. I understand now- he’s not using the “XLIMIT+” as a “+”. Ruida effectively turns the input not being configured for homing into an e-stop that should never trip in homing nor running, and it doesn’t matter if it’s + or - or even on the same axis. But it’s not going to act like an e-stop if it’s tripped while homing, it tries to move off it. The homing switch will likely be tripped all the time while running normally, since it’s within the working area, but it will be ignored by the controller. So he put a limit switch right where the axis is crashing, past the homing switch.
Not the same setting as “Limiter Polarity” which reverses the ‘active’ level on the pin.
Not according to Lightburn’s guide:
The second (limiter polarity) controls which side of the machine the laser moves to when looking for home,
I must test this ASAP. I’m seeing that the active level CANNOT be changed in config, any more than the door interlock which is always low=ok-to-run. Limiter Pol changes the direction of homing (although I didn’t see this so far, and I was looking for it).
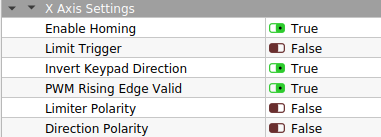
Limit Trig seems to be whether the unused LIMIT input is going to be ignored, or becomes an e-stop input.
From the Ruida manual
The limit polarity is optional, that is to say, when the motion axis reaches the limit position, it will
trigger a low-level signal so as to make the corresponding LED (under the cover) light; when the
motion axis leaves the limit position, it will trigger a high-level signal or disconnect the limit signal
so as to make the limit indicator go out, but when it leaves the limit, the corresponding indicator
will light and the limit polarity become positive. The mistaken setting of limit polarity will result
that the limit can’t be detected when the system is reset so as to lead to the collision of axis.
This does change, it looks for active being high, instead of pulling it low.
If you enable this, it will error out if you have a door switch and attempt to run with the door open. If you mean you can’t change if it’s high or low for active, I think yes. Mine came enabled, I turned it off.
He is using Limit*+, not to indicate max, just to stop the machine if it exceeds the limit switches area.
![]()
Well I sat with the machine to look for an answer to this very question.
Lightburn seems to have it wrong. Lmt Pol indeed only changes active-low to active-high. It does not change homing direction.
Still cannot find any function for “Y Homing (above/below)”. I couldn’t come up with any effect on any config.
It appears literally impossible to home in Y+ (far side) on this R6445G. There is no case where Ruida’s homing will take you there except to hit “Dir Pol” to incorrectly flip the y axis the wrong way, which will make the job cut flipped over the X.
I have emailed a couple of sources about how to do this. From what I gather so far, you have to have homing switches on the proper axes for that to be 0, 0. So for quadrant I it has to home front left. But until I hear from one of them, I’ll sit it out.
Now I have dirpol=neg, keydir=neg, lmtpol=neg, far Y home NPN switch on YLIMIT- (odd), nothing on YLIMIT+
Now it is y=0 at far, when you hit panel Y DOWN the gantry comes towards you but the panel reading is y++ when it comes towards you. It’s not a negative y, you start at the far Y home and jog down 100 mm the display goes from y=0mm to y=100mm, whereas it should read y=-100mm
So, the Y axis is flipped as far as the jog display coords is concern. But what about an actual job?
Interesting. OK, the display is not showing the job inverted of course, I wouldn’t expect it to. But if we’re just fooled it into thinking far Y is y=0 and think it’s moving further away to the back on y++ when it’s actually moving to the front, then the actual work will be flipped in the Y.
But, it’s NOT flipped. Makes no sense, but it works, so I’ll take it
This topic was automatically closed 30 days after the last reply. New replies are no longer allowed.