When I press the “test” button in Rotary Set up, I get the “Running this frame might exceed the bounds of your machine” error message. Both the machine and rotary device are set to the same settings that I always use for the rotary device, most recently on a job from 3 weeks ago.
I tried it again after updating to the latest version 1.1.03, and the same message appears.
There is no artwork for it to be out of bounds, and I am simply trying to set the correct ‘steps per rotation’. If I click through to go anyway, The ‘steps per rotation’ setting won’t set correctly either.
I have tried changing “Start from” to “Absolute Coords” before doing the test, and the error still comes up.
If your rotary is setup correct you should not have to ‘fiddle’ with steps/rotation, ever. Unless there is a hardware change.
How did you come up with the steps/rotation?
What’s happening is that there is ‘artwork’ or Lightburn couldn’t move the axes. It may be just the code to engrave a rectangle.
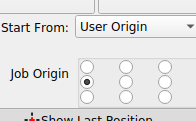
I run this way… Start from is ‘user origin’ and I use the Job Origin set to center left ‘dot’.
I have my design where the bottom is on the left.
That allows me to set the Y axes to the center of the ‘bed’ using the console then put the mug into the rotary. If I line up the mugs logo, usually in the center, to the head and press origin.
You need to remember that a rotary is viewed like the Y table, it remembers its limits…
Yeah, That’s how I understood it too, but it usually takes a few reboots to get the rotary playing nice with the laser. When I first got the laser a few years ago and was using RDWorks, I set the steps/rotation once and that was that. When I later upgraded to Lightburn I started using the Rotary more often and found I would often have to ‘calibrate’ it each time. I would have to keep changing the steps/rotation setting until I found the number where the chuck completed a full 360 rotation.
My usual setup is, as you have described below.
It is just odd that this issue is now presenting, but I’m now thinking it could be a hardware issue with the Rotary, (when also considering the need to calibrate the steps/rotation on each setup) which has gotten worse.
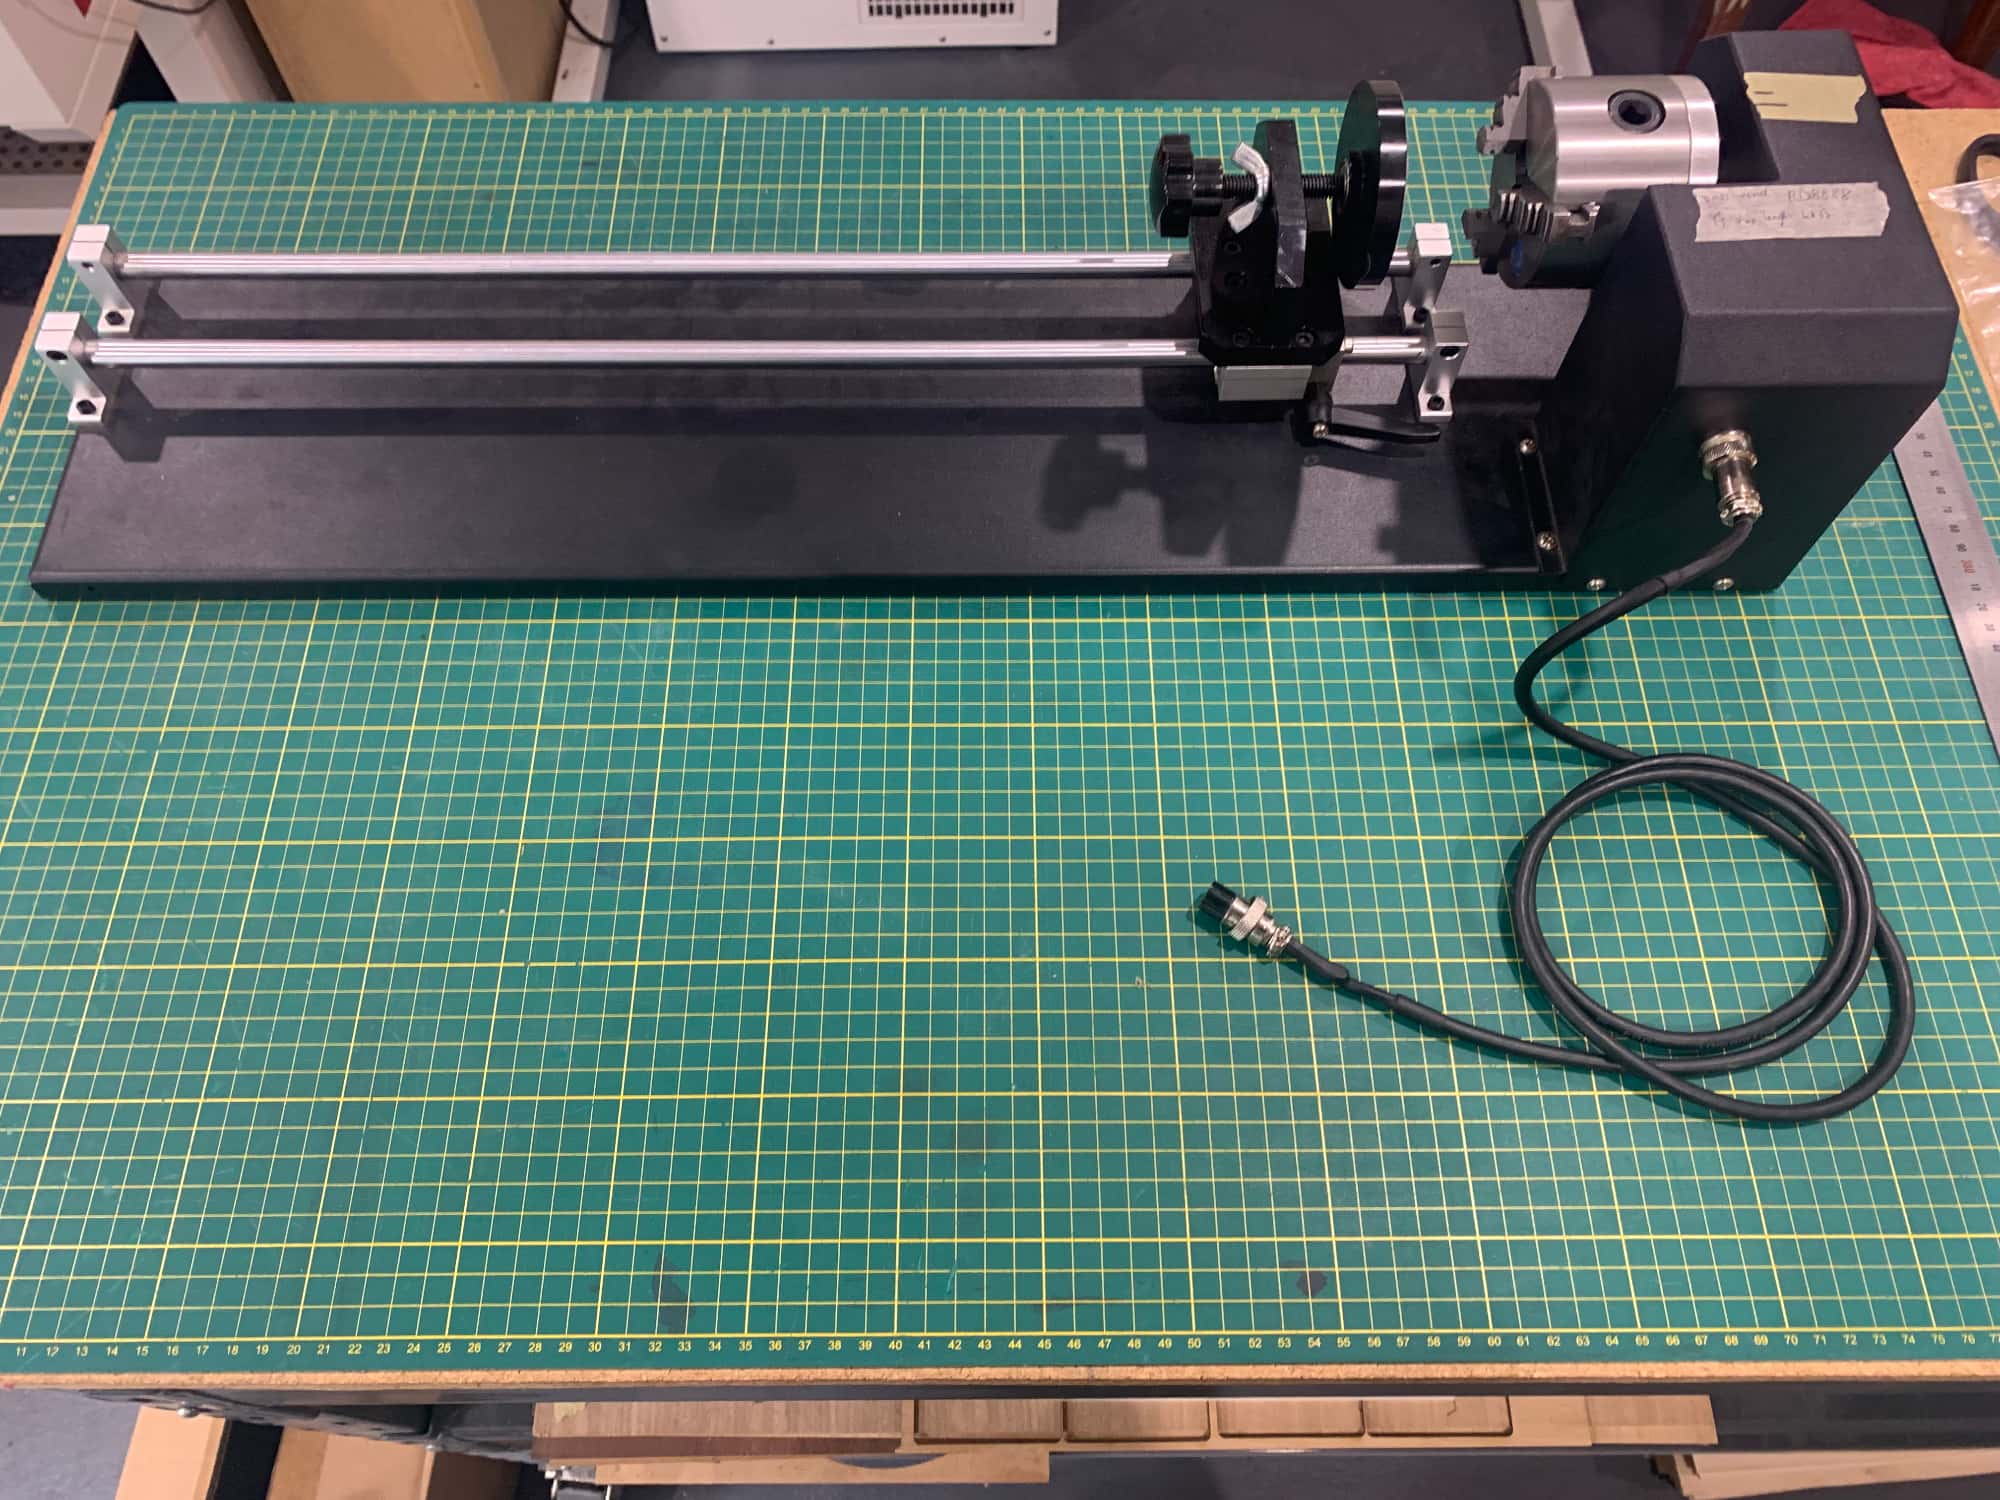
I have a Chuck style rotary, unbranded but looks like the standard Chinese rotary. Came packaged with the Redsail.
I don’t change any other controller parameters when I use the rotary. I just tweak the steps/rotation and edit the diameter to suit the job then power cycle to write the setting to the controller.
Do you think the issue would be with the Ruida Controller, or is there a separate controller inside the rotary which could be faulty? The Ruida runs as expected when doing any jobs on the flatbed.
This should not need to be done. Since it’s a rotary, you will need to enter some radius/diameter information. Steps/rotation should not have to be modified.
The ‘control’ flow goes Lightburn → controller → motor/driver → motor
It matters “whose” issuing the error. The title indicates it Lightburn.
If that’s the case Lightburn isn’t set up correctly, probably in the device settings.
I hope you saved the original settings and restored them.
From lightburn documentation
“Click the Test button to verify that the roller or chuck makes one full rotation, pauses, then returns.”
Lightburn thinks it’s going out of range. I think we need to look at device settings at least.
A lot of people seem to think you need to run Rotary setup every single time, or when you change to a different diameter mug.
The steps / rotation and roller diameter are for the Rotary, not for the item you are engraving, as I engrave lots of different Rotary items, and only did the setup ONE time. Putting the Obj Diameter and Circumference is confusing, and should be its own Menu item, as its just a calculator to give you a general idea.
I use the T2 layer with a rectangle for a X and Y dimension of the engraving area, and put my artwork inside of that rectangle. If you have a larger diameter mug, make your Y dimension on the rectangle longer.
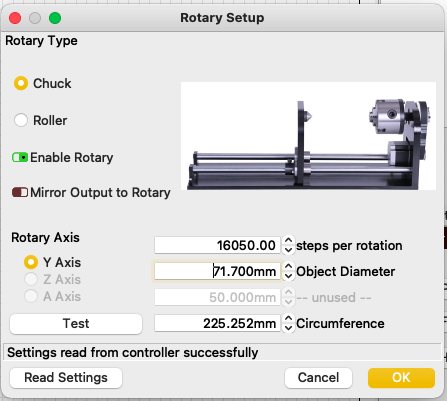
Can you POST a screenshot of what you are typing into the Setup?
What brand / model of rotary do you have, maybe someone has same and can share their steps and roller settings.
@jkwilborn@CadJoe – Firstly thanks for your time helping me with this, it is appreciated.
The Lightburn error message “running this frame…” that started this thread is now no longer showing. I fired up the laser just now to get screenshots of device settings and rotary setup for y’all, tested the issue again and the message no longer shows. I just test engraved a glass jar, and it came out perfectly.
I am using the original settings and method as before. (I saved the original settings before testing out Joe’s recommendations.)
I still believe that there is an issue happening somewhere, possibly in my setup, or possibly with the hardware. The Rotary device and software behaviour is not consistent, and as you have both mentioned I shouldn’t have to tweak the steps/rotation. I have known this since it first occurred, but as using the rotary is less than 5% of my work on the laser, I kept delaying looking into what was happening, until the other day when I got the “running this frame…” error which prevented the rotary from working correctly at all.
The steps/rotation figure that works * most * of the time is 16,050. This enables one full rotation of the chuck, before pausing and returning to the original position. The only other settings I change when using the Rotary is “enable rotary” and the diameter of the object I am engraving.
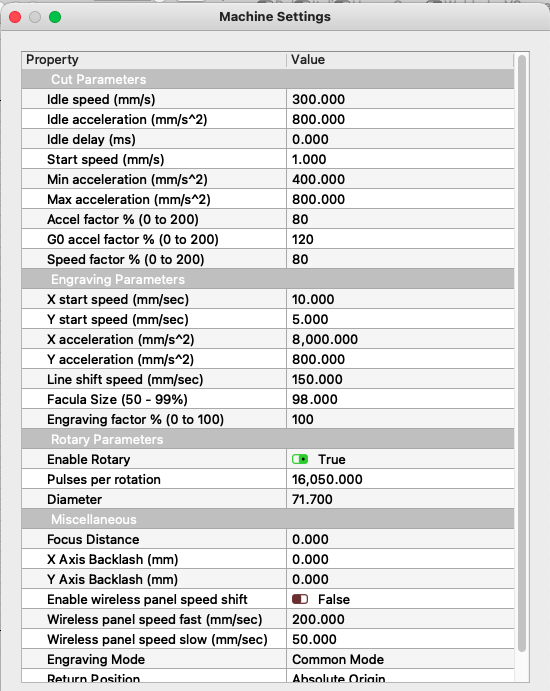
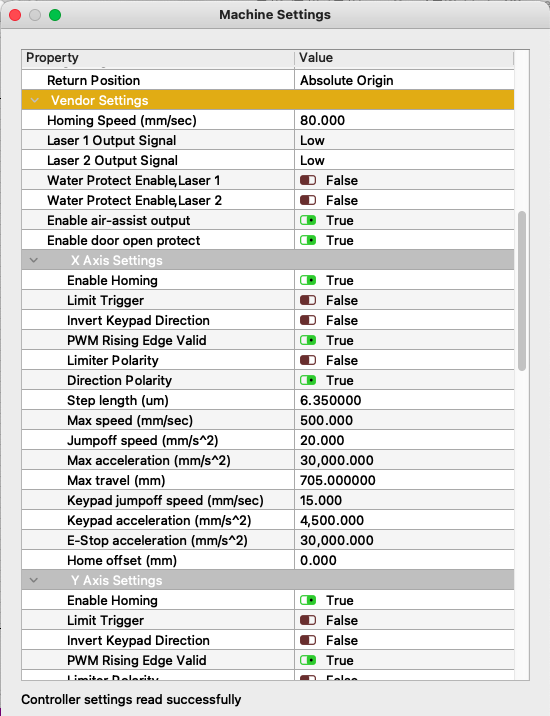
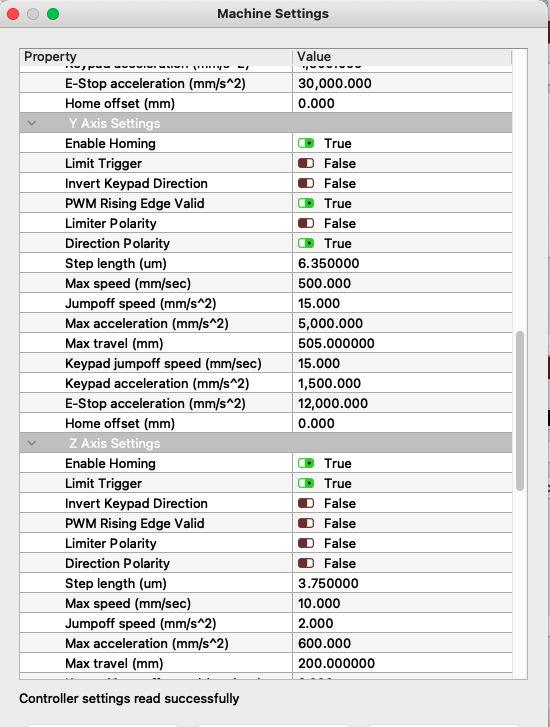
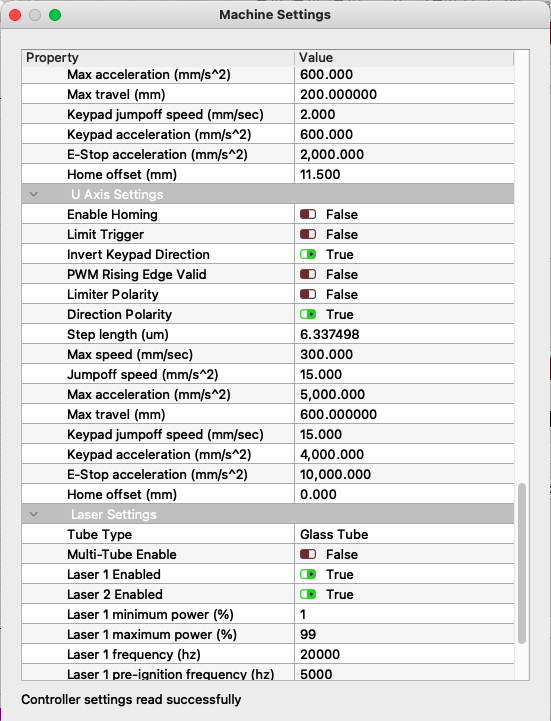
Maybe there is is an issue with the “machine settings”, or maybe I need to have different settings to load when I use the Rotary, as @CadJoe has mentioned. I don’t know. I’ll post my current settings screenshots after this as it’s only allowing me to have 4 images per post.
My Rotary is unbranded, standard looking Chinese chuck rotary that came bundled with my laser.
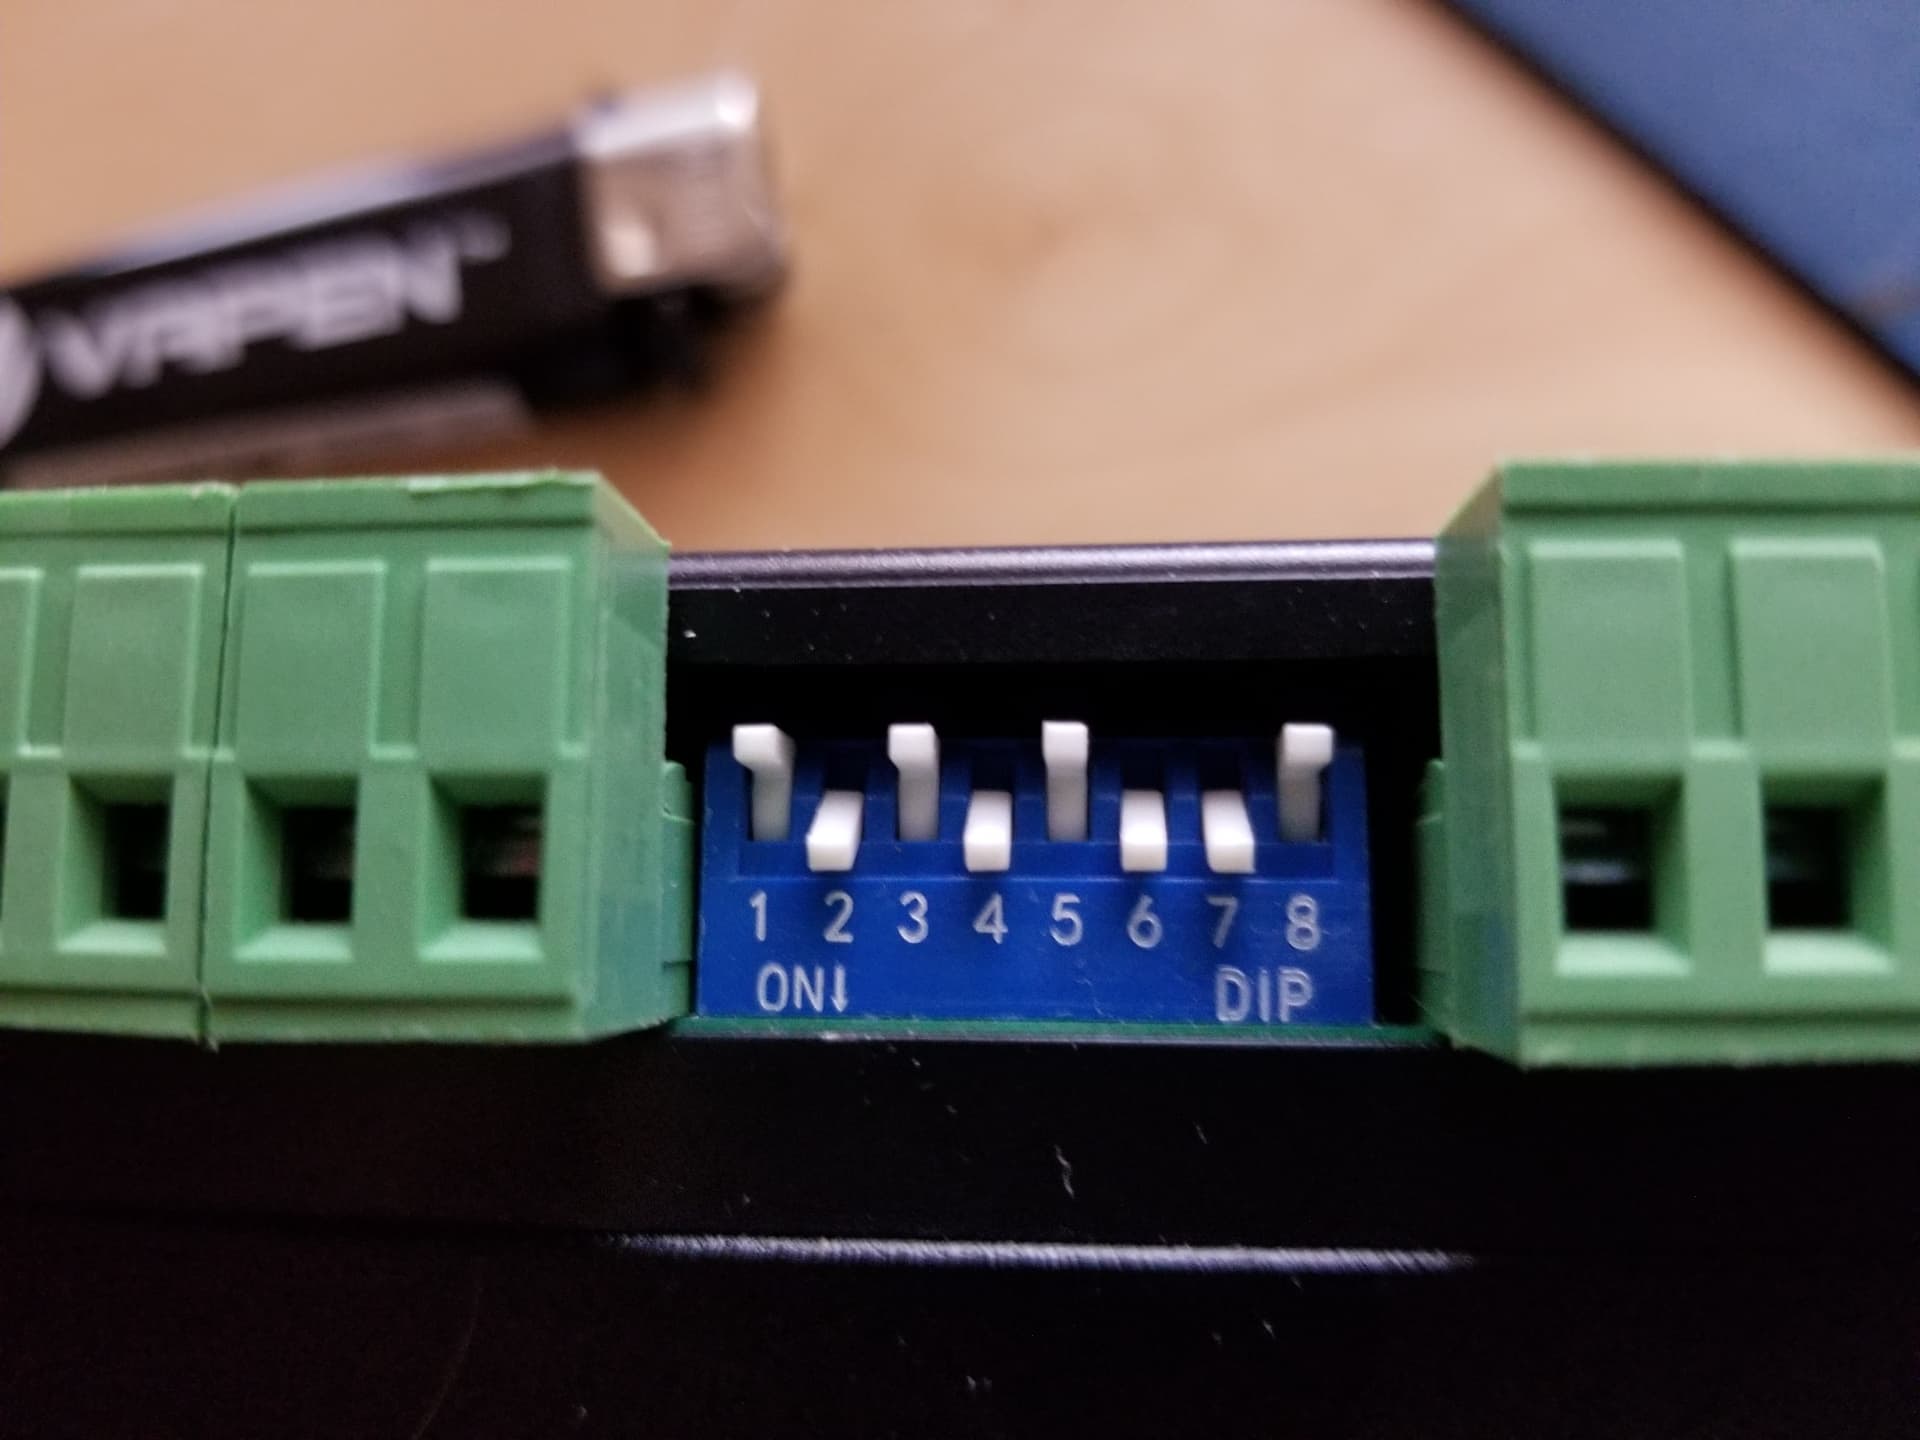
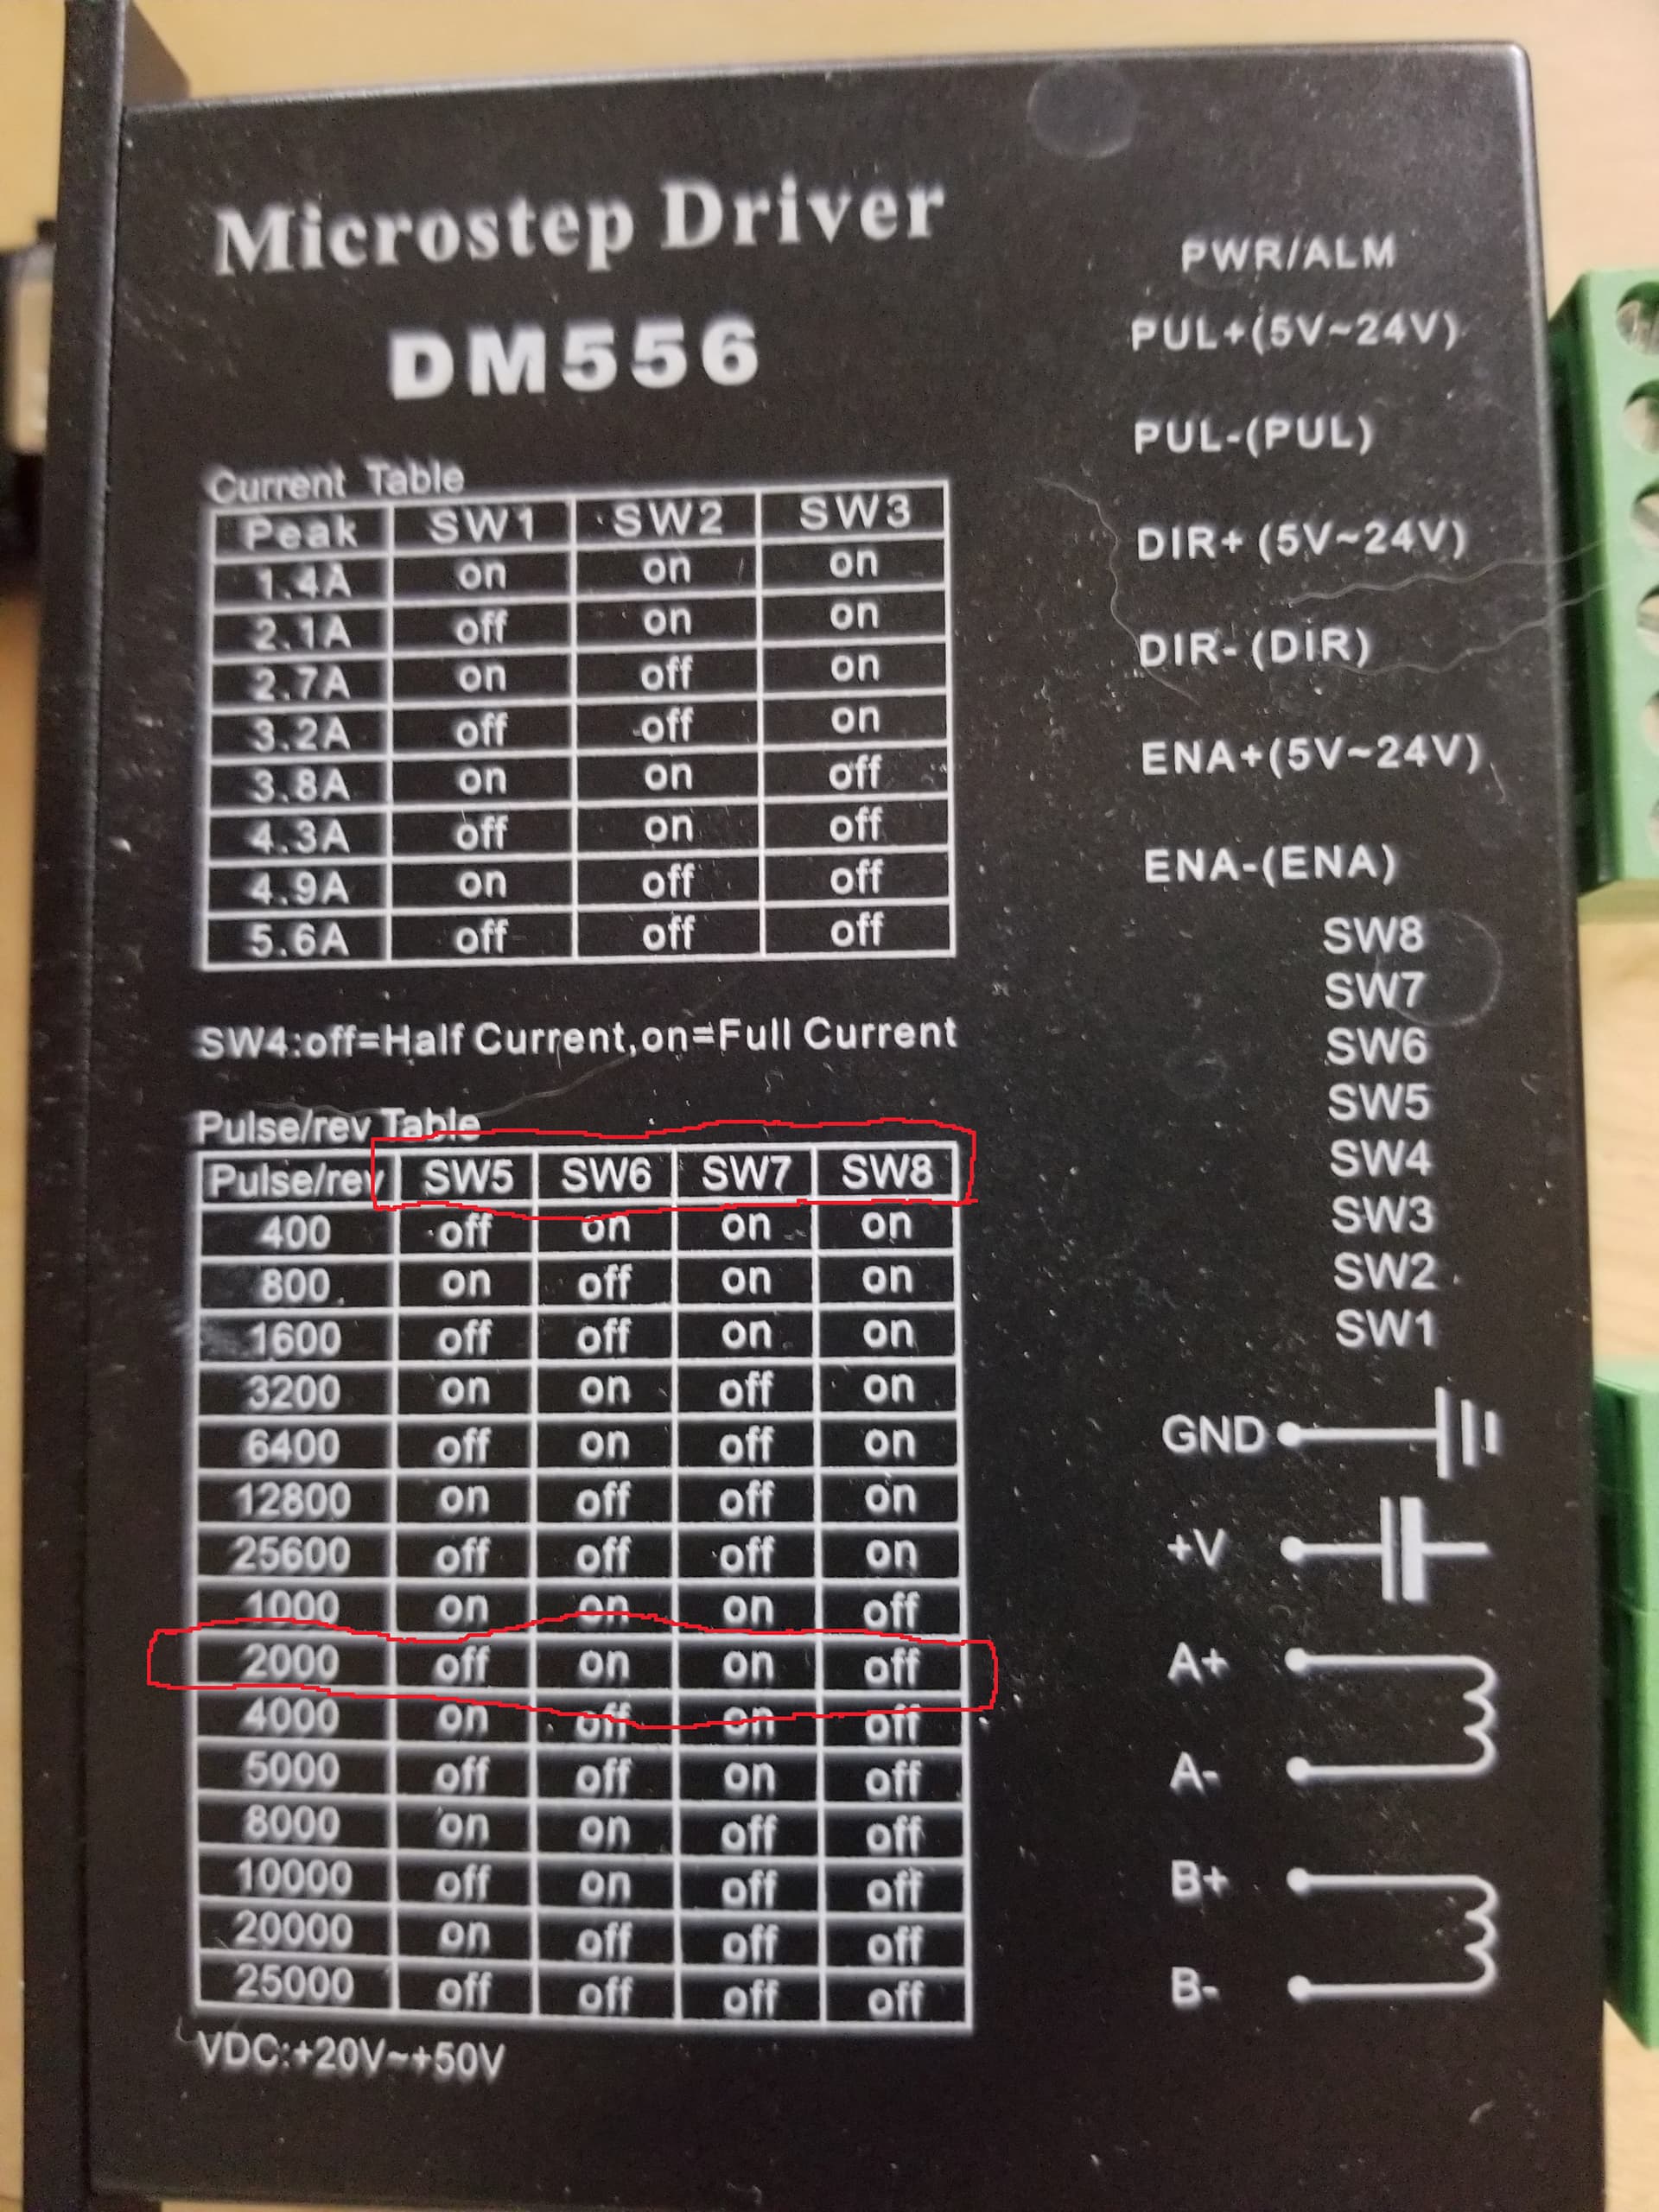
The only visual access I have to the motor drivers are the cable connectors and the heatsink. If the chart is printed on the top cover I can’t access it due to the way it is mounted. There is no step rate chart printed anywhere near the drivers or boards inside the machine. I was given the Y’s step length by the manufacturer, and used the test function in Lightburn’s Laser setup to determine the steps/rotation.
Yep, it’s still working at this stage which I’m happy with, but when I don’t know the actual cause of the original issue it’s concerning that it will happen again.
Yeah, this is what I was thinking. The old “turn it off and back on again”. I’m hoping it stays fixed.
I think I may have resolved the other issues I was having with the Rotary setup and needing to edit the steps/rotation each time. I have found that the sequence of connecting the rotary to the laser may have been the issue. Previously I would line up the gantry’s Y position to where I wanted the rotary, then plug in the rotary to the laser, sometimes while the laser was still powered on. I have just tested the following sequence and so far seems to consistently make the rotary to behave correctly.
Position the gantry’s Y position to where you want to place the rotary device
Power the laser off
Connect the rotary cable to the laser machine
Power the laser back on
Go to Laser Setup in Lightburn
Edit the diameter of the object to be engraved and click “enable rotary”. Click OK to close Rotary Setup and write the settings to the machine
Test artwork frame before starting the job
When Rotary job is finished
Go to Rotary setup and turn off “enable rotary”. Click OK to close Rotary Setup and write the settings to the machine
Power off laser
Disconnect Rotary cable from laser and remove Rotary before powering laser back on again.
I think was inconsistent with the correct sequence of powering on and off, which may be what was causing issues with the settings being written to the machine.