Sizing larger than setting

New to lightburn. I’m using the free trial and the size of the burn was larger than the set size of the object, I then went to a different computer and downloaded the software and changed basically nothing and am still getting larger sizes burned. I don’t have coding knowledge so I’m looking for a simple English answer as to what I can check. I wish I understood the $ codes and stuff, but I don’t. I just want to set something 4x4 and have it print 4x4.

Hi David, welcome aboard.

It would help if you gave us ‘hints’ that would be helpful. Does it print 1/8 or 10X size?

Are you making 4x4mm or 4x4 inch boxes?

Did you go through the Lightburn GRBL setup?

You will benefit from the Lightburn documentation on Coordinate and Job Origin, as this trips up the finest.

The software is usually runs in mm and you probably want it to be inches since a 4x4 in mm isn’t very big…

There is a button that toggles between inches and mm within lightburn.

Screenshot from 2022-02-12 11-12-01

In all likelihood it’s the machine set to mm and the software to inches. These machine communicate in ‘units’, you have to tell them if it’s metric or imperial.

Connect to your machine then ‘Edit → Machine settings’. Lightburn will read the configuration or should, you can click ‘read’ and it will do it again. You can ‘save’ it to a file for safekeeping so if you change something you can just reload it.

You will see one of the entries marked ‘Report Inches’ and set it to whatever unit you are using. If you change it, save a ‘different’ file with the operational settings. If you loose a control board or something you will like to have these around. Ignore the ‘Laser mode enable’ I don’t think it probably applies, but if it’s displayed it should be ‘true’.

Screenshot from 2022-01-25 04-21-57

You will be asked about your machine in more detail, probably.

In the Cut/Layers window the ‘console’ tab will show what your firmware is. If you don’t see the tab, click on the window icon and select it there…

This shot is for a Ruida, which doesn’t have a ‘console’ like you controller, but you can see where it is… right hand side…

Good luck

:smile_cat:

Thanks for all this. I will go through to shortly. I did adjust the object to inches so 4x4 was inches. The width of 4" burns at about 5", but the height seems to be correct to the 4"…even more confusing. The first time I downloaded the software it worked fine then I tinkered and it was then off, so I know it was something I did.
That’s why I went to a new laptop and redownloaded software and didn’t mess with the settings. I’m finally getting some good prints on slate but the sizing is killing me with having to test.
![image|666x500]l(upload://yDZCqiZGS75GMG1z8k8lKTTkI5z.jpeg)

Your image didn’t upload. Sometimes you have to wait a few…

If you modified something, you could just ‘write’ the original back to it…

Most of these have a way to calibrate the axes if it comes down to it… not preferred if it can be done with a correct setup.

Good luck…

:smile_cat:

1 Like

These are the three screen settings for machine, device, and settings.

Do you see anything wrong?

I think it would help if next time you open up the ‘console’ and reboot the laser. This will display the firmware you are running.

This is my console when I boot my machine. It has an error because it has homing enabled, but the power for the motors are turned off, so it fails to home. But you can see it grbl version 1.1f

Screenshot from 2022-02-12 14-43-31

I expect to see the ‘grbl’ registers to see what size you machine is set. Normally this is in the $$ registers. I have entered the $$ in the console and the configuration is displayed.

For the machine, $130 through $132 are the maximum limits to X, Y and Z.

The part I was looking for was actually in the ‘output’ section…

The only thing I wonder about is usually you have to ‘Laser Enable’ it in the settings…

I can’t really tell from the artwork what is wrong and the image is kind of covered up, so it’s hard to tell from this…

:smile_cat:

Ok will look into this. The catcher burned on the slate was just for you to see that it is working and I’m not totally dumb. I don’t do the home thing either. My machine doesn’t have limit switches.

I thought the slate didn’t look too bad, that why the comment I can’t see the problem…

The machine has lost it’s position and needs to be reset… That is alarm 3.

How fast are you engraving?

I can be caused by too high a speed or acceleration

:smile_cat:

Only get that alarm cause when I connect it tries to home and can’t, which is why the start position seems to adjust based on the size of the object. Baby steps, lol.
The actual engravings look great.

Generally you can turn off the ‘home’ function off in the Machine settings and then you can place the head where you want it to start… This is explained int he grbl setup for non ‘homing’ machines.

Screenshot from 2022-02-13 06-35-39

If you disable the homing cycle, the ‘hard’ and ‘soft’ limits probably won’t work as they need the homing cycle to set them up.

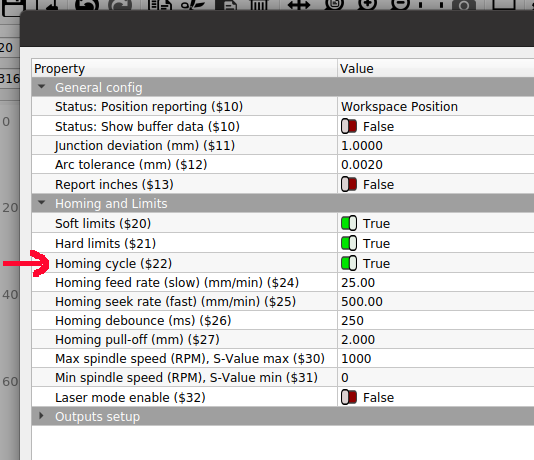
In your setup you have ‘homing’ enabled and ‘hard limits’ enabled. From your description it is ‘homing’

I usually have ‘Soft limits’ enabled. The software can detect ‘out of bound’ attempts and stop them from executing. Hard limits require it to activate the limit switch.

Some types of software will allow you to the gcode in a ‘check’ mode where it sends it to the machine, without actually doing anything to test if everything is ok.

I don’t know if you can do that in Lightburn…

Let me add that a grbl error 3 is not a homing failure. As you can see the grbl homing error is number 9.

Maybe there is other things…

Since you don’t know what kind of machine you have, maybe a photo, if possible…?

This will be a continuous question. You really need to know the identify your machine. Some of these ‘blue light’ lasers have different abilities and some have actually modified the grbl code. There are no names or labels on it?

Where did you get it?

Take care…

:smile_cat:

Ok I’ll turn those things off.
The engraver is from a company called Starengraver. It’s a Chinese knockoff type, only instructions are videos, they do respond to emails and also setup a WhatsApp chat. The laser is not “50w”. It’s a blue diode laser and when asked they said it’s more 18-20w actual power which I’m told is still most likely too high. I will say on 100% and slow speed it does BURN and even painted tiles it’s can over burn. Either way, it’s together (properly😀) and works-just need to dial a few things in like this sizing issue.

Yes, I know… It’s a solid state (ss) laser, so it’s ‘input power’ is the advertised power. They output of an ss laser is usually 20% max, mine have always been around 10% output. Co2 machines usually use output power.

Is there a proportion it’s off?

If it’s minor, you might try "Edit → Machine Settings’ at the bottom is ‘Calibrate Axis’ button…

I’ve never used this, but I’m aware of it. It might correct the issue is the amount it’s off is minor.

It’s probably worth a shot…

Good luck

:smile_cat:

It’s off on the width by 25%, so if I put it to 4" it burns 5", the height seems to be on point. So for a 4x4" coaster I have to set the size to 3" wide and 4" high

I’d try the ‘Calibrate Axis’ option. If anything else was off, I think it would show in the other axes.

:smile_cat:

This topic was automatically closed 30 days after the last reply. New replies are no longer allowed.