Snapmaker 2.0: edges burn darker on fill, regardless of overscan setting and fast whitespace scan setting

First let me apologize if this topic has been fully covered elsewhere. I’ve searched through the forums here, on Snapmaker’s site, and general Google searches and I can’t seem to find this exact issue with this configuration. If it’s answered elsewhere, pointing me in the right direction would be much appreciated.

All right, with that out of the way, here’s what I’ve got. I’m running the latest version of LB (1.0.06 as of this post) on Windows 10. My laser is a Snapmaker 2.0 A350, recently upgraded from the 1600mW to the 10W (though this problem has been persistent on both units). I’m running the latest firmware there as well (1.14.2).

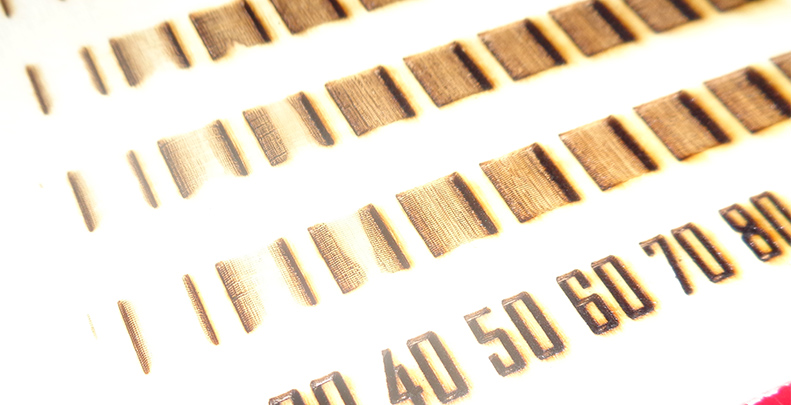
Here’s what I’m getting when I try to engrave using fill mode and LB-generated vector shapes (rectangles and circles shown here, though the problem manifests with text also):


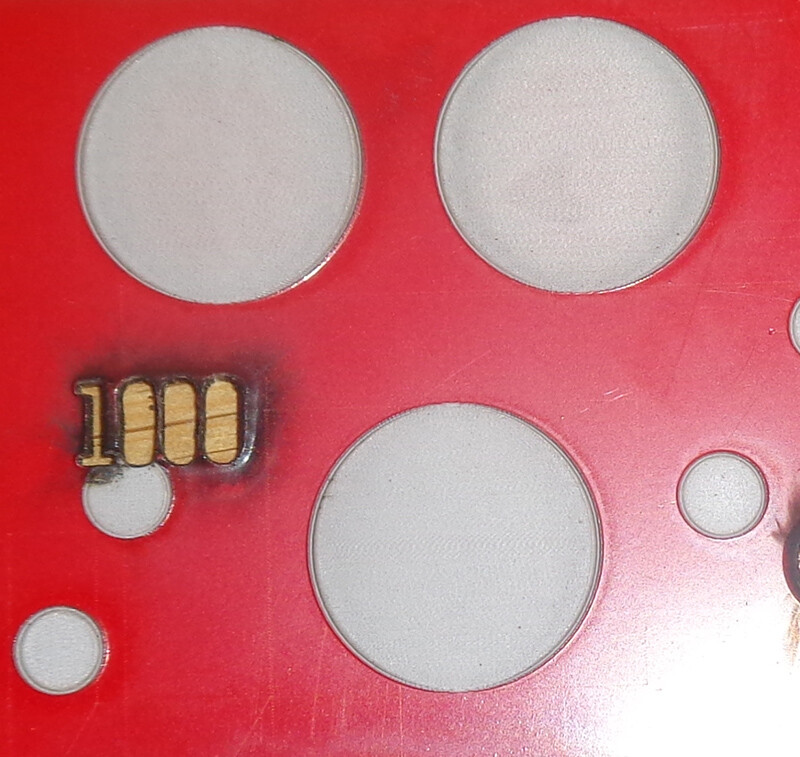
(Please ignore the “1000” that completely burned through the plastic; that was my first attempt at using this material with this new higher-power laser. Live and learn… :grimacing:)

Note that in the second picture, the larger circles only exhibit the more excessive burns to the left and the right, while the smaller ones exhibit the edge burning all the way around. This is because I turned on Crosshatching for the smaller circles. For all the circles, my settings were 0.050mm line intervals, 6000mm/min, and 10% power (1W).

The large circle at the bottom is using the default overscan setting of 2.5%, the top left circle is using 7.5% overscan, and the top right circle is using zero overscan. (The wood engraving is using 2.5% across the board.)

In addition to changing overscan settings, I’ve tried enabling and disabling the Fast Whitespace Scan option, which doesn’t seem to have an effect.

I spent a while trying to connect my Snapmaker to my laser and adjust the $32 setting (as described in the post “Still getting dark edges when overscanning”), before realizing that I’m not dealing with GRBL firmware, but rather Snapmaker’s own firmware, based on Marlin… once again, live and learn. :roll_eyes: (By the way, I did set up the machine manually in Lightburn using the Snapmaker preset, not GRBL or Marlin.)

So that’s where I’m sitting; so far no matter what I’ve done, I get this persistent issue with the edges darkening perpendicular to the direction of laser travel. I should note also that this problem did not manifest while I was using Luban to generate laser jobs. But… well… how do I put this politely… I don’t much care for Luban. :sweat_smile: Lightburn is a massive improvement to Luban except for this one annoying problem.

I did manage to get a successful USB connection to my Snapmaker and was able to use the console and basic controls, send jobs to the laser, etc. (They really hide that mini USB port way too well.)

Anyway, knowing my luck, it’ll be some setting that’s been staring me in the face this whole time, but I feel like I’ve reached the end of my own troubleshooting ability on this problem. Any suggestions or advice would be very much appreciated.

Thanks!
Dan

I’m picking at the GRBL 1.1f source code to figure out the math so I can actually say with full certainty what’s happening. I’m fairly sure the SnapMaker G-code variant is behaving similarly for similar reasons.

That being said. The fix is to slow down and cut power.

The weird artifact on the edge of the box is almost always caused by:

  • commanded engrave speed greater than allowed speed in firmware and
  • deceleration at the the end of the box.

So, what’s happening is the engraver throws fewer photons at the work-piece if it can’t go as fast as it’s being told to go. This is a firmware operation and it’s intended to keep corners consistent as the engraver slows down to make a corner or a curve.

As the engraver slows down at the edge of your box, I assume the power comes back up and it engraves at the actual commanded power at some point when the speed drops to what the firmware setting allows. If there’s no deceleration - the dark artifact line doesn’t appear.

If you simply slow down - you will likely have some very dark boxes. I believe they should all engrave at the level of the dark visible line or a little darker.

This is what happened to me.

I’m at about 90% certain this is how it works and why that happens and I am digging in to the source code to solidly define the problem.

Make sure you’re operating in mm/minute. mm/second on small lasers is really optimistic.

Good luck - please post your next materials test pattern!

1 Like

Thanks @JohnJohn! I’ll give that a shot. LB did throw me initially because I hadn’t realized its default was mm/s, but I’ve been operating in mm/min ever since my first test pattern. I’m loading up a test pattern now and will post the results as soon as I can.

I don’t understand much about this world yet, but I know that using GRBL 1.1f in addition to setting $32=1 I have to use M4 instead of M3, I think in the case of Lightburn it would be to leave the Constant Power Mode option off…

1 Like

Exactly! Likewise.

Just to piggyback on this. It’s specifically 1.1f and up where laser mode is available. The reason there’s a separate device type called GRBL-M3 in LightBurn is to accommodate 1.1e and lower where laser mode did not exist and did not provide variable power.

Constant Power Mode basically negates variable power.

Ok. The typing failed and the letter F was missing after GRBL, I’ve edited and corrected it…
But I don’t know this Grbl-M3 device, would it be hardware?
Sorry for my ignorance.

No. This is a device type in LightBurn. It’s one of the choices if you setup a new device.

Hey!! Looks like that did it! Apparently I was too gung-ho to be able to engrave much faster with the more powerful laser and… well… hopefully one day I will be able to once they get the firmware issues addressed. In the meantime, here’s my results on wood and on plastic:


Sorry the contrast doesn’t show up real well in this one. I’m getting full black squares at the following thresholds:

  • 200mm/min @ 400mW
  • 400mm/min @ 800mW
  • 600mm/min @ 1000mW
  • 800mm/min @ 1200mW
  • 1000mm/min @ 1400mW

… and, as you can (sort of) see on the lighter squares, not a hint of darker edges along the right or left sides.

Here’s my new plastic engraving test:


Note that there’s a little bit of what looks like a darker edge along the top, but that’s just due to the lighting when I took the photo. All three circles engraved without the edge darkening as well, going at the slower speeds. The one on the bottom (crosshatch) turned out the cleanest, so I’ll move forward using those settings for now. Oh, also, for reference, these circles (as well as the ones in my original post) were engraved using 0.05mm line intervals.

(As a side note, the larger dark spots seem to pop up with this stock (XLNT Tech Engraving Plastic) every once in a while. I think they’re just due to inconsistencies/impurities in the material itself.)

I’m very impressed with the new results. I’ll keep an eye on firmware upgrades and try some burns with the faster speeds if they seem to have addressed the issue, but in the meantime I’ll keep it slow and steady.

@JohnJohn – thank you so much for your help on this!! Hope you have a wonderful week!

Dan

1 Like

This topic was automatically closed 30 days after the last reply. New replies are no longer allowed.