This is MUCH faster and more accurate!
This fixes FOUR problems at once!
FIRST, use cheap colored posterboard. Avoid white, as it blinds the camera.
Use FILL, not LINE. But we do not want to “fill”- set the power high enough to just simply obliterate the filled area. That makes it MUCH easier to discern on camera.
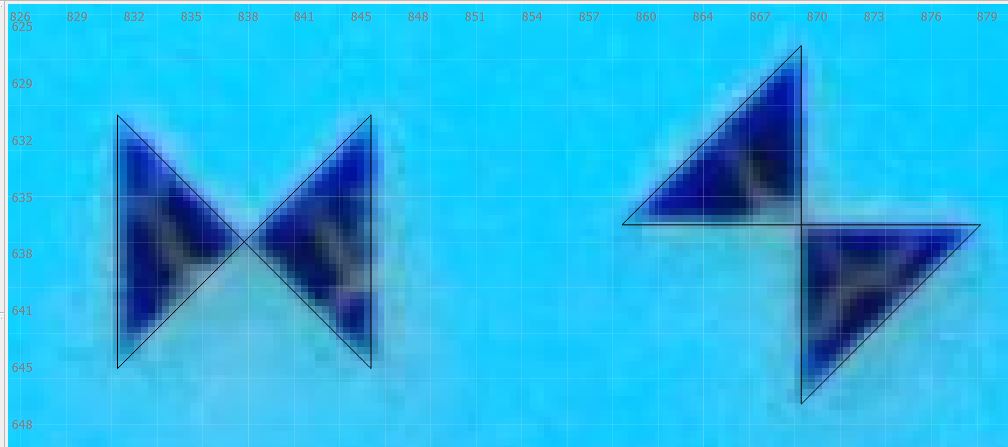
I realized there’s a flaw in LB’s method- it should NOT have the fiducial pattern align along X or Y, because that creates aliasing and ambiguity of the crossover point. Just ROTATE by 45deg and it’s several pixels less ambiguous, thus more accurate.
This pattern runs much much faster and only needs 4 small cards.
The below pattern is for a 1610 machine. The alignment wizard is based on a 180x180 unit pattern times the scale, and must be centered as per your machine’s declared width/height. My honeycomb is 1600mm wide but it can go to 1640 before hitting the stops and I can use that as raster extend space, so I declared as 1640 in the Device, so my pattern must center at 820,500.
Before using the wizard, run it as a job. First Frame and place posterboard cards where the 4 Frame corners are, and burn as Fill with enough power and line interval to create bowtie holes.
In the wizard, I just change Scale to 350% for my 3.5x180mm unit pattern, and skip the step where we burn the pattern because we already did that.
The bowties are 45 deg as proposed. They cannot be created as 4 lines, because that confuses LB’s understanding of “inside” vs “outside” and the Fill will break. Each one is two right triangles with equal right sides and a common corner, and Grouped to be one object. I created one, copied the Group object, moved the copy x+=3.5x180mm from the first, then copied both and moved them y+=3.5x180mm. This means the bowtie centers are spaced exactly, regardless of bowtie size, as long as the crossover point is in the center of each bowtie to begin with. Change that for the Scale you want to get near the visible limits of your machine bed.
Then select all 4. The selection reference 3x3 grid needs to be the “center” button. Manually type Xpos, Ypos for 1/2 your Device bed size settings- for me, 820mm, 500mm. This centers the 4 bowtie pattern, regardless of the width of the bowtie elements, or the Scale chosen.
In the camera alignment wizard, just change Scale to 350% and skip the burn stage. The crossover points need to be selected in order- top left, top right, bottom right, bottom left.
Accuracy is fantastic, really foolproof to see crossover points, takes just a couple of minutes, and only takes a small amount of dirt cheap material.
align_new350.lbrn2 (6.2 KB)