A little more mach3 research. Fill edition

About a year ago I used ChatGPT to write me a couple different apple scripts to help me control my laser using Mach3. These scripts have worked beautifully for me. I outline my work in the thread below.

THIS THREAD

If I am cutting at 100% power I use one script for GRBL-M3 but if I need to burn something at less than 100% power I use the regular GRBL profile and have the script add the needed modification for Mach3 to fire at the correct power level.

However I was having an issue with the FILL setting in either profile. Whenever I tried to generate a FILLED graphic it would just fill the entire graphic with laser line and there would be no open/whitespace. I finally played with LB enough and tested some of the settings to find out that I needed to check the FLOOD FILL setting in the advanced tab. Once this is unchecked the code will fill only the selected graphic and leave the whitespace in between shapes. This was a very simple thing but I’m guessing that maybe someone else out there could also have the same issue.

Now I just need to back and work with ChatGPT to get the script to pick up the power level for each layer and write that into the code. I have not yet been successful with this portion of my workflow. If I can nail this down then it should be possible to do some relatively decent raster engraving with MACH3 and LB.

1 Like

Maybe you could try 2 or 3 Custom GCode devices with your definitions.

this is the apple script I use to convert native lightburn GRBL g-code to code that my Mach3 unit can use.

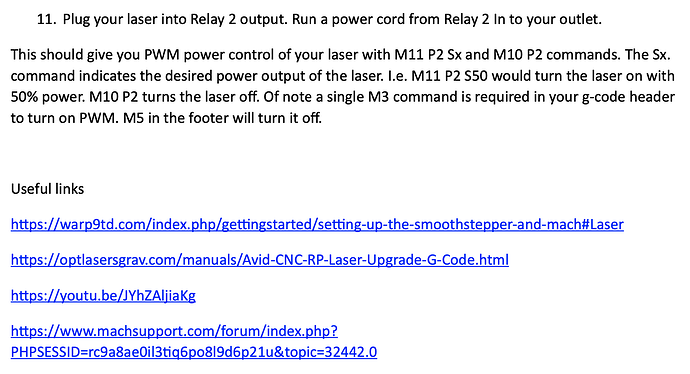
This requires that you have M11Px and M10 set up and working within Mach3. The script adds M11Px and M10 to the GRBL g-code at every G0 move. This is also set up with Mac and probably will not work on Windows machines. If you’d like to use my work and create a windows based version please feel free.

This allows me to control laser power and get synchronized on/off without any delay while still using Mach 3. Unfortunately I’m not able to upload the file so here is the text version.

– Choose the file to be modified using the Finder

set chosenFile to choose file with prompt β€œChoose a file to modify:”

set fileReference to open for access chosenFile with write permission

– Initialize variables

set modifiedLines to {}

– Define the text to be inserted

set insertLineAbove to β€œM10P2”

set insertLineBelow to β€œM11P2 S”

– Read and process the file line by line

try

– Read the file line by line

set eofReached to false

repeat until eofReached

try

– Read the current line

set currentLine to read fileReference until linefeed

– Check if the line contains β€œG0”

if currentLine contains β€œG0” then

– Add M10P2 one line above the G0 command

set end of modifiedLines to insertLineAbove

set end of modifiedLines to currentLine

– Add M11P2 S25 one line below the G0 command

set end of modifiedLines to insertLineBelow

else

– Keep the line unchanged

set end of modifiedLines to currentLine

end if

on error

– End of file reached

set eofReached to true

end try

end repeat

– Close the file for reading

close access fileReference

– Add M30 at the end of the modified lines

set end of modifiedLines to β€œM30”

– Combine the modified lines into a single string with line breaks

set modifiedText to (modifiedLines as text)

– Write the modified text back to the file

set fileReference to open for access chosenFile with write permission

set eof of fileReference to 0

write modifiedText to fileReference

close access fileReference

display dialog β€œFile successfully modified and saved.” buttons {β€œOK”} default button β€œOK”

on error errMsg

– Handle any errors that occur

try

close access fileReference

end try

display dialog "Error: " & errMsg buttons {β€œOK”} default button β€œOK”

end try

I have a second version of this that I have not yet tested that eliminates the Sx command after the M11Px command. I’m hoping this version will just read the S command from the code and respond accordingly. Unfortunately I’m away from my machine this weekend and will not be able to test this until next week. If this works I may be able to do some raster engraving. I’ll post again next week if I am successful.
I have mach3 as well but i understand that mach3 is not fast enough to control laser power with raster images . I hope that this proves to be wrong .keep at it !

While I have never used my laser with anything except Mach 3 I cannot comment on how fast it is in comparison to Mach 4 or some other control method.

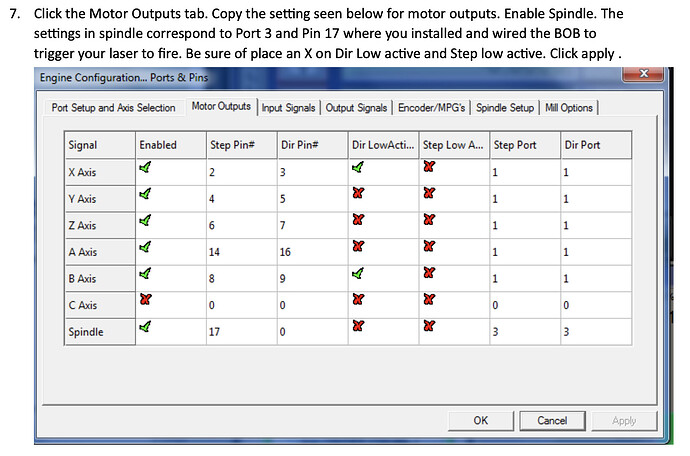
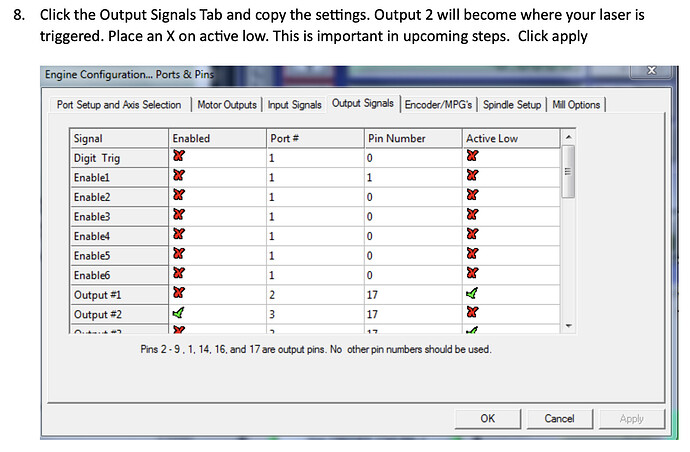
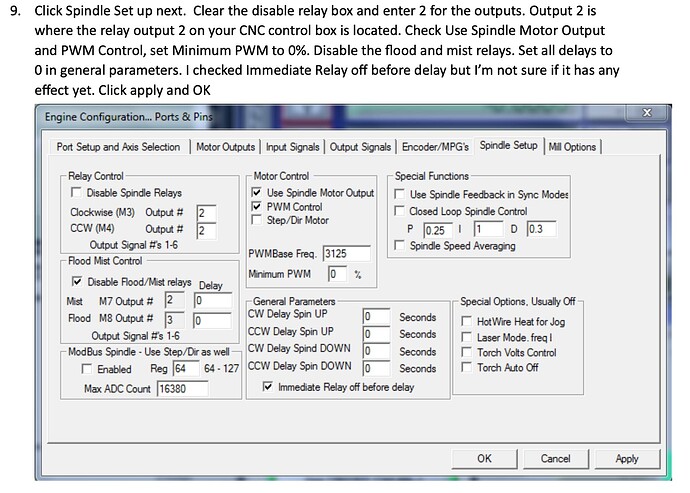
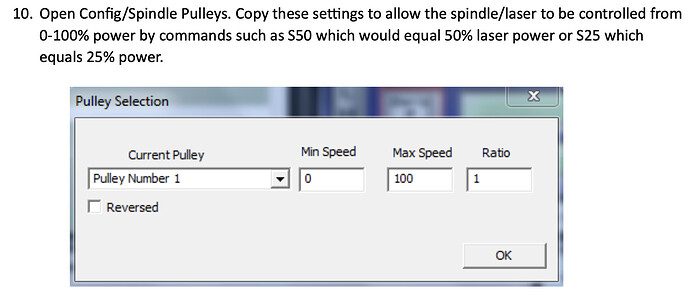
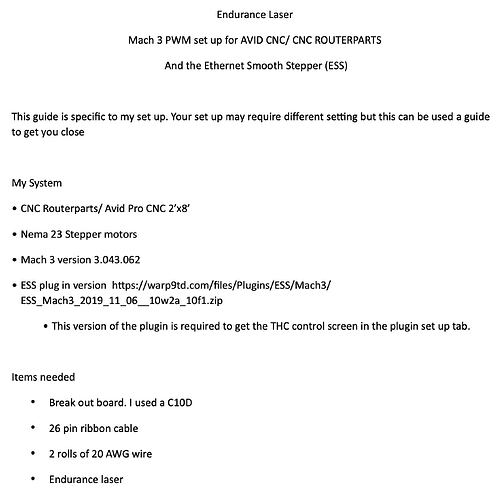
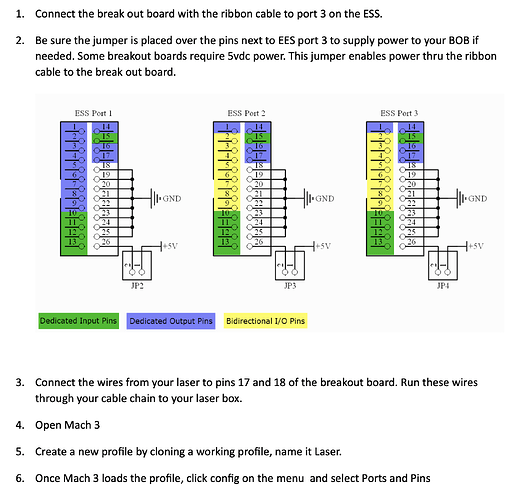
What I can say is that with the M11/M10 commands to turn the laser on and off there is no delay like there is with M5/M3. This is not easy to achieve in Mach 3 but it is doable. I have a .pdf of my Mach 3 configuration but I am not able to upload it so I have taken some screenshots of the document that you can view below. This is specific to my machine/hardware and software. There may be changes to your config that are necessary to make this work.

This will give you the ability to use Lightburn using the GRBL-M3 profile as long as you change each M5/M3 command to M11Px /M10Px. With me set up this give you the ability to fire the laser at 100% power only.

To fire the laser at anything except 100% power you must use the GRBL profile and use the script I added above. This will give you the ability to fire the laser at any power level between 0 and 100%. It MIGHT be able to fire the laser at any and all power levels based on the LightBurn setting defined in each layer. I have not tested this yet.

As far as a raster image, that is also something I have not yet tested but I think could be possible with modifications to my script. It may be possible to break the image down to individual layers to make something like that work but I think the resolution and number of greyscale layers could be a limiting factor. I think It could be possible with something like a few well defined layers resulting in a high contrast image but the transition between grey scale levels would not be very smooth. However I am not a script writer or programmer.