Sorry for yet another rotary question! I have looked in the other rotary topics but not sure I am finding the answer to my question.
I have a homemade 50W laser using the 3 axis controller GRBL from an Elekmaker diode laser. At the moment I am not using the Z axis output. The Y axis on the machine uses two steppers one at either end of the gantry. I don’t want to use the Y axis for the rotary because of needing to unplug two cables from the controller. I don’t see X axis as an option in the rotary setup box, but the instructions on line say to select the “A” axis for a GRBL controller.
**I assume this is so that you can have different settings stored without upsetting existing X axis??? **Does this “A” axis actually drive the “Real” X axis?
**I also assume I need to manually disconnect the X axis motor output and connect to the rotary motor?
**Better still would be to be able to use the existing Z motor output on my controller. If I select Z axis in the LB rotary setup will this drive the Z motor output on my controller and hence the rotary motor? That would mean I don’t need to connect and disconnect my X axis every time I want to use the rotary.
Sorry again if this has been covered, but I couldn’t find it.
This was written with the assumption that you had an A axis on the GRBL board. The diode controller you are using does not. Not many people are using an Eleksmaker controller to drive a 50w CO2 laser.
I would suggest trying the Z axis as you mentioned. Just plug it in and select it there.
Thanks Ray, I’ll be playing with the rotary at the weekend once I have assembled it.
My home made laser started as an Eleksmaker A3 and sort of got out of hand…It’s now a 1000mm x 650mm fire breathing monster:grinning:
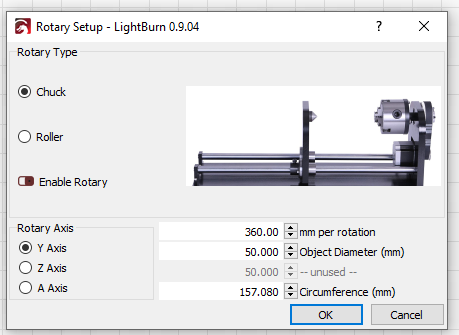
Just an update to a closed post I made in July regarding adding a rotary to my home made laser with a Mana SE 3 axis controller. I did successfully use the Z axis of the controller by setting this in the LB rotary settings and works like a charm. And saves having to disconnect either X or Y motors which is a massive time and convenience feature. Have to say was very confused about the top parameter “number of mm per rotation” This seemed odd as the obvious answer is the same as the perimeter calculation. But it isn’t that! After lots of experimenting to get it to turn the correct amount I ended up with “16” and that works for all stock diameters. I sort of assumed this was something to do with the fact that I have 1/16 micro stepping on the controller???
An also not sure what speed is used for the “Z” axis when used for the rotary??
There is a speed for Z in the move panel of 800, but not sure if this is used while engraving? Anyway, works great at what ever it is.