When you power it up, this output goes high and stays until you power it off ?
That seems pretty useless… I assume that you’ve gone through the configuration of those in the controller. All of these manuals leave a lot to be desired…
I would think there would be some output that would indicate the machine is in operation.
Many of these appear use a ‘light stack’ to inform the user of the state of the machine. In a factory where you may be watching over multiple machines, it would be useful.
I would think if anyone knows, the @LightBurn would know what it does on that controller when air assist is enabled.
I’m also sure there are many things the developers would like to know about these machines, information is pretty obfuscated. It would be nice to be able to set the ‘origin’ of the machine via software. I have to move it to some known location, go out and remember to press origin before I can run it…
It would still need some kind of ‘logic’ to toggle anything, when and for how long…
No, they don’t, but the example clearly shows a low current ss switch being used. I did not detail through the manual, but didn’t see anything about solenoids. Might be worth a search. I did for mA/current/Amp and didn’t find any hits.
I looked thru the configurations on my C version controller and no parameters mention outputs. I think it’s firmware controlled.
Out1 is on all the time? Possibly or just when it’s running a cycle. For low pressure air I don’t think it matters. You could plug an air pump into a power strip (the one used to power the controller) and use out2 for compressor only. No logic needed. Runs air pump all the time and everything is off when you power the machine down.
Keep in mind that none of this can switch air between cutting and engraving. That’s where LB control would be handy if only it would work.
Ok sorted it now.
If I check air assist in a layer in Lightburn I get high pressure air.
If I turn it off then I get low pressure.
If you thought that schematic was bad, check mine out!
It does look like it’s connected up correctly. I have virtually the same thing on mine…
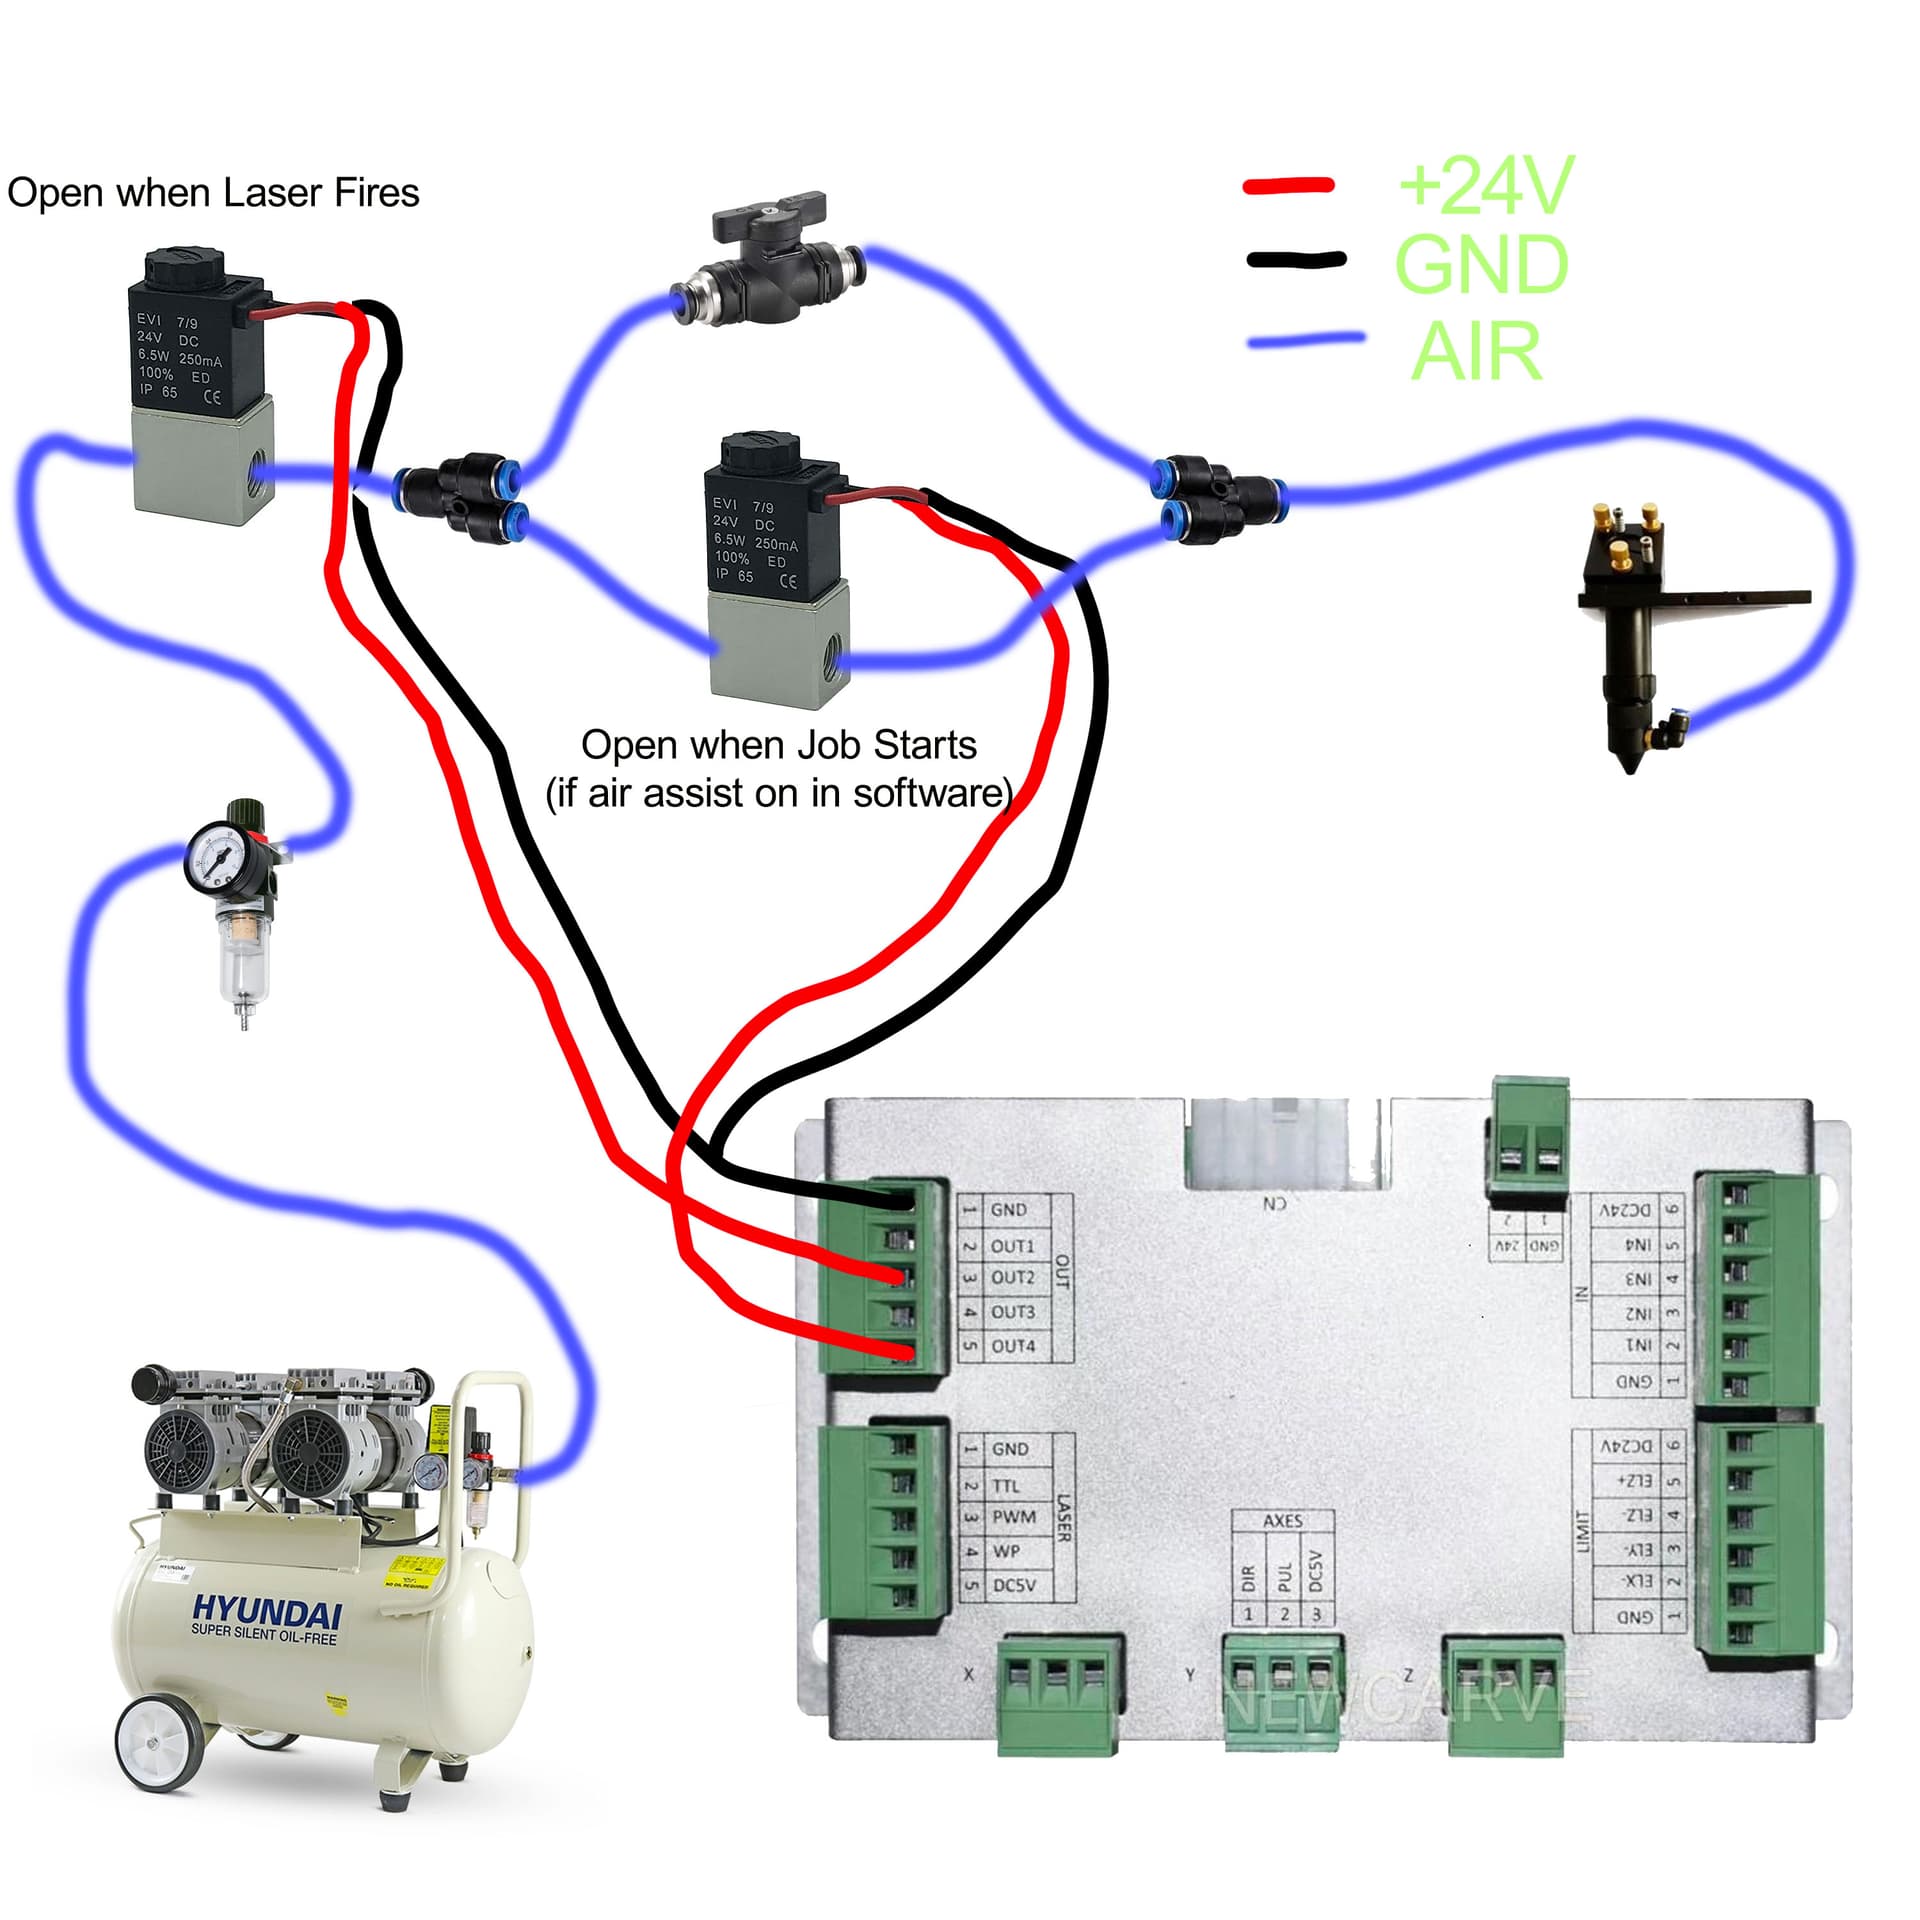
Sometimes is much easier to just show the black to ground at the device. Hopefully anyone doing this knows that a common ground needs be present.
Term ‘Open when laser fires’ is not correct, just when the machine is in ‘run’ mode. The laser is not necessarily firing and could be moving to another location.
Along with ‘Open when Job Starts if…’ is more like a high pressure or ‘air assist’ selected on that layer…
When the machine is in run mode, the job has started regardless of the ‘air assist’ setting.
I’m just used to schematics and engineering drawings. These generally don’t help the novice, as you don’t learn how to read a schematic which is a valuable asset. The one I posted from the manual was very clear about the ‘run’ mode.
Like your compressor… Need to purchase the one I found. The one I have now is really loud…
I’m just trying to show people the set up which worked for me, if they have the same controller!
The term ‘open when laser fires’ is correct - the pin becomes active when the laser is firing.
The other pin become active when a job is started, as long as the air assist is switched on. If it is switched off the solenoid connected to that pin won’t open.
I’m not sure I can explain it any clearer than this.
I have seen quite a few threads asking about air assist with Trocen controllers but none of them were actually resolved.
So if anyone is searching, this is the set up is whcih id working for me and yes the software switch in Lightburn does work, with my AWC708S at least.
That may be correct for the Chinese interpretation…
The laser firing is directly related to the pwm input.
What I’m saying is it’s not tied to the laser firing it’s just operating. The Chinese people just ‘translated it to English’ that way.
The ‘other pin become active when a job is started’ just confuses the matter as you can’t select ‘air assist’ on or off from anywhere but via the software. So the job has to be running.
They operate just like ‘Status’ (machine is in ‘run’ mode) and ‘Wind’ (active when executing a layer with ‘air assist’ enabled.) ??
I genuinely can’t tell if you are misunderstanding me or being pedantic.
Yes the laser firing is indeed related to the pwm input. If I set the power to 0% it would still activate the solenoid but the laser wouldn’t fire. However if the nozzle is moving between cuts the solenoid will close.
The other pin is active when the job is started ie it is active all the time - cuts and moves - until the job is finished. However if its turned off in software, it overrides this.
The set up in the link is pretty similar to mine, thanks.
I will take your word for it. I don’t think I was understanding you…
You have the ‘hands on’. I just wonder what the planned use of it was.
When I engrave many small ‘engravings’ on a single item, I don’t want my air turning off and on while it moves a mm or less. I guess it wouldn’t hurt, but it would be rough on the solenoid.
Yes you are right about the Solenoid and the engraving - it will get worked hard. It is a concern.
I would’ve preferred the ability to override the Output which works only when the Laser Fires so for engraving the air would be on constantly.
But I couldn’t think of a way to do this without building some extra circuitry.
Perhaps this is why there is an override switch in the image you posted.
I personally don’t engrave very often - the low pressure air will get used more for cutting acryllic - but it is still a compromise and I’m not sure how it will pan out.
The solenoid was cheap though - which is good and bad I guess!
I thought I’d clarified all this but it turns out I’ve made a few mistakes so just in case anyone happens on this thread I’ll carry on updating my meandering progress.
It turns out that only a cut layer will cause OUT2 to go high ie only if Line is chosen in the Mode dropdown menu in Lightburn. The air assist toggle switch has no effect on this. The output goes high and low with the firing of the laser.
OUT4 (and possibly OUT1, not sure mine is broken) goes high if the air assist toggle switch is on for the duration of a job ie from then you hit start until the end.
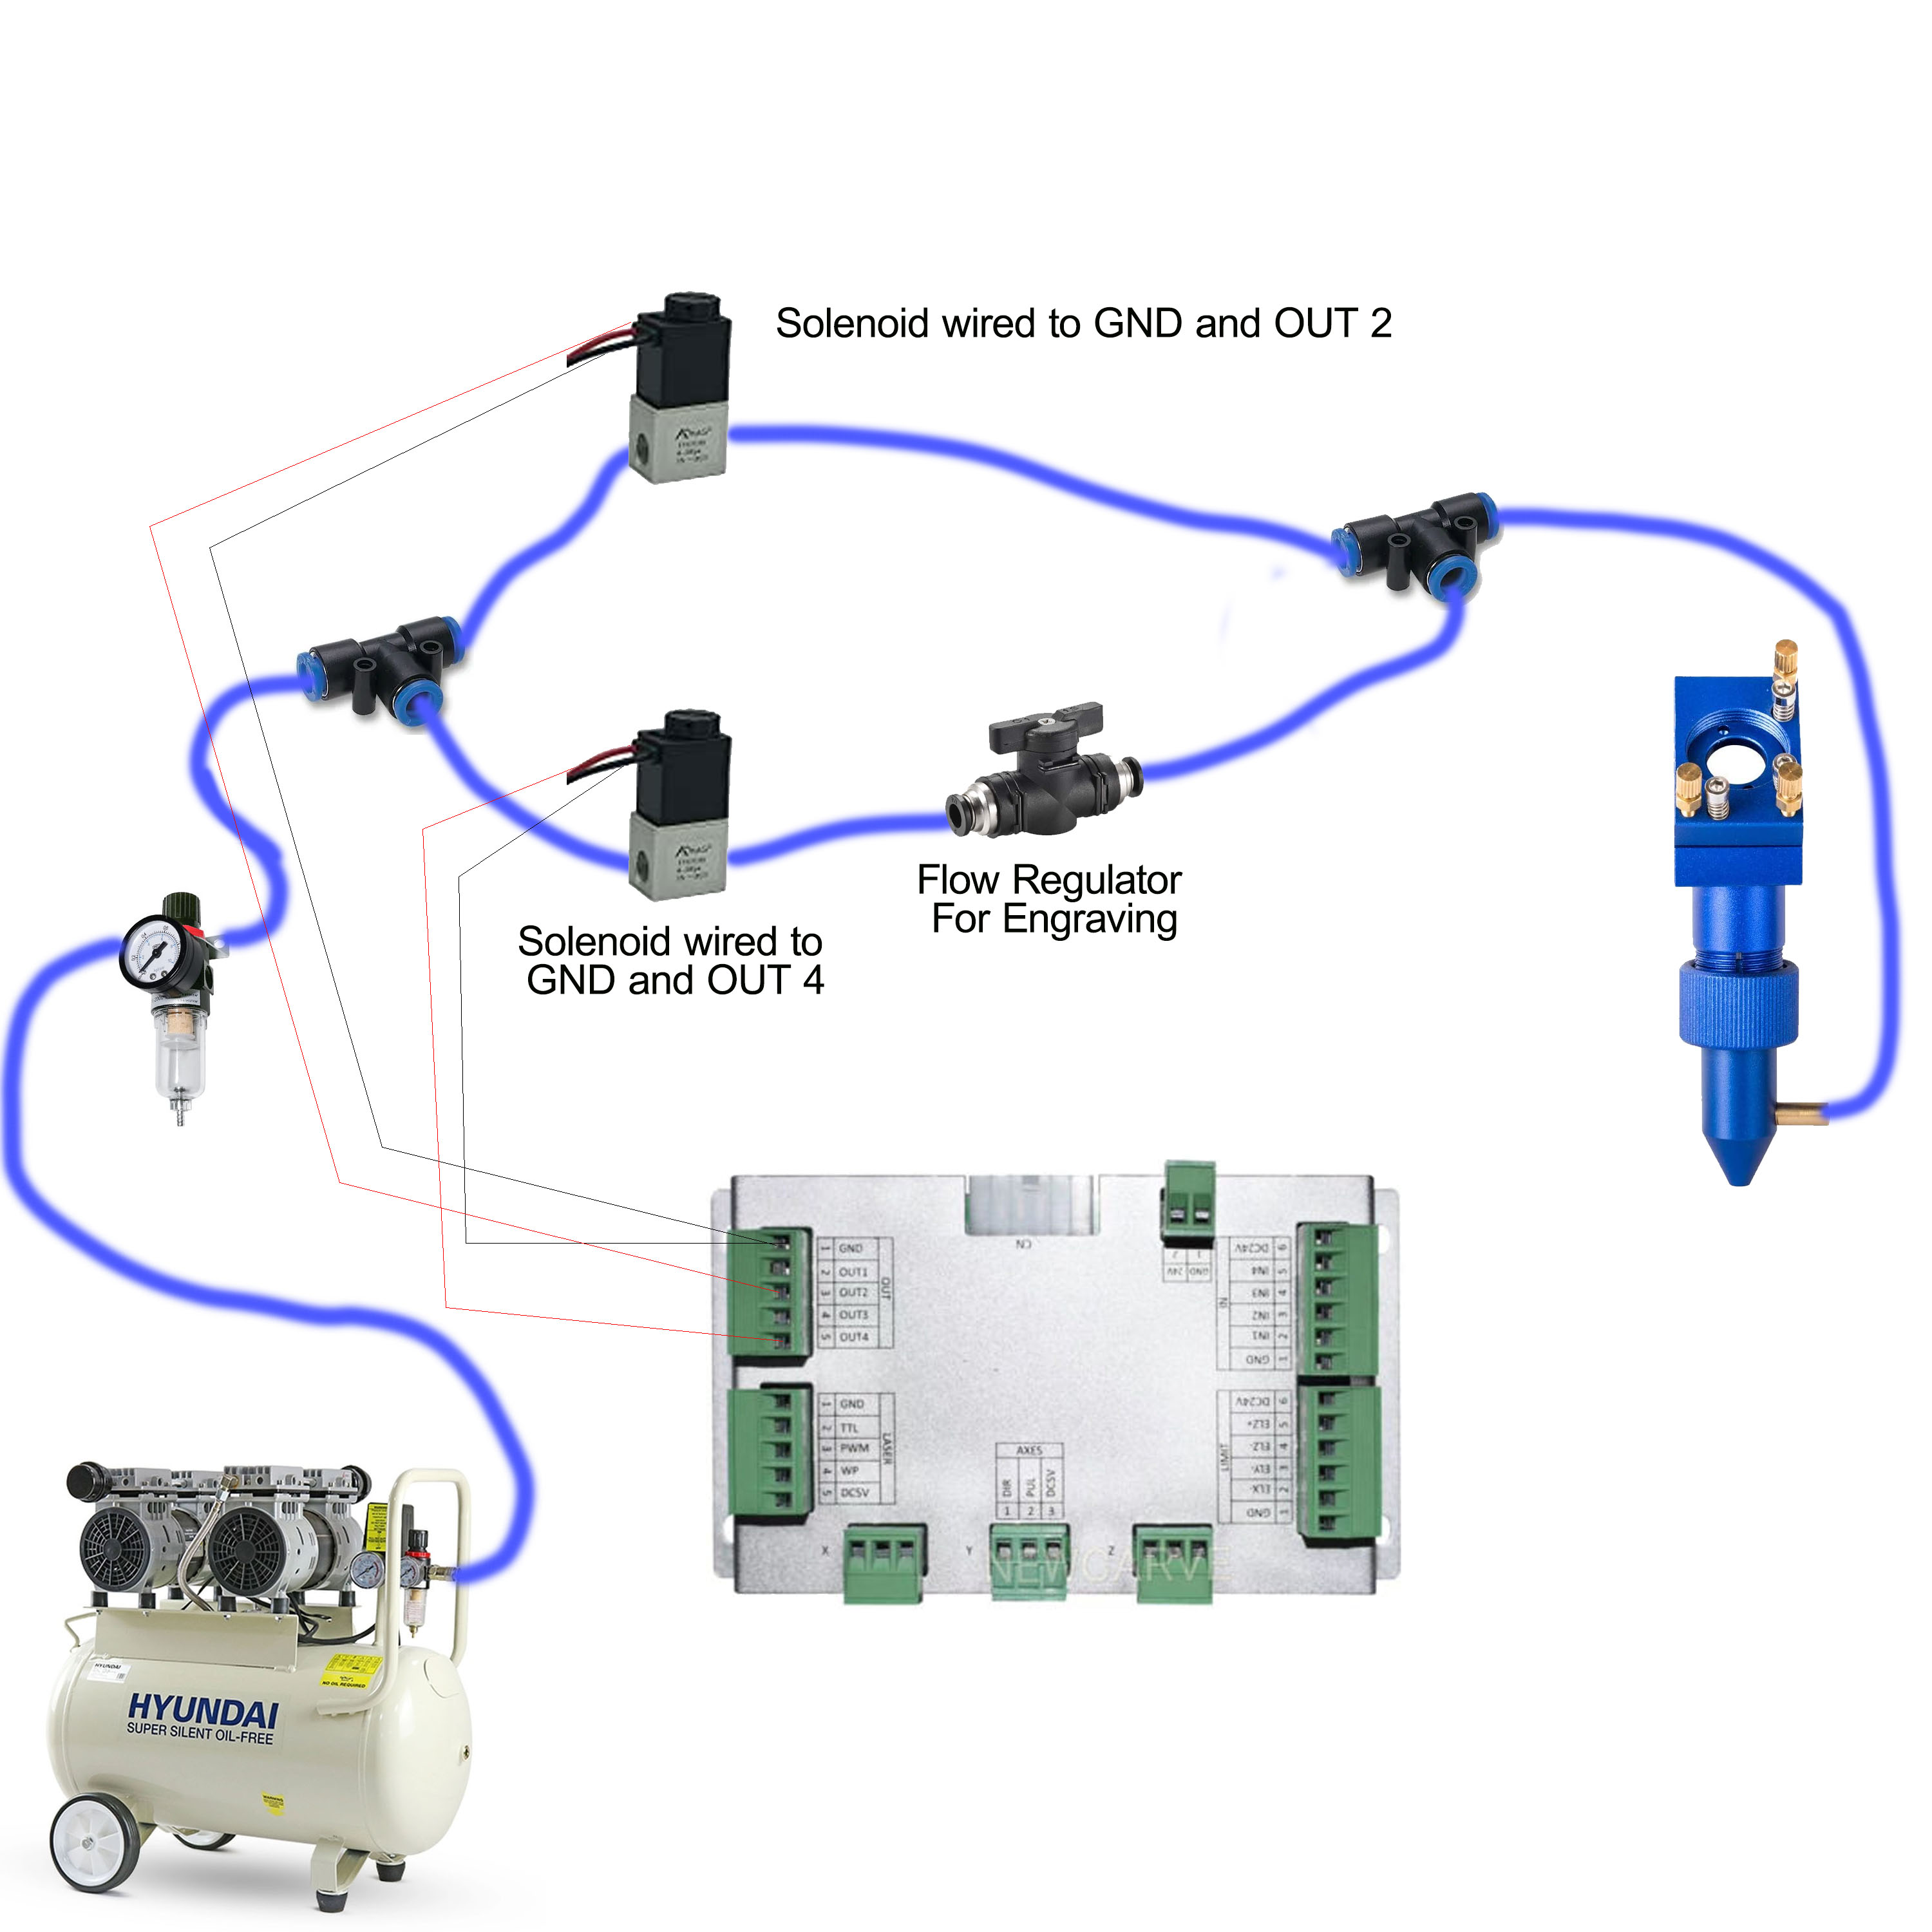
This actually makes things much simpler. With the set up below you should get high pressure air assist with cuts (cutting in and out as the laser fires) and low pressure air with all engraving. You don’t really need to use the air assist switch in lightburn, unless you want to disable the air completely for some reason.
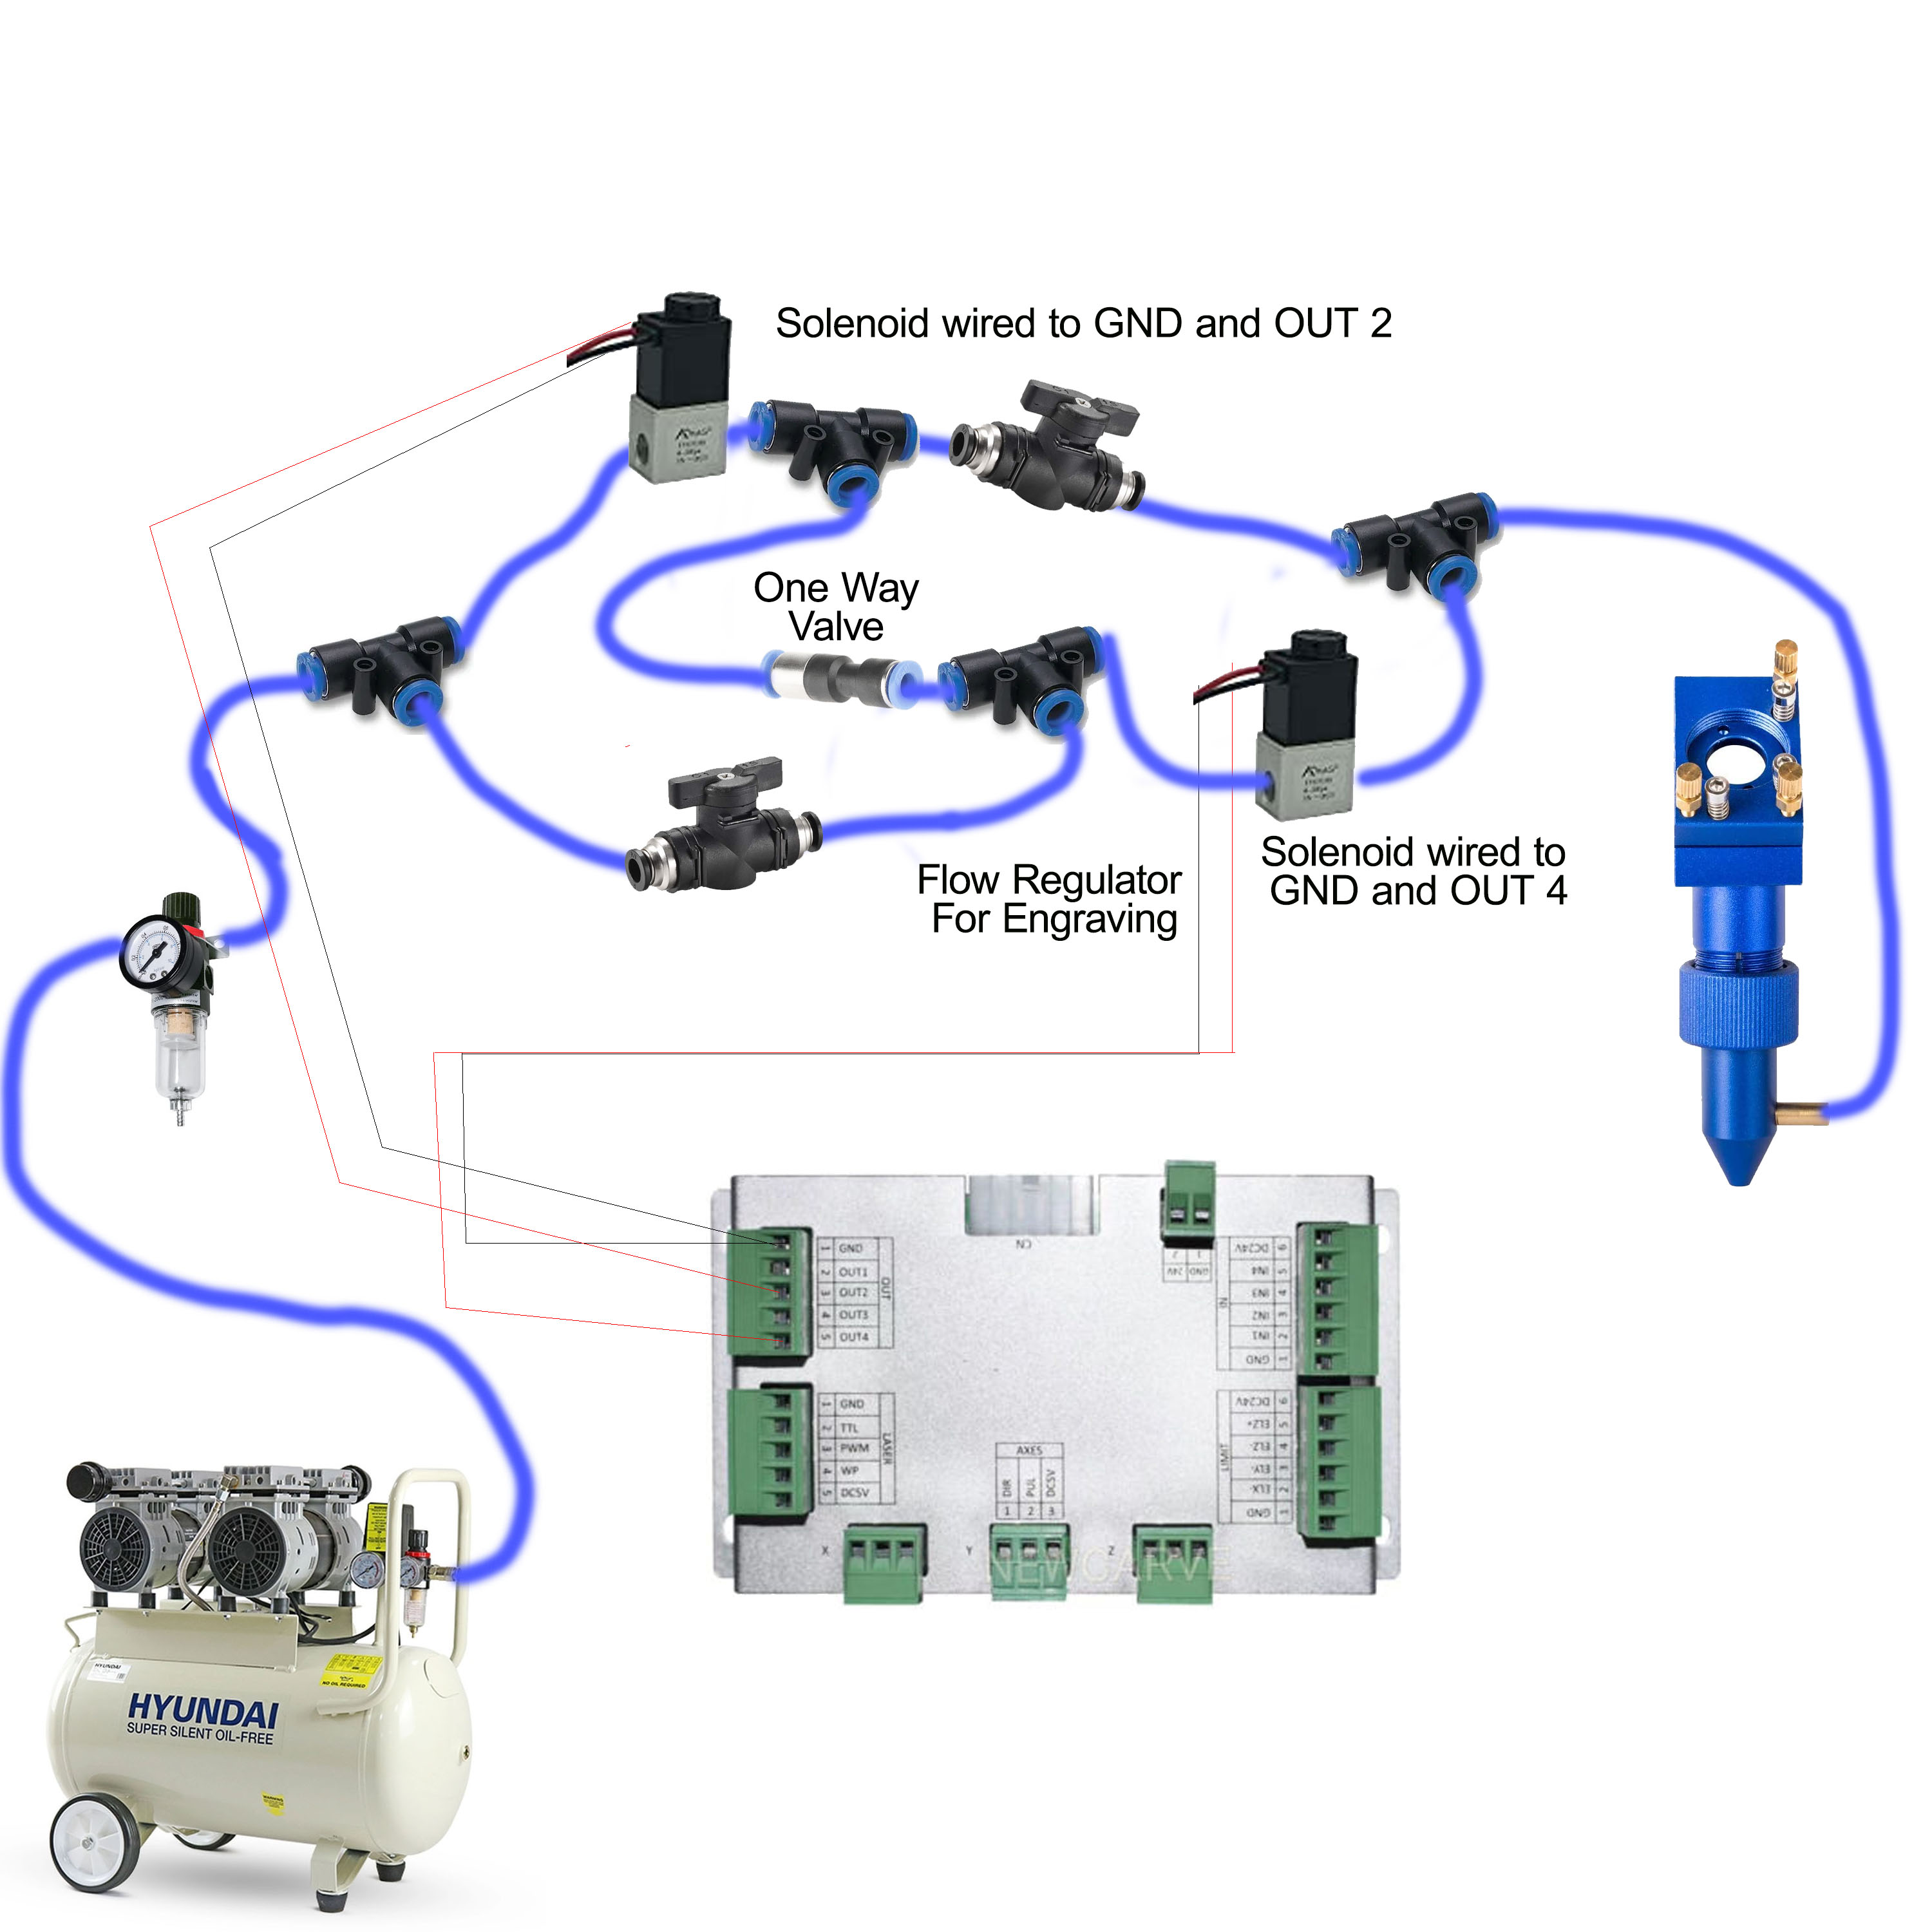
The one caveat with this is that you can’t affect the air pressure when you are cutting. Personally I frequently cut acrylic and wish to use low pressure air for this. I could use the regulator or install another flow regulator but I’ve decided to try out the following set up. It’s a total mess - sorry! - I’ll let you know if it works out.
Thanks for taking the time to clarify this Galvin. One question: if you are engraving a photo or fill (where it scans back and forth) does the out2 signal also turn on and off? Or does it only turn on when cutting/engraving a solid line?
Out2 on when raster engraving would drive the circuitry nuts I would think, as air solenoids are not intended to chatter like that.
It turns out that only a cut layer will cause OUT2 to go high ie only if Line is chosen in the Mode dropdown menu in Lightburn.
Out2 only turns on/off when cutting a line. When Fill or Photo Engraving, Out2 stays low ie solenoid will be closed and will not turn on and off really quickly.
This is essentially what I missed before, leading me to overcomplicate the whole thing.
I couldn’t actually find this information anywhere on the internet and I have found quite a few people asking, so maybe it is quite confusing and I’m not a total idiot!
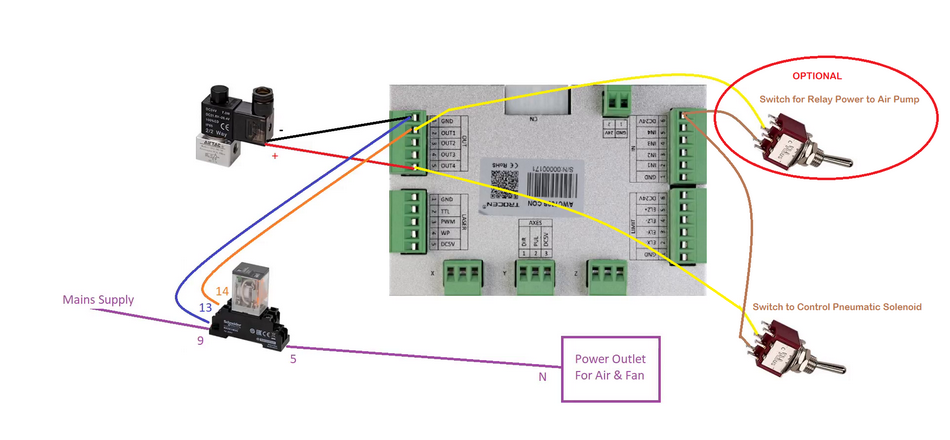
Valve on the left opens when you run a job. It allows the compressor input and goes through the restrictor delivering low pressure air while the job is running.
If the air assist is enabled, then right one opens bypassing the restrictor.
I’d buy MW laser a coffee and ask him about the output controls.
I’m pretty sure he’s done the ‘whole enchilada’ air assist before.
It would be worth the cost to clarify these outputs.
I think (hope) you’ve made them more complicated than they are…
Is that the compressor you have? Mine is so noisy I just ordered this one from Air Compressors Direct.
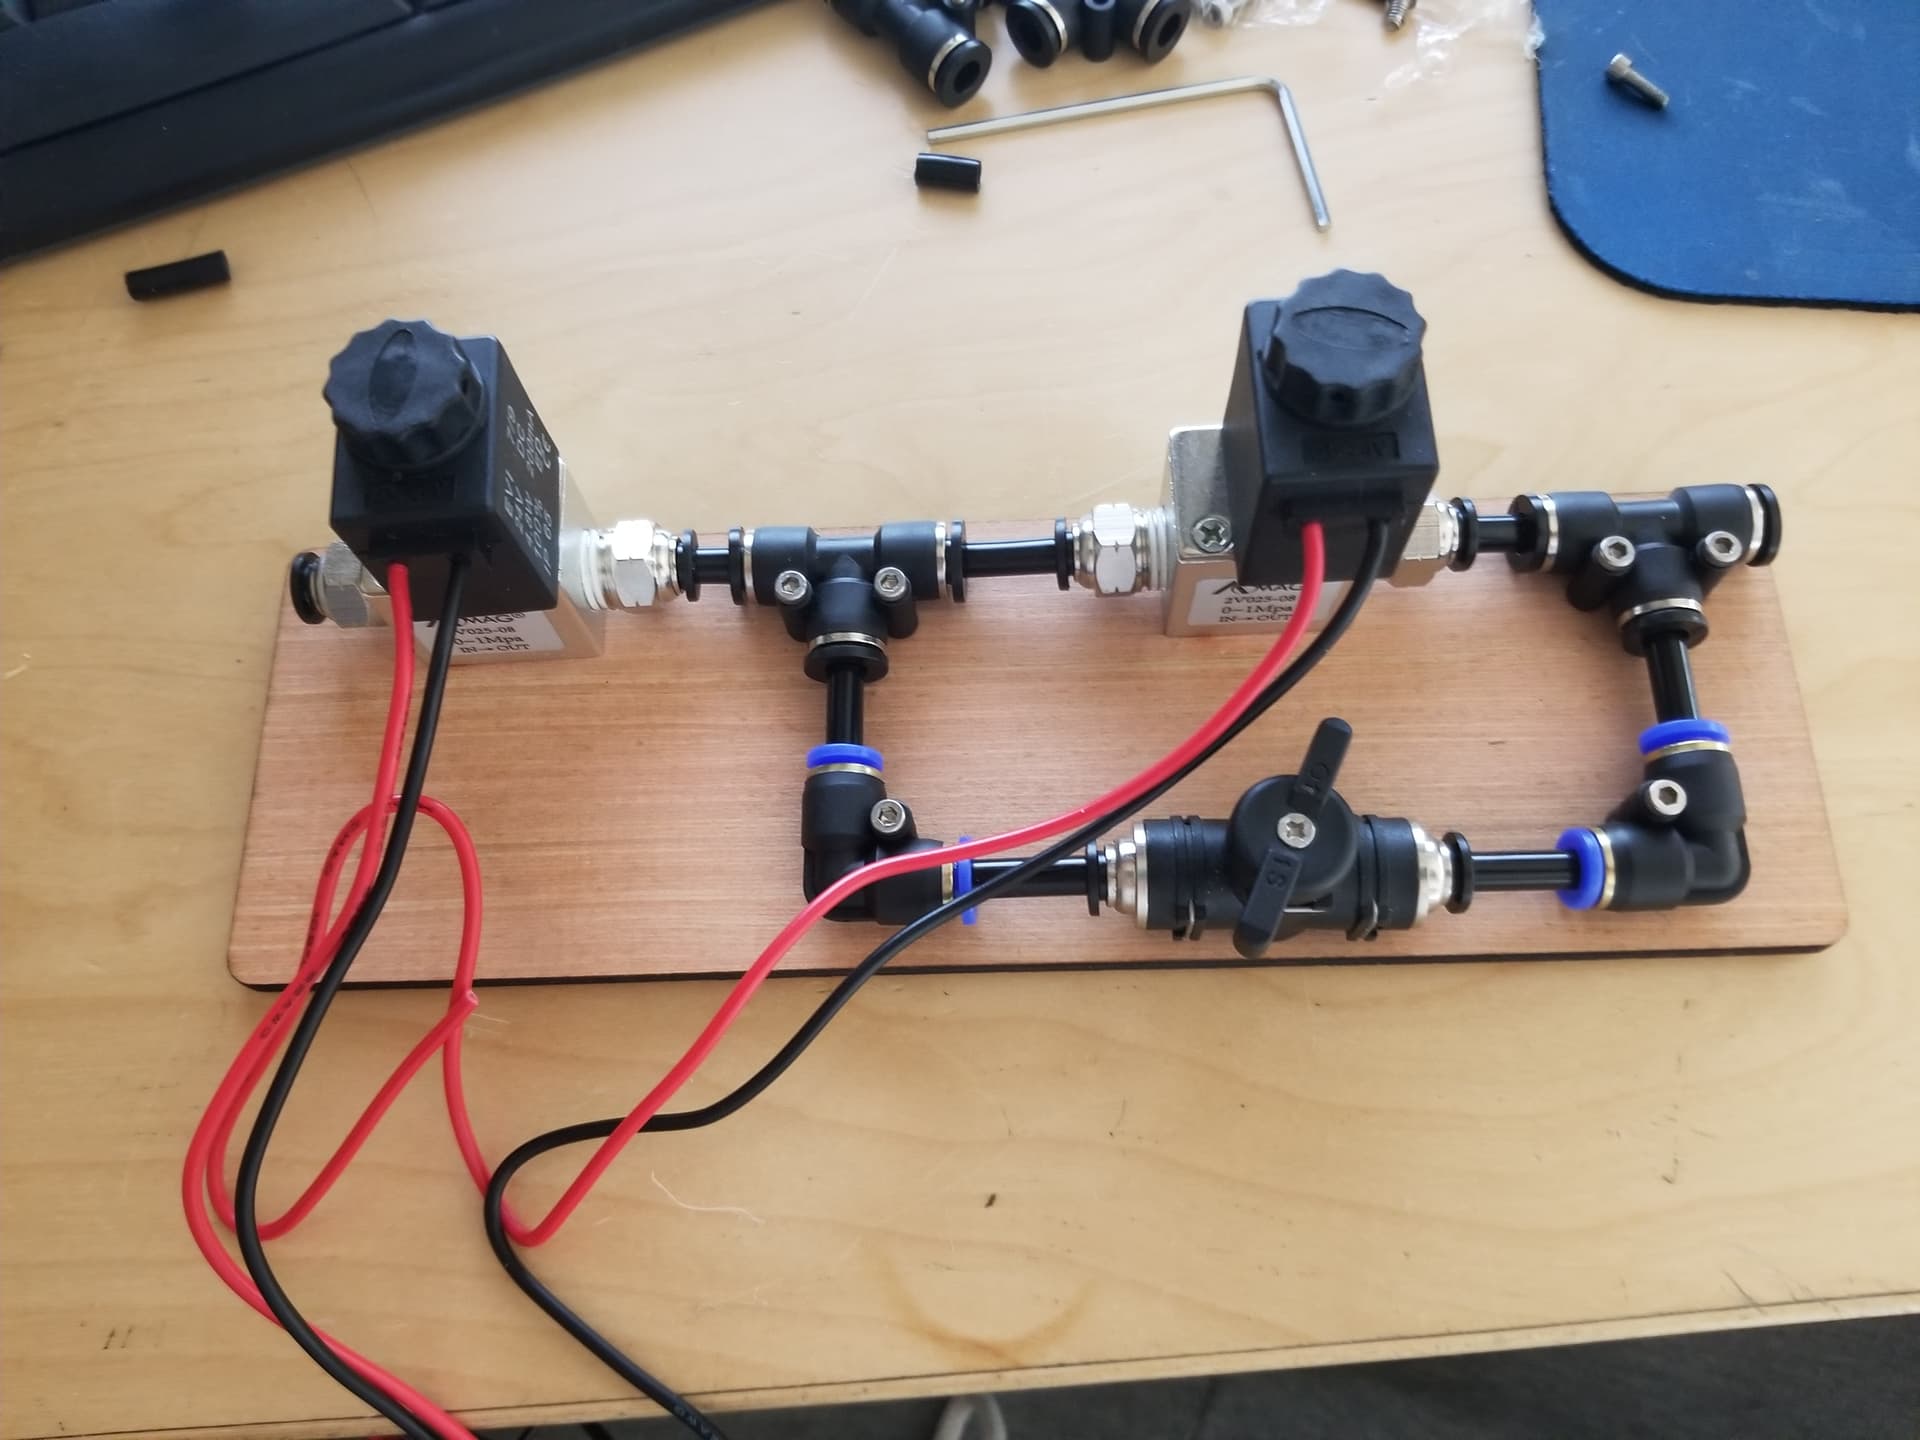
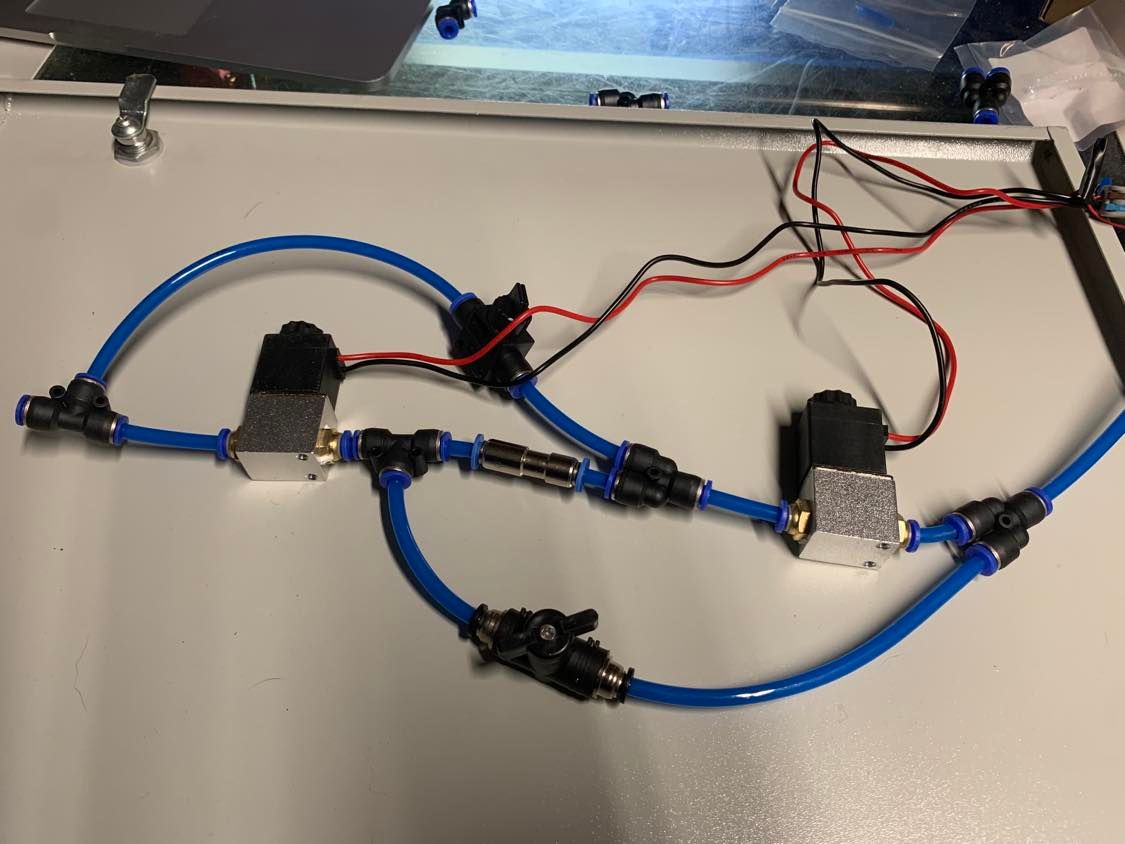
Here’s mine, Seems to work in the benchtest.
High or low pressure assisted cutting.
Engraving with independent low pressure.
And no rapid firing solenoids!
Yes, I’m in UK and I don’t think we have the California one over here. Mine gives really nice clean cuts and the compressor is pretty quiet.
The recommended duty cycle is only 25% and I’m not sure how long it would last if I was cutting 8+ hours a day. But for my use at the moment it’s perfect.
I’ve got a ‘cheap’ tool type that is a generic Chinese model… When it cycles on, you can’t talk over it. The ten gallon tank wasn’t really large enough either, doubled it on the new one. It was always cycling especially with a 30 psi cut…
Don’t know what the permitted operational period (pwm driven) is…
Is the upper ball valve for setting high pressure?
I set the high pressure limit on the compressors regulator.
You should post the schematic for how your solenoids are hooked up. I’m sure there are others out there that will need it.
Ok here are a couple of schematics.
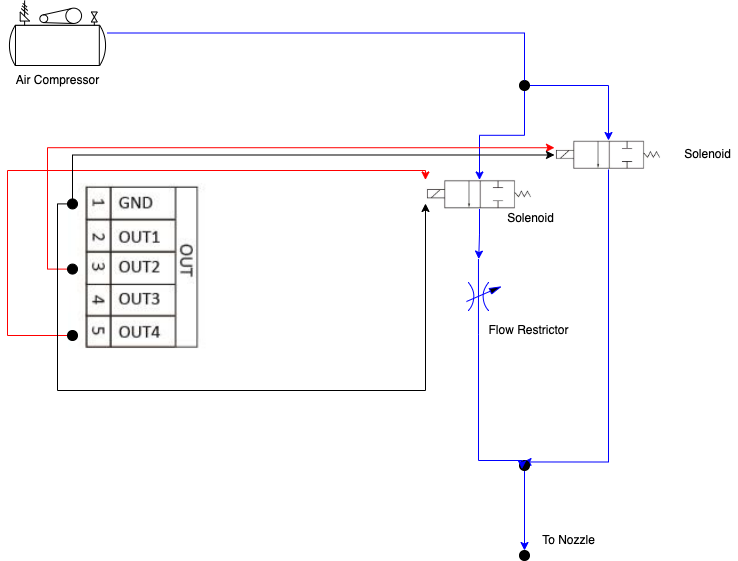
The first one has an airline coming from the compressor. Water Traps are advised.The air splits into two and goes towards two solenoids.
The one on the right is connected to Out2 and ground and will open in Line Mode when the laser is firing eg cutting.
The solenoid on the left opens whenever a job is running and the air assist switch is on. Thereafter it passes through a flow restrictor.
Then both paths meet and flow to the nozzle.
So this should enable high pressure when cutting, low pressure for engraving
I wanted to go one step further and enable two different pressures for cutting so I can set a lower pressure for acryllic. It was pointed out that you could just adjust the pressure on the regulator for this. I do actually have two regulators in line but I don’t really like to adjust them for this - perhaps because of where they are located - I just find it a bit fiddly.
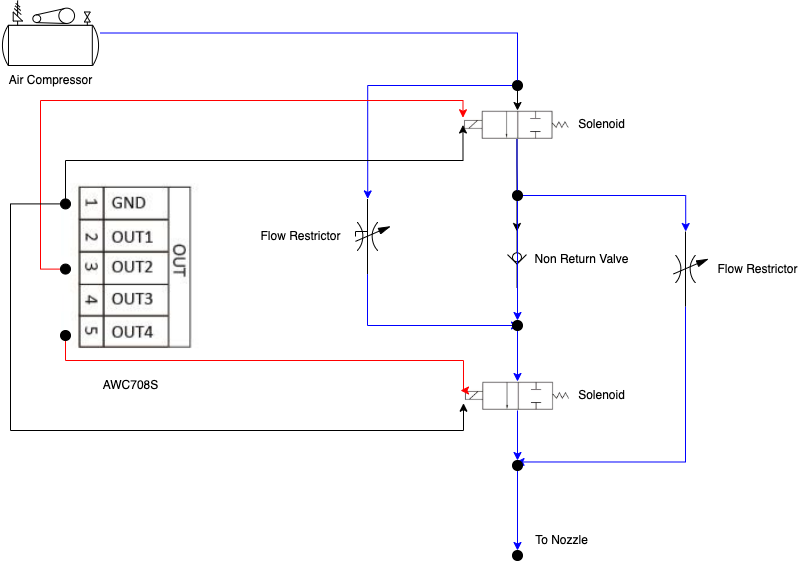
So I’ve made this other setup.
It adds a non return valve and another flow restrictor. The electrics are the same.
The flow resistor on the left is for the low pressure engraving.
The one on the right is for lower pressure cutting.
For high pressure cutting make sure air assist is on, for low pressure make sure it is off.
Hope this is helpful!