Let me ask this a different way. I created a template that included target/positioning marks. The template is to hold 10 corkscrews where I will engrave text. When I checked the Preview option, the template was offset slightly counterclockwise. This caused the text engraving to be too high on the corkscrew. I’ve reset the Print and Cut settings multiple times, but get the same result. What am I missing?
An image of your problem.
You can move the fixture under the laser, which is intuitive. Or you can move the work in the opposite direction of the error you see at the laser. This will not make sense until you play with it. Otherwise, you will feel like you are chasing your tail.


By using limit switches and Absolute Coords. Once you get your drawing aligned with the fixture, it is Plug and Play after that. Of course, you must have a system that ensures the fixture goes back into the exact same position each time.
I am confused with this conversation…
I thought by using the target/positioning marks, that in itself eliminated the need for the fixture to have to be in the exact same place or alignment.
Am I wrong?
Nope, I do it all the time, specifically to avoid having to put the fixture in the same place every time. The overall accuracy seems to be give-or-take half a millimeter, worst case:

However, that has some ground rules:
- The fixture must not move at all, ever, after the P-n-C alignment happens
- The P-n-C targets must be in focus for the alignment
- The material must be at the same Z-axis level as the targets or
- You must refocus on the material after aligning
I suspect the top of the corkscrews sticks up above the fixture, so you must focus on the targets for the P-n-C dance, then refocus on the corkscrews for the engraving.
If doing that doesn’t improve the results, upload some pix so we can look over your shoulder.
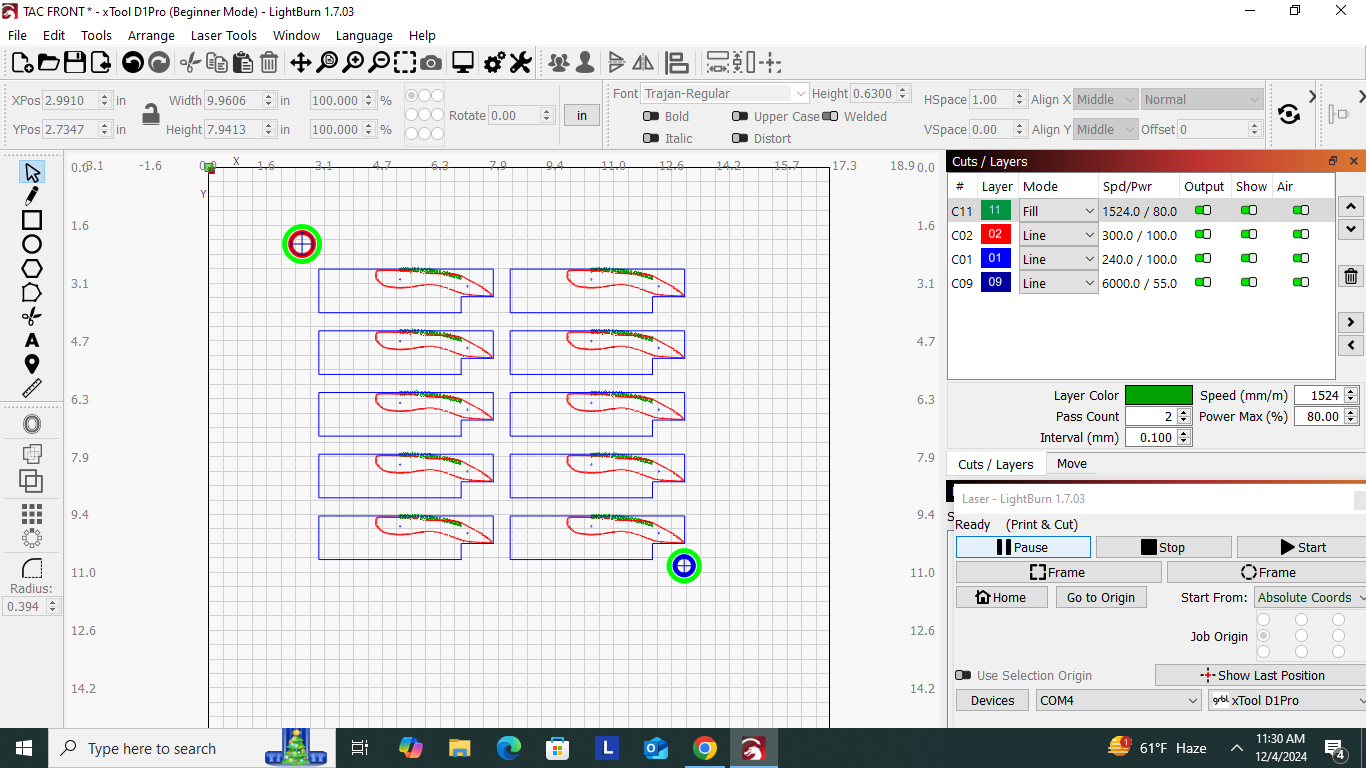
I used Absolute Coordinates and added the Target points when creating this template. When I set up the template for engraving, I again used Absolute Coordinates, starting in the Home position I used the Move tool to jog the laser to the upper left target and marked it with the PnC tool. I set my laser height to the template material. I again used the Move tool to jog to the lower right target. I marked it, set it for “scaled”, and hit the Home button.

When looking at the Preview screen, the template is obviously tilted.
My questions are:
What makes it tilt?
How do I correct it?
After marking the Target points, can I adjust the template manually?
That’s the adjustment required to align the pattern in the LightBurn workspace to the targets on the platform. The fixture isn’t aligned with the machine axes, so P-n-C is doing some heavy lifting.
The targets seem to be on the cut layer and the lower right one looks janky. Be certain you select the middle of those crosshairs, not the individual lines making them up; the entire tilt may come from an incorrect target selection point.
Is the template a different size than the actual objects?
If it’s the same size, then scaling doesn’t make sense: the engravings will come out at a different size and in different positions than the actual objects, which surely is not what you want.
The machine home position is not connected with P-n-C, because it depends on the actual machine coordinates.
If you are re-homing the controller by having it bump off the homing switches, then it will likely come up with a slightly different set of coordinates than before, which will put the pattern at a slightly different place than you just aligned it to.
You’ve told LightBurn where the template is, it’s created the adjustment required to lay the pattern at that spot. Moving either the design in LightBurn or the template on the workspace will wreck that alignment.
The workflow should go like this:
- Put the template on the platform
- Load the things to be engraved
- Do the P-n-C alignment dance
- Select the
no scalingalignment - Run the job
Doing anything else pretty much guarantees something will disturb the precise alignment you need.
It worked! Thanks to all who took the time to help me out. Very much appreciated.
Mike
For others mark the one that worked as Solution so its easier for them to find.
This topic was automatically closed 30 days after the last reply. New replies are no longer allowed.