If anyone has an Atomstack A70 Pro or Max and would like to use the Red X to position the laser when framing here are the values I used on my machine. You may have to make adjustments for your machine but this should get you pretty close.
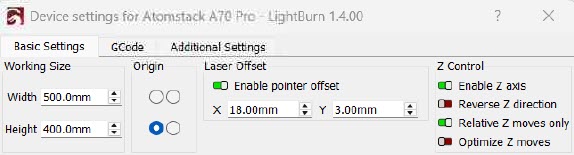
To test this put a piece of stock on the homeycomb bed. In the Device Setting screen Enable the Laser Offset and enter the values shown in the screen shot below. In Lightburn draw a box the same size as your test piece. Use the Red X to position the material so it outlines your test piece when you frame. Place the Red X Cross on the lower left corner of the test peace when you frame. Then run the job in low power and the laser beam should outline your work piece exactly. If your off a bit make adjustments to the X and Y Offset in the Device Settings Screen as needed.
You can use this same procedure for any machine but you will need to determine the starting values for the X and Y Offset. What i did was put a test peace on the laser bed. Then fire the laser at low power and use a metric scale and measure the X and Y offset between the Red X and the Blue laser beam. This should give you a starting point.
After this is all done you can now use the Red X beam to position and frame your work piece. Once this is all working you can also turn off “Laser On When Framing” in the Device Settings screen
There is something in the lightburn documentation on how to do this. But its a very complicated process. My instruction are much simpler to implement. But if you like there instructions better have a blast.
No, I meant something different. It was not criticism about your process. I wanted to say that if the laser has a pointer integrated, the manufacturer should provide the offset values in the manual. So that you don’t have to examine them.
The Cross Hair was part of the machine when i bought it. There was nothing in the manual for the Atomstack that mentioned anything about how to set Laser Offset