I have an atomstack a20. All of the material setting atomstack gives are a max of 3000 mm/m. But if you search it up, they state the maximum speed is 30000 mm/m. Now, I understand that mechanically, it’s usually not a good idea to run any machine at its maximum anything (speed, power, load, etc). But with that said, does anyone have anything to weigh in with in regards to an efficient maximum speed? I know that I have to do a material test with everything, and that will determine my best settings. But will it do any harm to the machine to run it like 7 times the speed I have been?
Edit: well now I’m confused. I’ve been running some different speed and power combinations this morning, trying to bump the speed up. I have to keep increasing power as the speed goes up, which seems natural. But the test I just ran was from 15000-25000 mm/m in 1000 increments, and 45-75% power in 5 increments. Here’s the part I don’t understand: the preview said it was going to take 15 minutes, which seems long for the speeds it’s testing. But then it ran over by another 12 minutes…
Have you updated the simulation settings from the actual controller settings?
That may be true, in a specific direction on a sunny day with a stiff tailwind, but such claims generally live on the wildly optimistic side of truthful.
The machine’s actual maximum speed limits come from the GRBL $110 and $111 settings, respectively for the X & Y axes. You can get to those through Edit → Machine Settings with the controller turned on and connected.
You can command any speed you want, but the controller has the last word on the speeds the machine will actually reach. If what you want lies beyond the settings, the machine definitely won’t go that fast.
I was just looking into all of this before seeing your reply. I’ll have to check some settings
After reading some older threads with other machines, it’s highly likely that it is a bogus number anyway. The material suggestions are all listed at 3000 mm/m directly on atomstacks site. So I should assume that is likely a max that they recommend. Which is hugely disappointing lol. 32 minutes for a 4"x4" image burn is pretty lame.
Lol, yeah I’m finding that out. It was kind of a spontaneous second hand buy: “hey, We can make some stuff and make money.” Admittedly with precisely 0 knowledge of laser engraving.
I’m making due with some things just fine. But others not so much. I’m thinking a small CO2 will be my goal to work towards.
Edit: though I may be able to push some numbers if I think about it. If I’m only burning at 25% power, I ought to be able to push the speed a bit after I check/modify the value in lightburn
I was where you are at 2 years ago and was looking at the K40’s. I quickly realized that most of them (at the time) were not Lightburn compatible (unless you paid extra for a LB compatible controller), had a very small bed size and it was difficult to get a rotary under. Ultimately, I got a 50W OMTECH (there are many other good brands out there as well), and even though it was about 3 times the price of a small K40, it was the best decision I’ve ever made. When asked (I realize you didn’t) I tell folks to buy the biggest one they can’t afford, it saves you from outgrowing what you thought would be big enough (I know, because I had to buy a bigger one a year and a half later). Just my 2 cents for what it’s worth.
I appreciate it. I’m always willing to take advise and critique. I was looking at some k20’s on Facebook, as well as a giant omtech for $9k lol. Far too much out of my price range for now. But I’ll get there…and then re-learn everything I’ve been doing ll
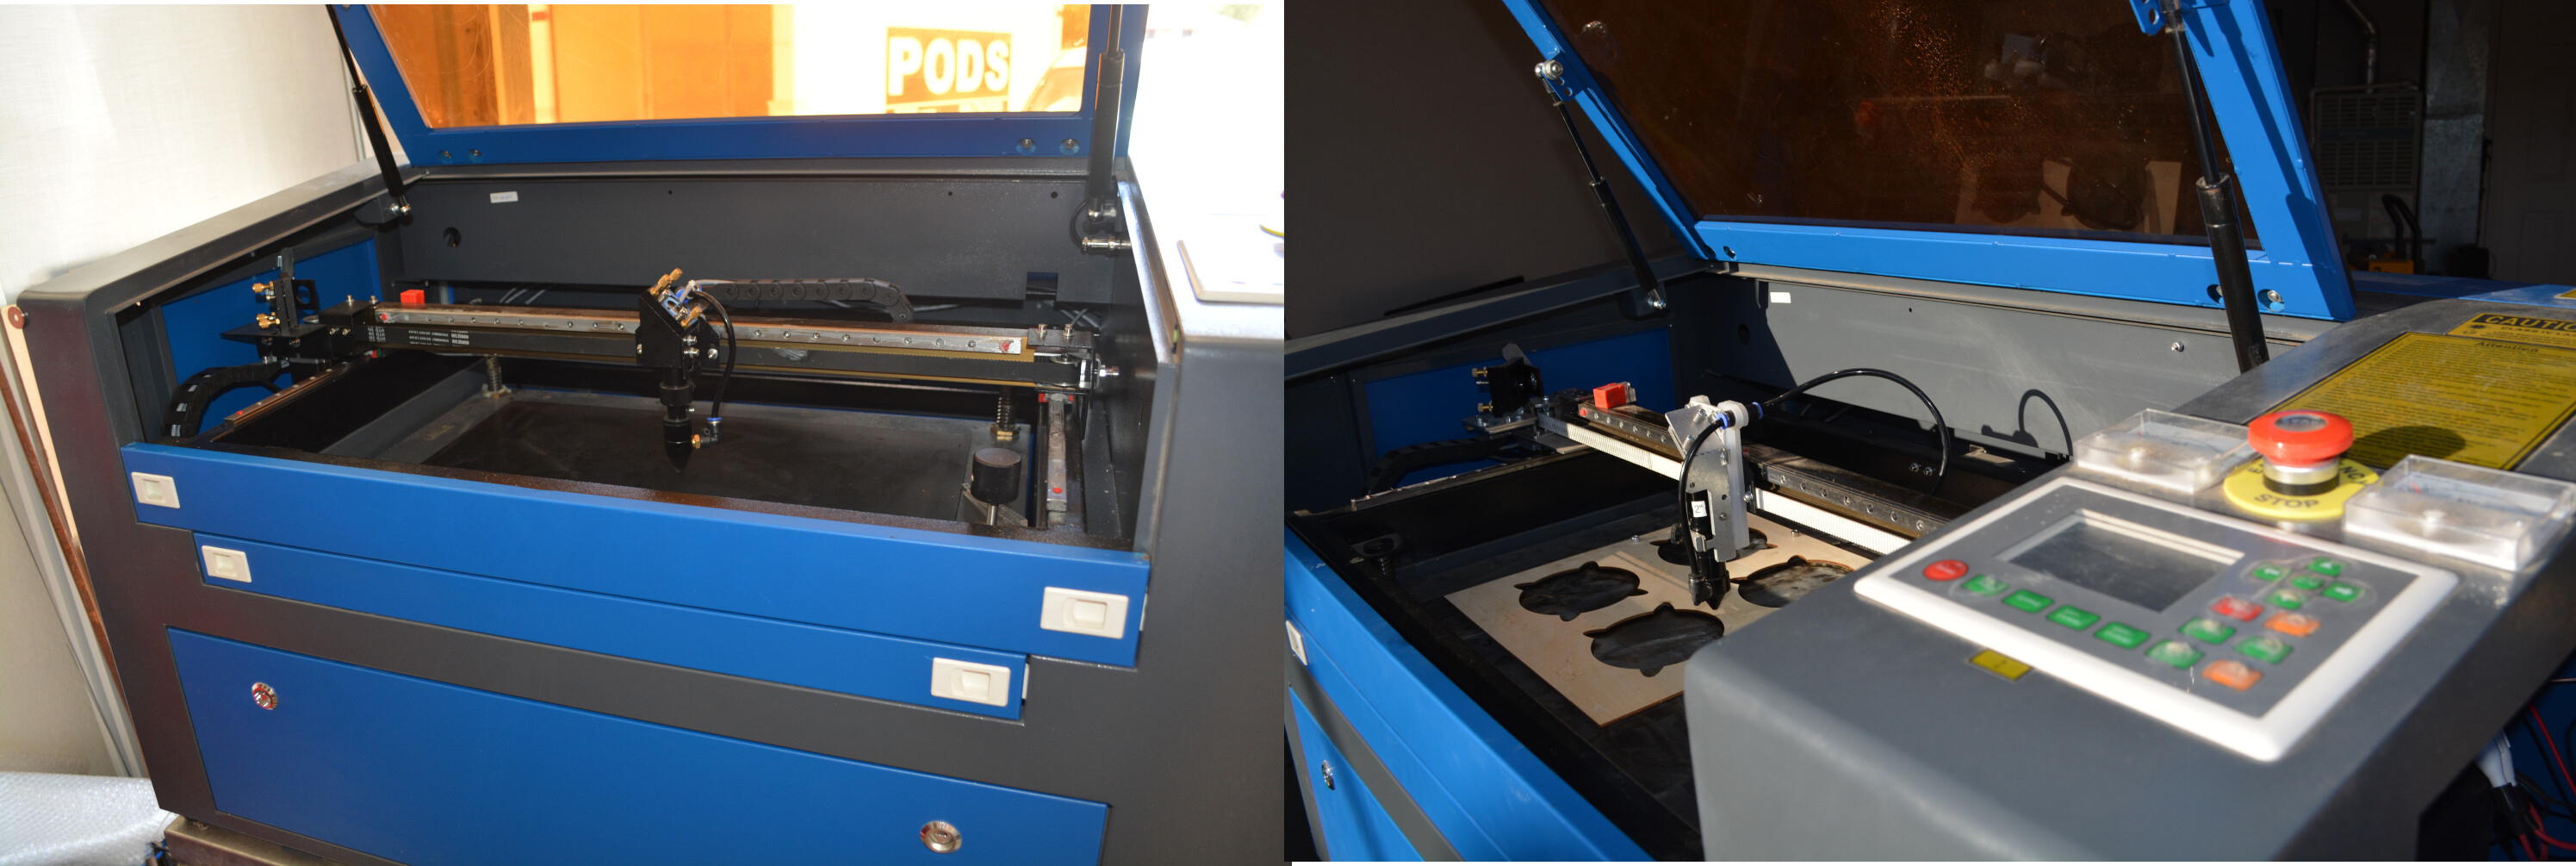
I got a OMTech China Blue a few years back… I have modified most of it at one time or the other.
Most of the good stuff, came from Russ Sadler. I had to do lots of work and a bit of head scratching to get every part to work properly… It was a very educational, time consuming and relatively expensive for a new machine.
The spouse won’t tell me it’s costs over the $2k price tag without chiller… Probably removed 5lbs of from it. Many of these parts look identical, but one from machine A won’t necessarily fit machine B.
Photo on the left is close to what arrived from China, sans honeycomb bed, that I tossed. Almost current on the right…
If I’d known then what I know today, I’d buy this one in a heartbeat.
All the issues I have corrected are fixed, even some I haven’t tried to correct… Probably out of your price range, but thought I’d throw it up there anyway. They do have a tendency to sell out…
This is a bit of how he developed it.
I believe this video is on the Cloud Ray web site.
Don’t get hopped up about speed… I rarely run over 300mm/s for any job and this is pushing the lps. I have run 1650mm/s, but it’s all academic, I’m easily outrunning the lps response time.
I’m sure there will be no comparison to Atomstack as far as performance
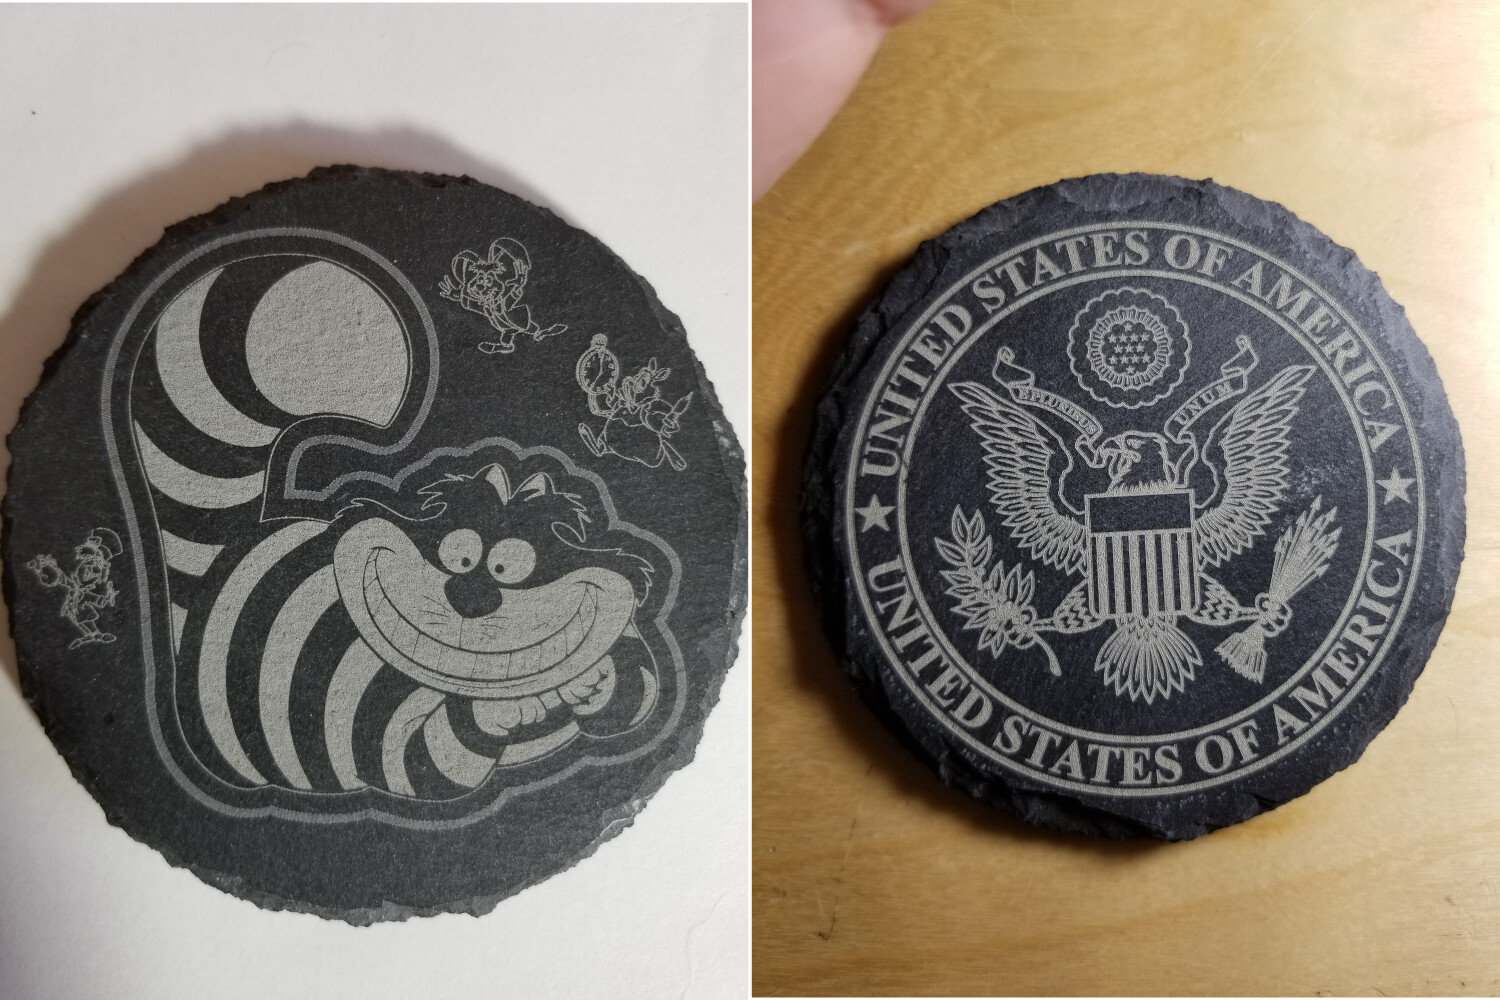
My 4x4 coasters take 45min each. It is what it is. Like Ed said, cheap, fast, good…pick two. Wanna go fast and have it look nice? Take out a second mortgage for a nice galvo machine.
I have a fast diode machine. It’s rated at 48,000mm/min. I’ve tested the daylights out of it and while technically capable of reaching that speed (in X, for a small portion of the total travel), it can’t do any WORK at that velocity. The fastest I’ve been able to do anything meaningful (with the quality I expect) is at about 10000 and that’s fringe. I very seldom go over 7500 (20% of its “potential”). Ratings are for ads to get sales and generally don’t reflect reality.
45 min, $300 machine, 6000mm/min, .04mm interval. A Galvo could do it nicer in probably a 1/3 or less time for 20x the cost.
I appreciate the response and info. I’m coming to learn and accept all of this. One day I’ll have some badass machine lol.
I’ve managed to do some more test runs, and it seems to run at 6000 mm/m just fine. And as it turns out, that’s the settings in lightburn. Did an 8x8 piece in a little over an hour. I still need to adjust preview configuration for timing though
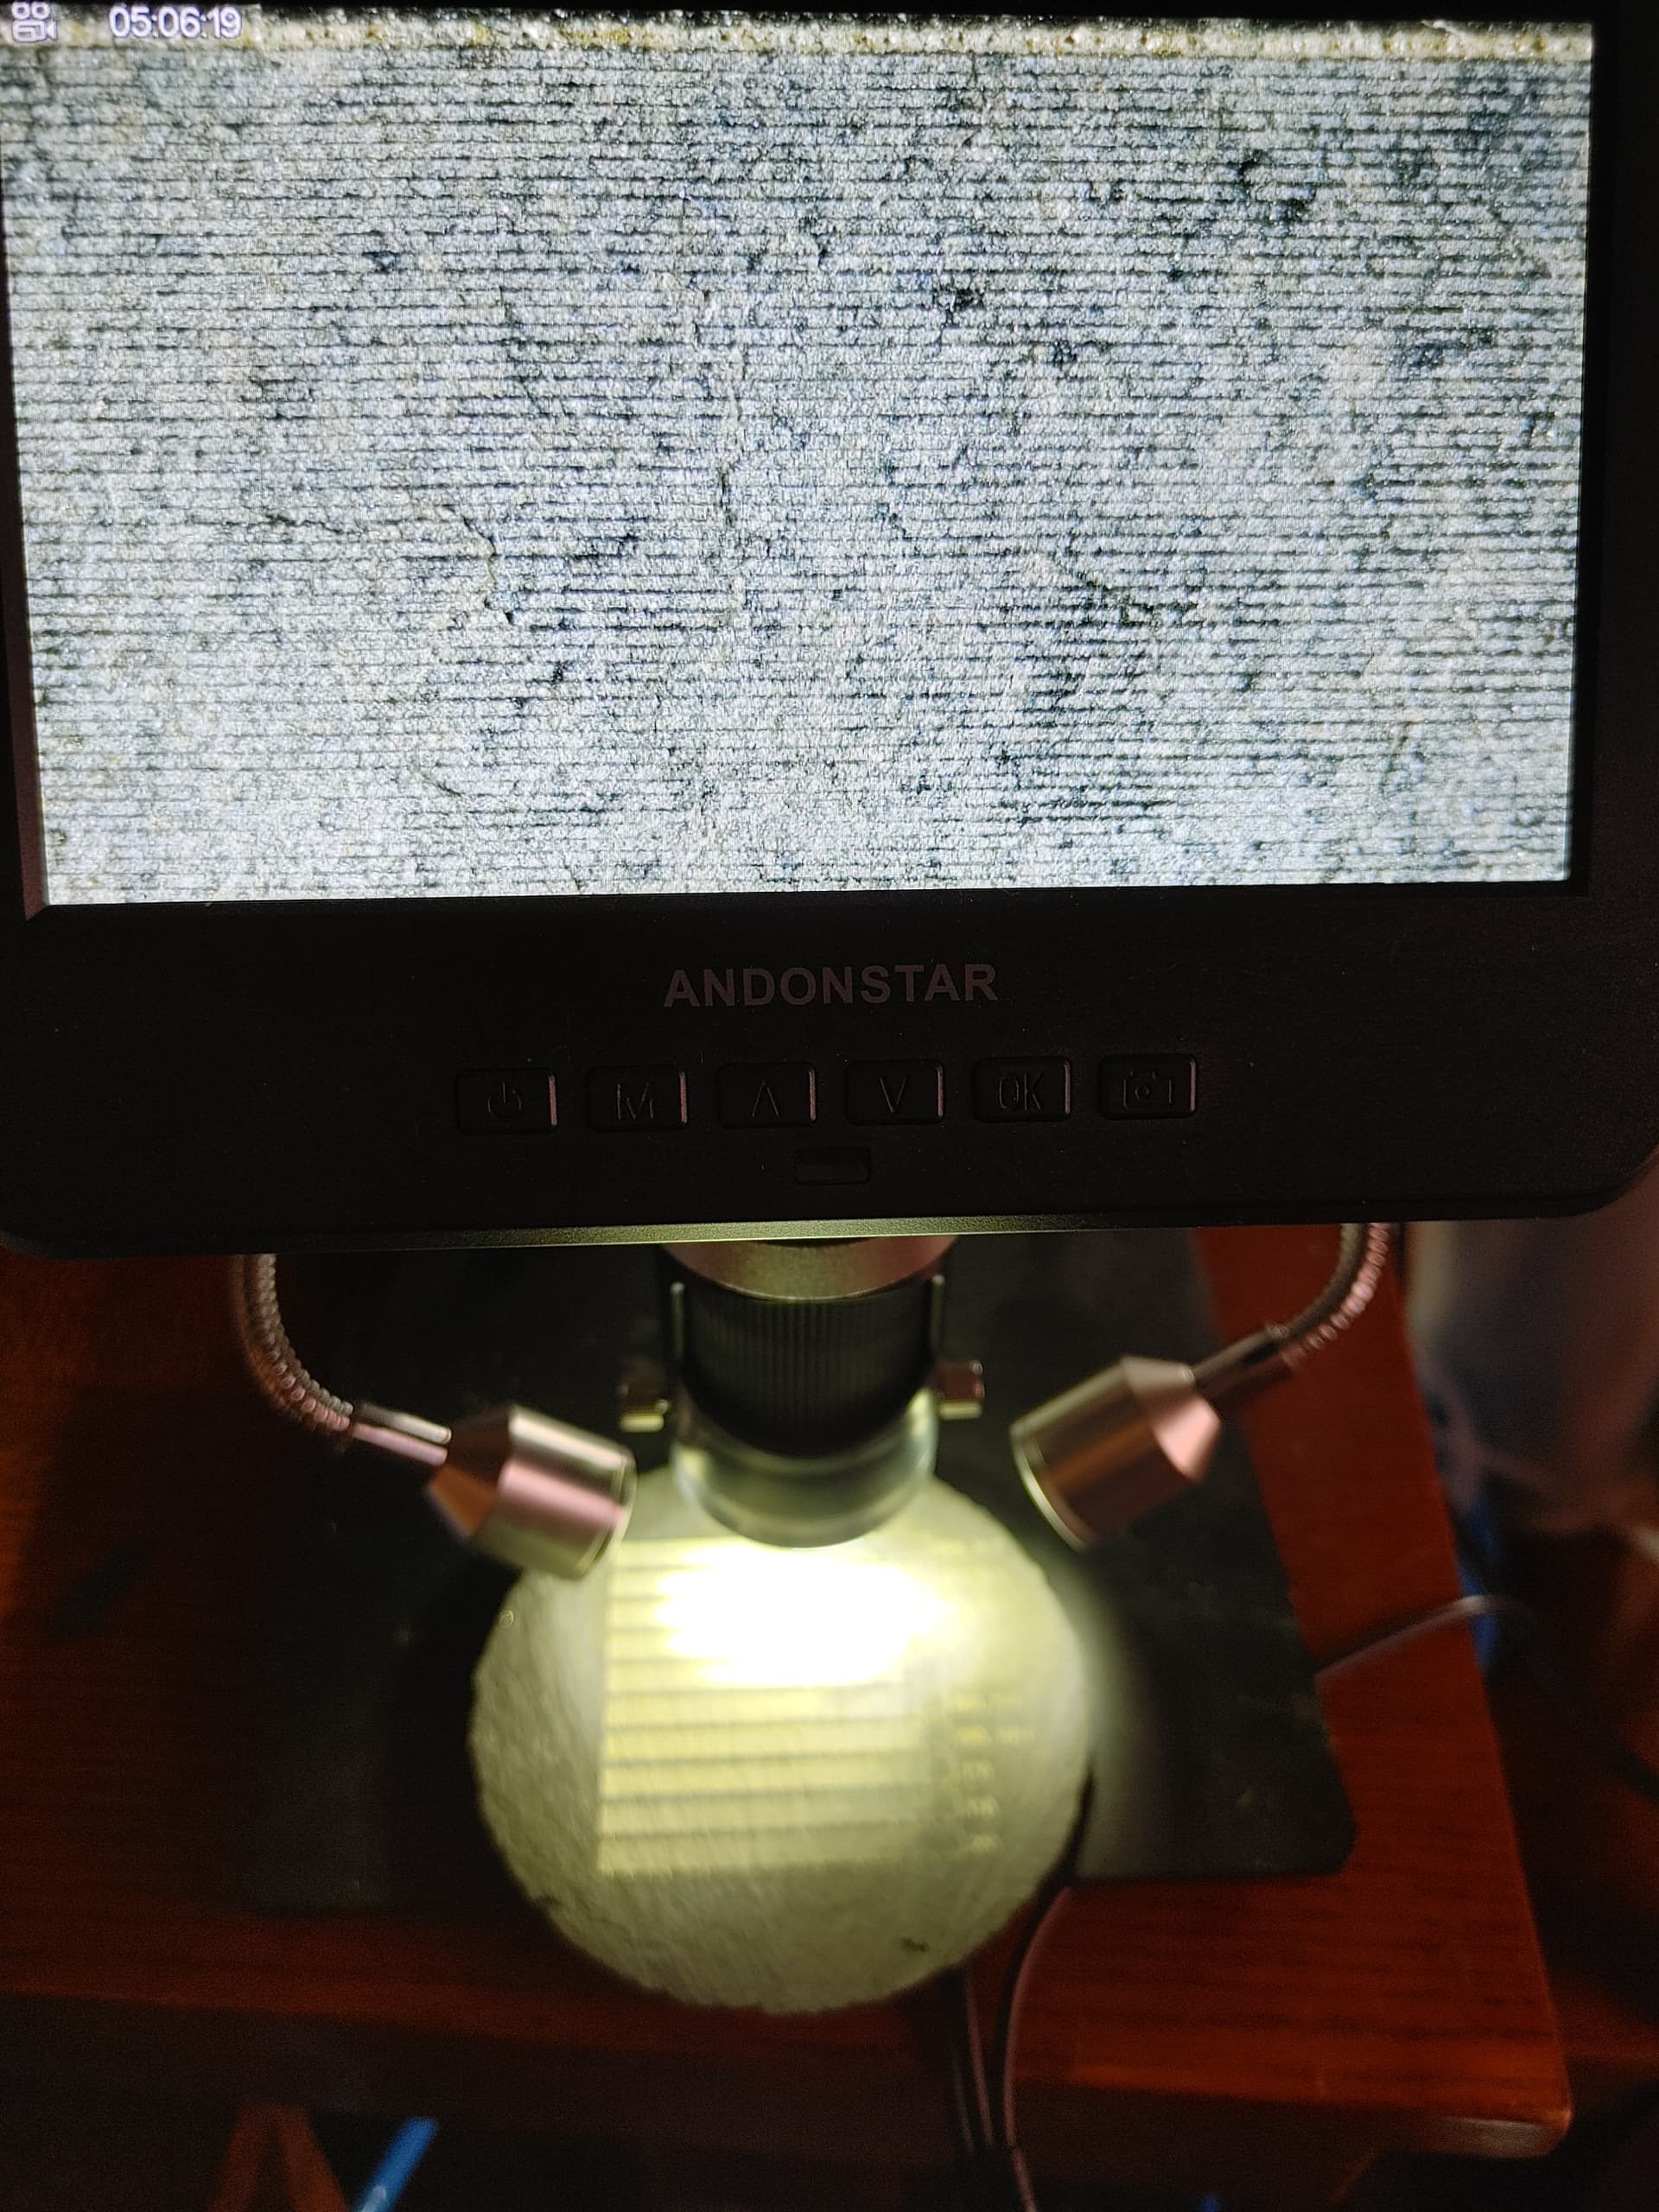
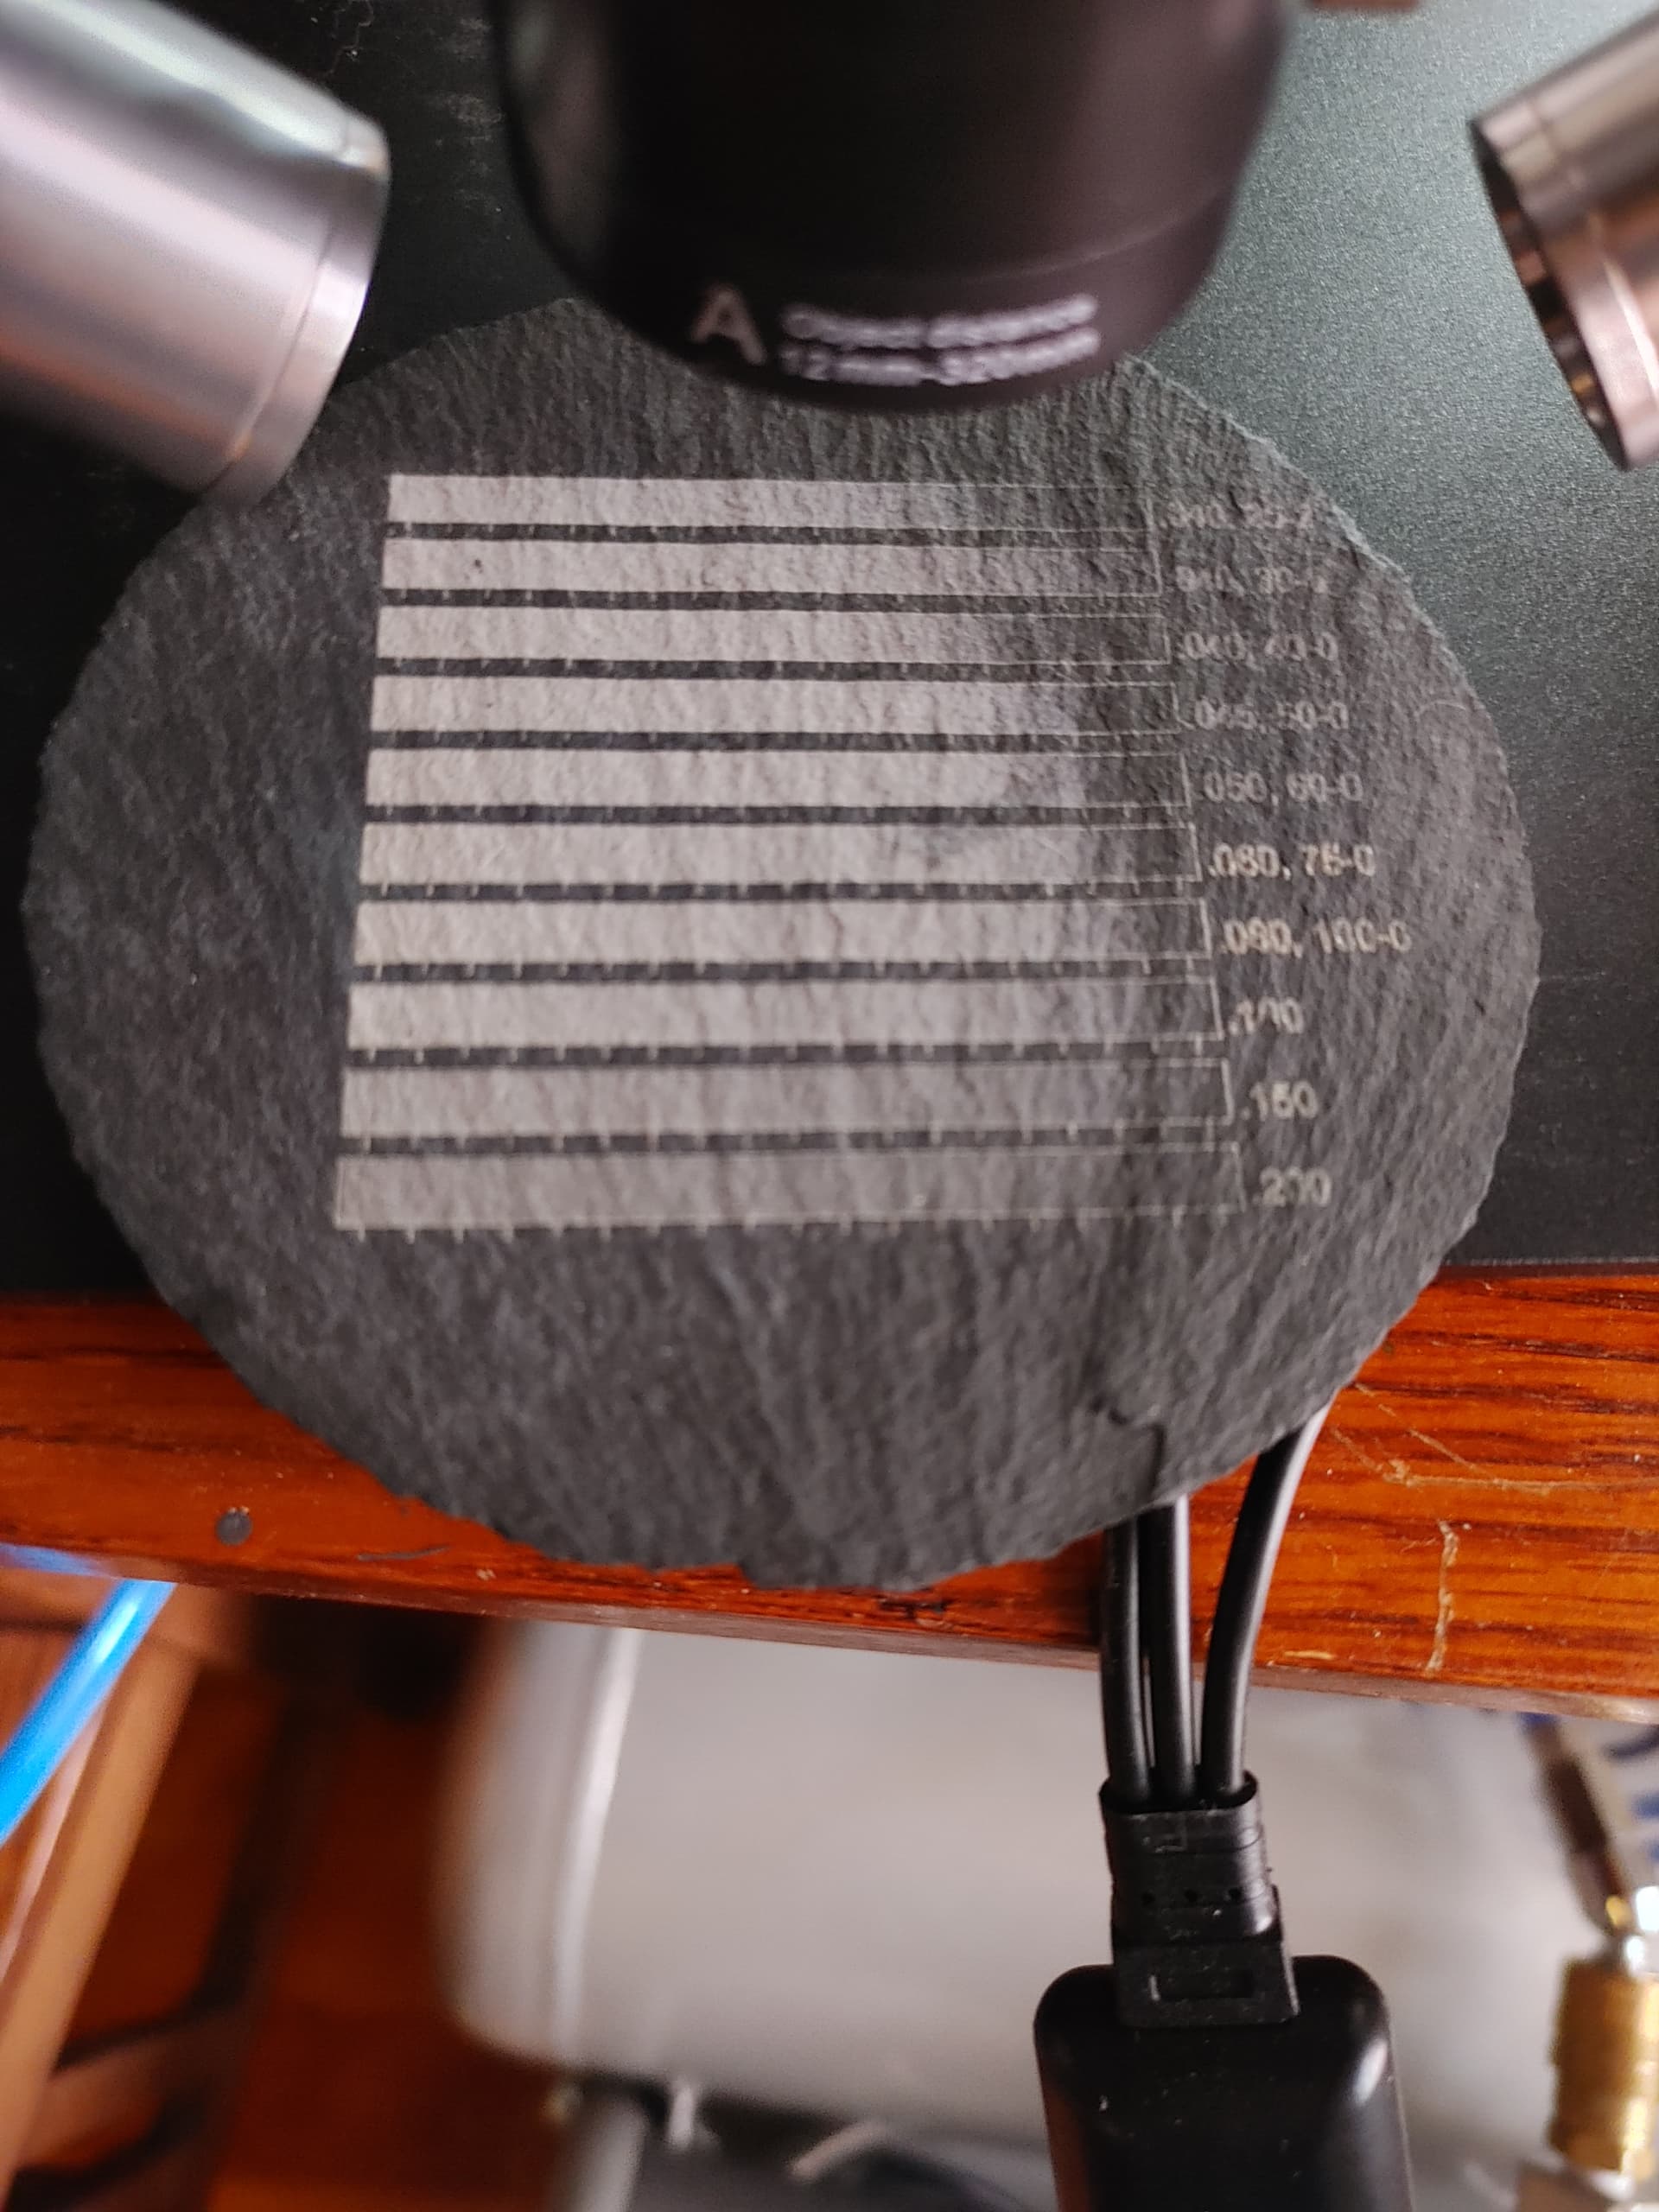
One set of MANY tests… I don’t trust mfg specs but I do trust my eyes.
.040mm is on the screen. Notice the gaps.
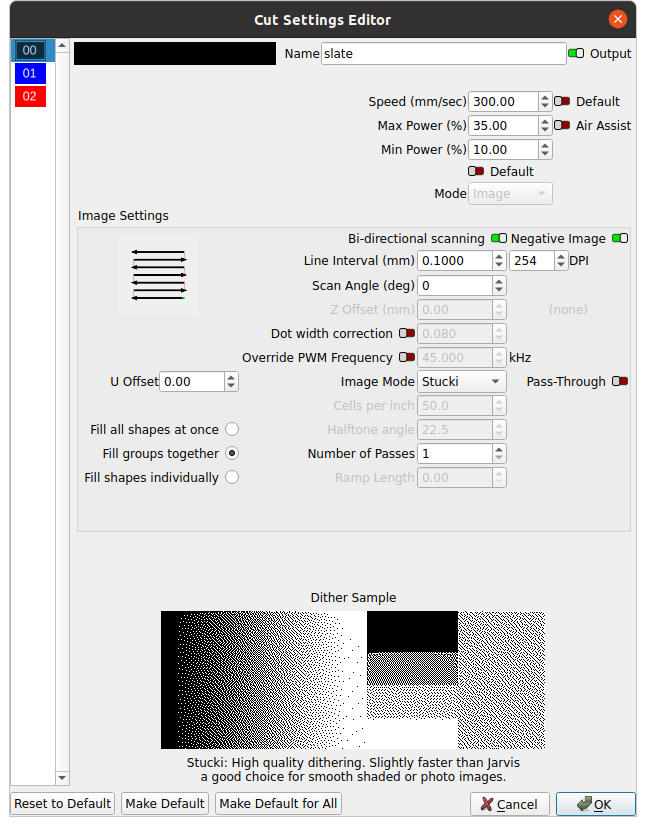
The effect on the slate changes as power increases. Wider burns as power increases. Full effect (white) produces about .06-.07mm lines but that leaves plainly visible gaps/stripes in darker shaded areas. The .040 is my compromise interval for greyscale…slight overlap at highlights and slight gaps at lowlights. That skull above was not dithered so could have been run at .06, but it was a test as well and turned out real nice anyway (IMO).
Edit: this is NOT from the Ikier. That machine can do .1mm on slate, on a good day. This is from the 5W Algo
I haven’t done dpi tests on slate, but I came to the conclusion with other materials that 254 is the best I can do from the laser thickness. It’s also the recommended from the manufacturer. Not saying I can’t tweek it, but after reading some of the threads here, I at least understand why I can only go so small.
For a quad diode like the A20 (and my K1 Pro), .10 interval on hard surfaces is a fairly typical. Depending on job type and material, I set my 20W machine anywhere from .095 to .15
The current tech diode sources, beam combiners, and lenses mean adding diodes increases beam size. That may change, but for now it’s where the industry is.
I started with a 20W quad diode but couldn’t produce the detail needed for many of my designs so I added the single diode 5W. It’s slower, but that’s a fair trade-off in my book.
I defocus my 20W for some things but I got the 5W exclusively for high rez detail, so I’m perfectly content to let it run however long is required. Well…maybe not perfectly content, but I accept it unless/until the day comes my budget will allow a better machine.