Booleans/Welding/Subtracting help please

Ah-HA! Got it, thank you very much! I love learning new stuff!

1 Like

I spoke too soon. Here’s a wrench for ya… what if I want different trees to be different layers (for different power settings to try and achieve a non-uniform look on wood) ? Obviously then I can’t combine them into one shape… and when I try to select them when layered different it won’t let me Boolean Intersection. I grouped them as one shape (even when different layers) and when the Boolean Intersection happened it changed them all to one layer color. Thoughts?

1 Like

Break the overall process described above into several pieces, designed for each layer you want (different layer for the different power levels you want to cut). In other words, do the exact same process multiple times, isolating the desired sections and place them on a different layer. Repeate the process for each section until you have the complete presentation.

1 Like

To change the color after the intersection, un-group them, pick the bits you want, and click one of the layer colors in the bottom palette.

No sooner than I had typed I think I figured it out. I duplicated the bear, selected one tree, and Boolean Intersection’d. Then I duplicated the remaining bear shape, selected another tree, again.

As a suggestion from a dummy like me, a cool thing would be a short little animation that pops up with a blurb about the Boolean functions, with one of those boxes “click here to never see this again”. I use them semi-seldomly and despite best efforts, seem to need to re-learn the little tips and tricks each time. Thanks!

We have had discussions about these types of helpers and adding links to video tutorials. These chats continue but this work will require resources we are currently dedicating to development and feature additions.

To help you today, hover over any tool and select F1 to bring up the appropriate help resource, including a link to the relevant video tutorials.

2 Likes

Hi there, I’m back! This is a combination question that is really about the “panel” cutting of a long design that doesn’t fit in one bed/cut and needs to be moved and cut in stages.

I’m trying to set that up, in the attached screenshot I have a rectangle drawn that represents the first portion of the engraving I’m trying to make, that will not be Output. Then I have the two crosses (one on top and one on bottom) that will be output, to be used for aligning the next cut.

HOWEVER, I am trying to Boolean subtract/intersection the design to only the parts in the rectangle remain. I just can’t make this happen for some reason. You can see I have a “fill” and a “line” layer set up (red and blue), and even changing these to the same color layer hasn’t made it work. I’ve tried grouping and ungrouping the red and blues, but nothing works. When I subtract, for some reason the blue keeps remaining even outside my rectangle. I’ve selected them in different orders (rectangle then layers, layers then rectangle) and nothing seems to work. I have no idea what I’m doing wrong.

This topic might help - it covers using the booleans to cut a shape in half:

You’ll need to to this per-layer, because booleans don’t preserve layers (or just re-color when done) and it only works with closed shapes. We don’t have a general solution for just cutting a job in half yet, though that’s actually a planned feature.

Thanks. With this particular design, there are a ton of open shapes so I broke them down so I could “fill” and “line” separately. Are you saying I need them all in one layer before it will work? I tried that and still must have been doing something wrong because I couldn’t figure it out.

Am I understanding the open shapes can’t be cut like this? I made the mistake of committing to this for a customer before having tried it, thinking it would be like the other “larger than bed” projects I’d seen on here.

Open shapes can be done manually without too much headache - You’d insert a node at the point to split the curve, then hover over that node and press ‘B’ to break the shape at that point. Closed shapes could be done with the boolean tools pretty quickly.

Hover the mouse over the Node Edit button and press ‘F1’ for the list of keys used.

I’m not trying to be dumb but I just tried this, and I do not think I understand nodes very well at all or how to work them. I will need to separate every shape that overlaps the rectangle? I tried hovering/pressing B and it did “something”, but I have no real idea what.

This project is proving more difficult than I had originally thought!

Hover over the ‘Edit Nodes’ tool (or any tool for that matter) and hit ‘F1’ for help. This will open a browser tab showing help for that feature. There, you will read about how you control the state of a node.

  • Pressing the S key when hovering over a node will convert it to a smooth node, and if required, creates tangent handles that can be manipulated from it.
  • Pressing S while hovering over a line will convert the line to a smooth curve, with tangent handles, but leaves the shape of the original line intact.
  • Pressing L while hovering over a smooth curve will convert it back to a straight line.
  • Pressing C while hovering over a node will convert it to a corner, allowing the two handles to be manipulated independently of each other.
  • Pressing D when hovering over a node will delete it and connect the lines on either side together.
  • Pressing D when hovering over a line will delete it and open or split the shape.
  • Pressing I when hovering over a line or curve will insert a new node at that point along the line
  • Pressing B when hovering over a point will break the curve at that point

And this is worth review.https://www.youtube.com/watch?v=uzFsrUwONbw#t=9m15s

1 Like

You’d need to break lines or other open shapes manually.

  • Select the shape to be split
  • Hover over the point to split it
  • Hit I (capital i) to Insert a new point
  • Hit B to break the shape at that point
1 Like

Hi guys, thank you both for the replies.

I’m fairly desperate at this point, under the gun. I’ve broken all the shapes along the line (four total segments for this project) and now when I go to preview or engrave there are open shapes because I broke them. I tried the close selected paths with tolerance, but it did all kinds of strange things. I went through and manually added lines to close the shapes, but it took a very long time/the result wasn’t great.

I’m not sure why this one is giving me so much trouble, but this multi-tile thing is making my head spin a little. Definitely would vote for a feature where you could input your desired bed size that would automatically just split along those lines! I may have to tell the customer we’re bailing on this one, I’m about to try again. Thanks for the help once again!

Anything that’s a filled shape (which implies it should already be a closed shape) you can split using the boolean tools, like the link I posted above (How to optimize an oval ring engraving).

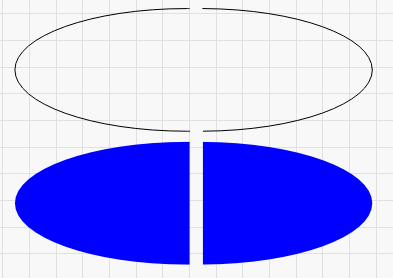
You only have to manually split the things you’re running with ‘Line’ mode. If I want to split this is design down the middle:
image

I’d do it like this:
image

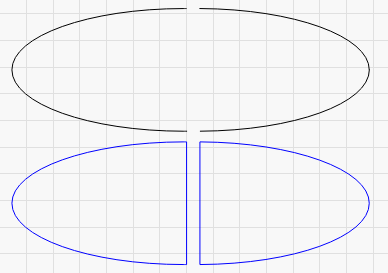
The top shape is left open because it was just done as a line - I don’t want the line down the middle that I’d get from using the boolean tools, because that line shouldn’t be there. The bottom shape needs that line though, so the two halves fill correctly:
image

Ah I see. I’m worried the nodes are driving me a little nuts, I’ll try to explain:

When I couldn’t get the Boolean operations to work right, I did what you guys said about breaking and inserting nodes. Then I went through and manually closed those shapes with a line. I was getting the “There are 26 open shapes that have been removed, is that OK” window, so I went though and selected each shape and its new line and did “auto join”. Some of them still said they were open, and so I used “Close Selected Paths With Tolerance” which screwed it up further. EDIT to add further: Shapes that appear closed (the line I drew snapped from point to point… they are letters like an “H” on the edge that needs to be split) are saying they aren’t closed. I can’t figure out why for the life of me.

Now I went through and tried to Boolean, and I don’t know what my problem is but I seriously just cannot get it to work. I’ll attach some screenshots that hopefully illustrate what I’m talking about, I’ve been trying for hours.

The only Boolean option it gives me when I select the “fill” layer (which obviously includes the “fill” parts that are along the border that need to be closed) and the rectangle (which will not be output) is Weld. This is such a fairly complex design, with the four segmented parts to be done, that I can’t figure out what I’m doing wrong with it.

Edit to include the screenshots of what I’m trying to do…

Email the file you started with to me (developer at lightburnsoftware dot com) and I can show you.

Will do, thank you. It says it’s 27MB so might come as a google drive link… not sure.

You could zip it - Right click, then Send to > Compressed folder. Send that and it’ll be much smaller.

This topic was automatically closed 30 days after the last reply. New replies are no longer allowed.