The power and speed settings are written on the test piece. Cutting works at about 2mm/sec, but it feels slow. This isn’t my first attempt, it took a few tests to reach this result, though I hoped for slightly faster cuts.
I removed the front protective film because engraving tests showed it’s hard to remove afterward, but kept the back film to help cutting, as fully transparent acrylic is even harder for the laser to process.
I avoid exceeding recommended power to protect the tube. My main use will be cutting small objects in 2mm acrylic, so I’m looking for reliable settings that don’t stress the tube.
Question: What speed/power settings work best for cutting 2mm transparent PMMA acrylic on a K40 without stressing the tube? Any advice or experience is much appreciated.
I used about the same parameters as @misken mentions on my K40, and my max was 16mA on this tube.
It could be that your focus is not quite optimal or alignment is not 100% or some impurities on the mirrors and or lens.
Doesn’t really matter what you can see through, it’s the co2 wavelength being blocked that allows the co2 to damage the material. Acrylic blocks all co2 emissions.
What size of small items are you going to work with. Small is a relative term.
I’ve done a lot of acrylic, I’ve found that, cutting, I need to run as fast as possible with the highest power I’m comfortable with.
Multiple passes, I don’t do. I’ve managed to cut 10mm acrylic with my 43W machine, but it was slow. Even if you think about how a multiple pass would affect the material, they usually have poor results, comparably.
I also turn my air assist down very low, just enough to keep the lens free of acrylic dust. If you blow on the acrylic, it seems to change how it forms at the cut. It was recommended to me to use the least air possible, and I’ve followed that with good success.
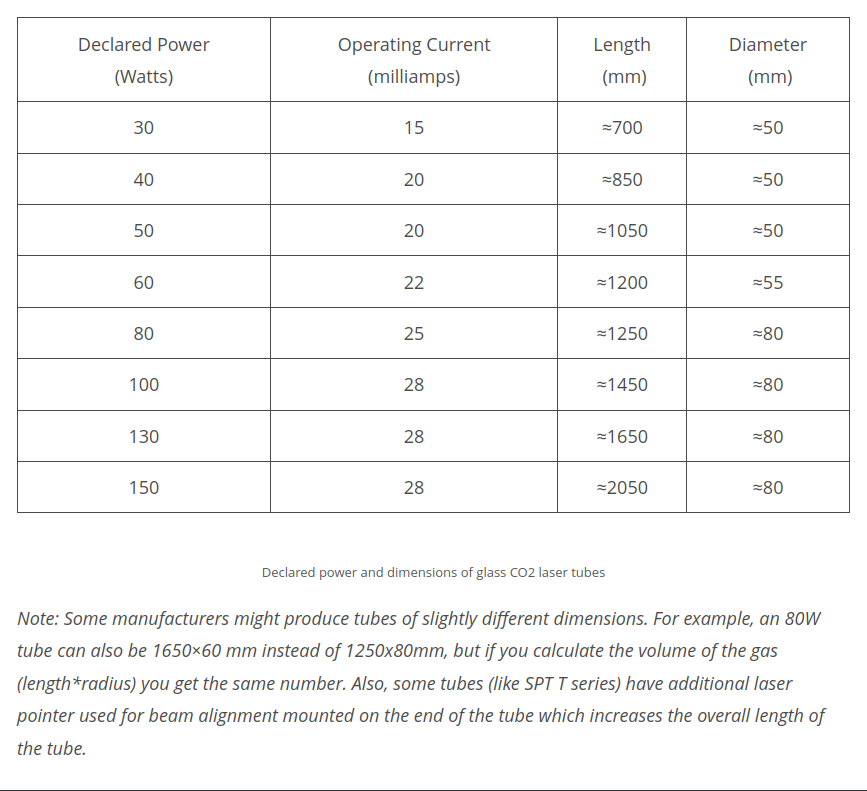
Suggest you measure the length of your tube (and it’s diameter) to get a realistic idea of what maximum current should be.
A K40 usually has a 650mm - ~700mm tube length. These should be limited to about 15mA as they are 30W and below power levels. If you’re running 70% power and allowing 13mA, that’s more like an 86% power level… 13/15 = 0.86
With my potentiometer set around 2 PM, 100% power in LightBurn gives me about 13 mA max.
Cutting starts to work from about 70% in LightBurn, which in reality is ~9 mA (since 13 mA is my “100%” cap) with a 2 mm/s speed.
If I turn the potentiometer all the way up, the tube goes up to 19 mA, but I don’t plan to run it that high.
The manual even says the machine can run at 24 mA, which doesn’t match what I’m seeing (and would be way too much for this tube anyway).
Some extra info :
I’ve been setting the focus on the acrylic surface, not halfway through, because I read that for thin materials like 2mm this is usually good. I use the focusing tool that came with the machine (10 mm high), so the lens is positioned about 10 mm above the material.
I’d really like to know what speed/power settings others are using for 2mm or 3mm acrylic on a OMTech K40+.
Yes, I believe that I should be able to cut at about twice my speed, also found out that the cut wasn’t always neat in some area, constant power mode ON, seem to have solved this issue.
There is a slight technical issue with running a glass tube laser from grbl boards.
Let me explain how a glass tube control signals work.
The IN voltage (DC or PWM) controls the current limit the laser power supply (lps) will allow. There is another input L (or H) that enables the tube to lase.
DSP, like my Ruida produces a continuous pwm while it’s executing a layer, no matter if it’s lasing or not. Laser enable (L = low enable or H = high enable) tells the lps to lase.
This is a typical analog operation. If you want 50% power the tube run 50% power as long as laser enable is held active.
A grbl machine uses only a signal control line, the pwm. Many of these K40 types use a pot to set the IN voltage (tube current) then the pwm drives the laser enable.
With this type of configuration, for 50% power, the tube is turned on and off by the pwm to it’s on 100% power for 1/2 the time.
This also means that mA display is likely showing you an rms value.
I looked, my old tube cutting 3mm, I ran 14mm/s@80% or about 16mA of current. I’d guess I could run 1/3 less power for 2mm or go faster by 1/3.
Keep in mind, unless you have a scope, most meters measure rms values.
If your meter is operating like this, what’s displayed is actually smaller than it’s actually current. If your meter reads 9mA at 70% pwm, then the meter actual reading it 9mA/0.70 (percent power) or 12.8mA.
Thanks a lot for the detailed input, I’m really learning a ton.
Right now, I can cut at 9 mA and 5 mm/s after some new tests. What feels strange is that I can’t really cut much faster even at higher power. Maybe it’s better to stick with this setting to save my tube?
Any machining operation will work best at a certain, what’s called speeds and feeds.
Although we sometimes obfuscate their meanings, the operation is the same, no matter if it’s additive machining (such as a 3d printer) or subtractive, like a laser or milling machine.
These operations work over a pretty wide range, however, they work best within a restricted range. Want least wear, fastest production and least amount of energy, you have to figure out where this area is attainable.
With a metal machine, there are calculators that will tell you speed (spindle) and feed rate for a specific metal using a specific size tool bit. Many of these machine can move the table and tool, so the feed rate is how fast the tool is engaging the material.
Works pretty much the same for lasers, except there are way too many variables that come into play to get a good estimate. Also mother nature decides how she constructs some of this material, changing it’s ability to be machined at specific speeds.
Hang in there, you’ll have an epiphany some day and a lot of things will instantly become more clear.
Don’t be too scared, the 30-35Watt tubes used in the good K40 machines are reasonably robust.
If you are very sure that your mechanics are ok (focus, alignment mirrors and lens) you only need to do a test to find the specific limits of your machine. This is easily done with a slightly thick acrylic block on edge, shoot a series with 10% or 5% increase in power with e.g. a pulse of 5 seconds. You will see that somewhere between 65% to 75% power penetration does not deepen any more, i.e. here is your tube’s max usable effect. It should typically be well below the supplier’s max mA recommendation. If you have then written down your corresponding mA values, you have a good overview of the machine’s capabilities without abusing it. (You won’t ruin your tube by running it briefly at 85% to test, but you won’t get any extra power from it.)
ps.
Have you done a ramp test to confirm your correct focus? and have you checked if your nozzle is perpendicular to the machine bed?
I haven’t done a ramp test yet, I’ve been following the manufacturer’s recommendation using the 10 mm guide they provide, but I’ll do the ramp test as well just to make sure my focus is spot on.
As for the mirrors, I was actually quite astonished to see that they were perfectly aligned when I received the machine.
Thanks for the tip about testing with a thicker acrylic block and using the pulse button at different powers while recording each result. I finally found that 9–10 mA at 5 mm/s works well to cut 2 mm acrylic in one pass and 5 mm acrylic in two passes. My machine can go up to 19 mA, so I believe I’m still in a safe zone and not overusing the tube.
Regarding the nozzle perpendicularity, I believe it’s correct, but I’ll check it accurately as well.