So I recently picked up a Falcon laser module to get my feet wet. Connected currently to a Creality Ender 3 Pro.
My question is: how does the camera in Lightburn deal with a moving bed when a 3d printer is being repurposed as a burning station? I’ve been chasing issues trying to get a camera that actually worked with this tiny little platform (220x220 bed), and realized that I might be chasing it for no reason.
Longer-term, I definitely am planning on building a larger setup, but just repurposing what I have on hand for now while I learn.
Probably well enough, but the bed must be in exactly the same position in all three axes for the image correction to behave properly. The homing switches will probably get the platform close enough, but the camera must also have a rigid position on the machine frame and that may be difficult.
You can get a rough idea of the positioning accuracy required by dividing the bed size by the camera resolution. For example, if the 220×220 mm platform occupies nearly all of an image’s 1920×1080 pixel width, then each pixel represents about 0.2×0.1 mm.
The switches probably deliver that kind of accuracy, but the camera position / angle can be difficult to stabilize that well.
Appreciate that. For right now, I think that level of accuracy is adequate. I’ve had trouble finding a good mount (as you expected) that positioned the camera well, so I’m looking at just mounting it on a tripod or arm over the “printer” instead of mounting on the frame. Using the bed slinger printer, my biggest challenge is that the x axis bar blocks quite a bit of the view if I mount the camera on the top rail. For right NOW, I’m just viewing all of this as a learning experience and doing some smaller burns for fun and for family items. If all goes well, I’m thinking of using my existing laser module and controller (10w Falcon) but building a frame based on one of the OpenBuild designs, probably in the 400x600mm range.
That pretty much won’t work, at least if you expect the calibration / alignment to last more than one session.
However, if you don’t need or expect absolute positioning accuracy, having an orthographic camera view of the platform is wonderful for arranging patterns on whatever scrap of material you’re re-re-purposing. When you get things laid out, then the rubber-band frame + aiming laser will accurately reveal what’s just over the edge:
Thanks. At this stage, I’m not too worried about pinpoint accuracy. Like I said, considering everything currently as a learning opportunity until I build a larger bed. I have one small project I want to do (just burning some text into a project I’m building for my wife), otherwise, everything right now is just “experimenting”. I don’t mind re-aligning the camera if/when needed - I’m probably only using the laser once or twice per week as time allows between work/kids/etc., and think I may have just figured out which of my webcams has a good enough field of view to use on the top rail, so have a mount for that printing on the 3d printer now and will try it this afternoon if I get a chance. Would I need to re-calibrate each time though? I was under the impression that the calibration was more about identifying lens distortion, and that once saved it shouldn’t have to be repeated, but again, not a huge deal if I do, although hopefully this mount will eliminate the need for that in the 1st place.
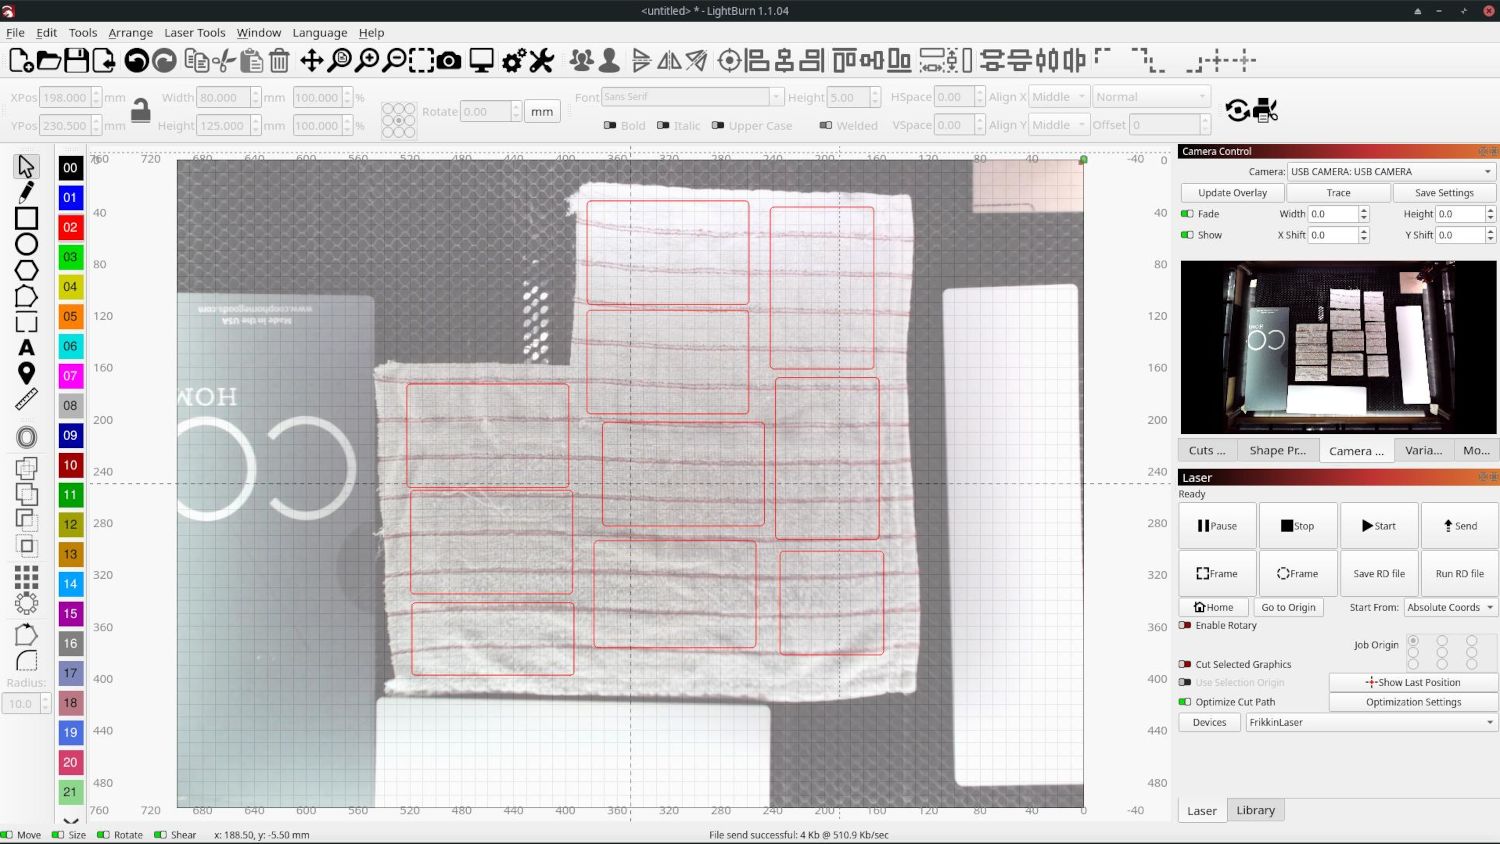
Just to provide closure… spent my lunch setting up the new 3d printed mount and calibrating the camera. I’m on “default” mode for the camera, so lousy resolution, but it calibrated easily and I was able to get the alignment done. On 1st pass, it looked like I was probably somewhere around 5mm off as far as alignment - I took a scrap of wood that I’d burned something onto last week, lined some text up against it in Lightburn, and ran it, and was somewhere around 4-5mm off by my estimate. Close enough for a 1st attempt, this will definitely change how I approach the laser in a very positive way.