Can't get Lightburn and Laser to communicate properly

I have a AtomStack A5 Pro 40w Laser engraver. I have a Mac M1 with the later software running Light burn 1.2.01. I have been having a serious trouble getting items lasered in the correct area and I am wanted my grid to match the laser.

My cut space is X410MM by Y400MM; Lightburn reflects this. I have watched numerous videos for setup and it cuts perfectly. If have enabled the homing cycle, and calibrated my axes-both of them.
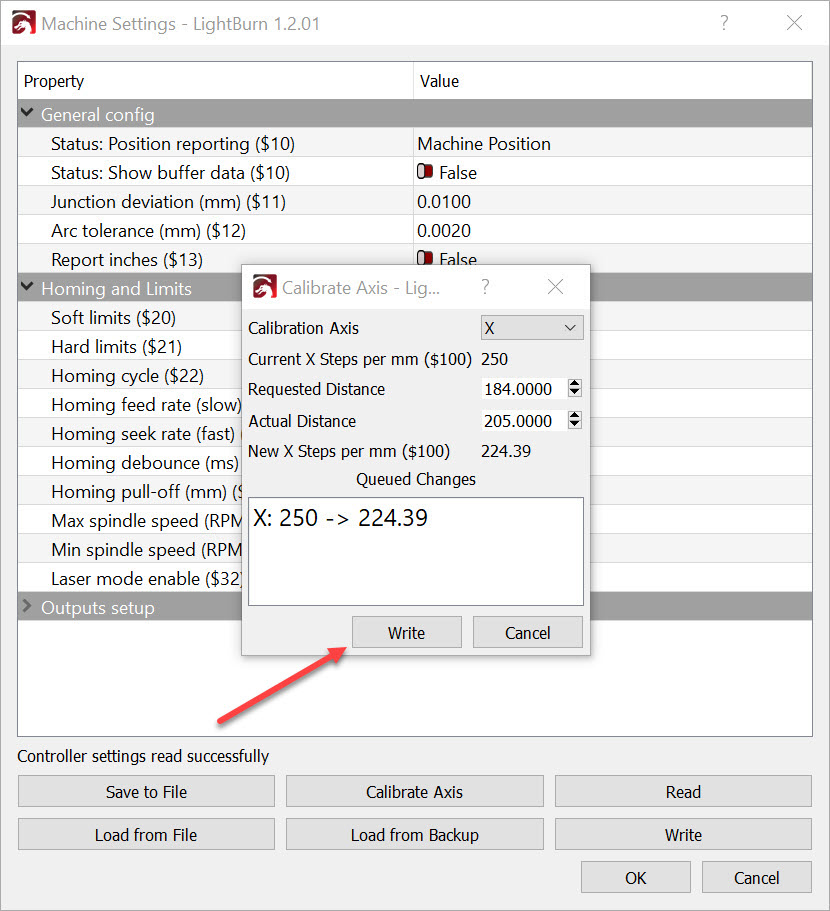
In the software 202 for my Y is actually 200 on my machine. Likewise, 184 in the software for my X is actually 205 on my machine. Due to this issue, I cannot get items cut right where the screen shows them.

$$:
$0=10
$1=25
$2=0
$3=0
$4=0
$5=0
$6=0
$10=1
$11=0.010
$12=0.002
$13=0
$20=0
$21=0
$22=1
$23=0
$24=25.000
$25=500.000
$26=250
$27=1.000
$30=1000
$31=0
$32=1
$100=80.000
$101=80.000
$102=250.000
$110=6000.000
$111=6000.000
$112=1000.000
$120=1000.000
$121=1000.000
$122=10.000
$130=410.000
$131=400.000
$132=200.000

ok

?:
<Idle|MPos:0.000,0.000,0.000|FS:0,0>

$I
[VER:1.1f.20170801:]
[OPT:VI,15,128]
Target buffer size found

$#
[G54:0.000,0.000,0.000]
[G55:0.000,0.000,0.000]
[G56:0.000,0.000,0.000]
[G57:0.000,0.000,0.000]
[G58:0.000,0.000,0.000]
[G59:0.000,0.000,0.000]
[G28:0.000,0.000,0.000]
[G30:0.000,0.000,0.000]
[G92:0.000,0.000,0.000]
[TLO:0.000]
[PRB:0.000,0.000,0.000:0]

1 Like

In LightBurn’s Device Settings you can change the workspace size to match your laser itself. See here for our documentation on the subject.

I noticed that the work area ($130=410.000 and $131=400.000) appear to be set correctly.

X & Y Axis calibrations are in steps per mm and are visible under $100 & $101.

It’s possible that the axis calibrations didn’t take when you recalibrated. I’m suspicious that the calibration settings are resistant to correction. With $100=800 steps/mm and $101=800 steps/mm I can see that they still look like factory defaults. My post-calibration steps/mm numbers were no longer tidy round numbers.

I recommend repeating the calibration steps and rechecking to see if the factory settings can be tuned to your liking.

You can perform the axis calibration using your 200mm square:
In LightBurn click Edit
Then wheel down and click Machine Settings.

In the buttons near the bottom of the box you’ll see ‘Calibrate Axis’.
Click that button and enter your commanded and actual distances.


After you write the calibration settings for the X-axis and the Y-axis, you can confirm that your engraver is now not set for 800 steps/mm on either axis.

Please request the same settings report you did previously ($$ in the Console Window). The revised $100 & $101 (Steps/mm) settings should be there.

1 Like

$$
$0=10
$1=25
$2=0
$3=0
$4=0
$5=0
$6=0
$10=1
$11=0.010
$12=0.002
$13=0
$20=0
$21=0
$22=0
$23=0
$24=25.000
$25=500.000
$26=250
$27=1.000
$30=1000
$31=0
$32=1
$100=80.000
$101=80.000
$102=250.000
$110=6000.000
$111=6000.000
$112=1000.000
$120=1000.000
$121=1000.000
$122=10.000
$130=410.000
$131=400.000
$132=200.000
ok

?:
<Idle|MPos:0.000,0.000,0.000|FS:0,0|WCO:0.000,0.000,0.000>
[VER:1.1f.20170801:]
[OPT:VI,15,128]
Target buffer size found
ok

$#
[G54:0.000,0.000,0.000]
[G55:0.000,0.000,0.000]
[G56:0.000,0.000,0.000]
[G57:0.000,0.000,0.000]
[G58:0.000,0.000,0.000]
[G59:0.000,0.000,0.000]
[G28:0.000,0.000,0.000]
[G30:0.000,0.000,0.000]
[G92:0.000,0.000,0.000]
[TLO:0.000]
[PRB:0.000,0.000,0.000:0]
ok

This is after multiple calibrations. The machine will now go to max locations (x:410, y:400) as entered in Lightburn. Oddly enough, when I enter 0,0 the unit will set to (x:0, y:10). This is even after starting from 0,0 and starting LightBurn from this location with “Get Position” entered.

This topic was automatically closed 30 days after the last reply. New replies are no longer allowed.