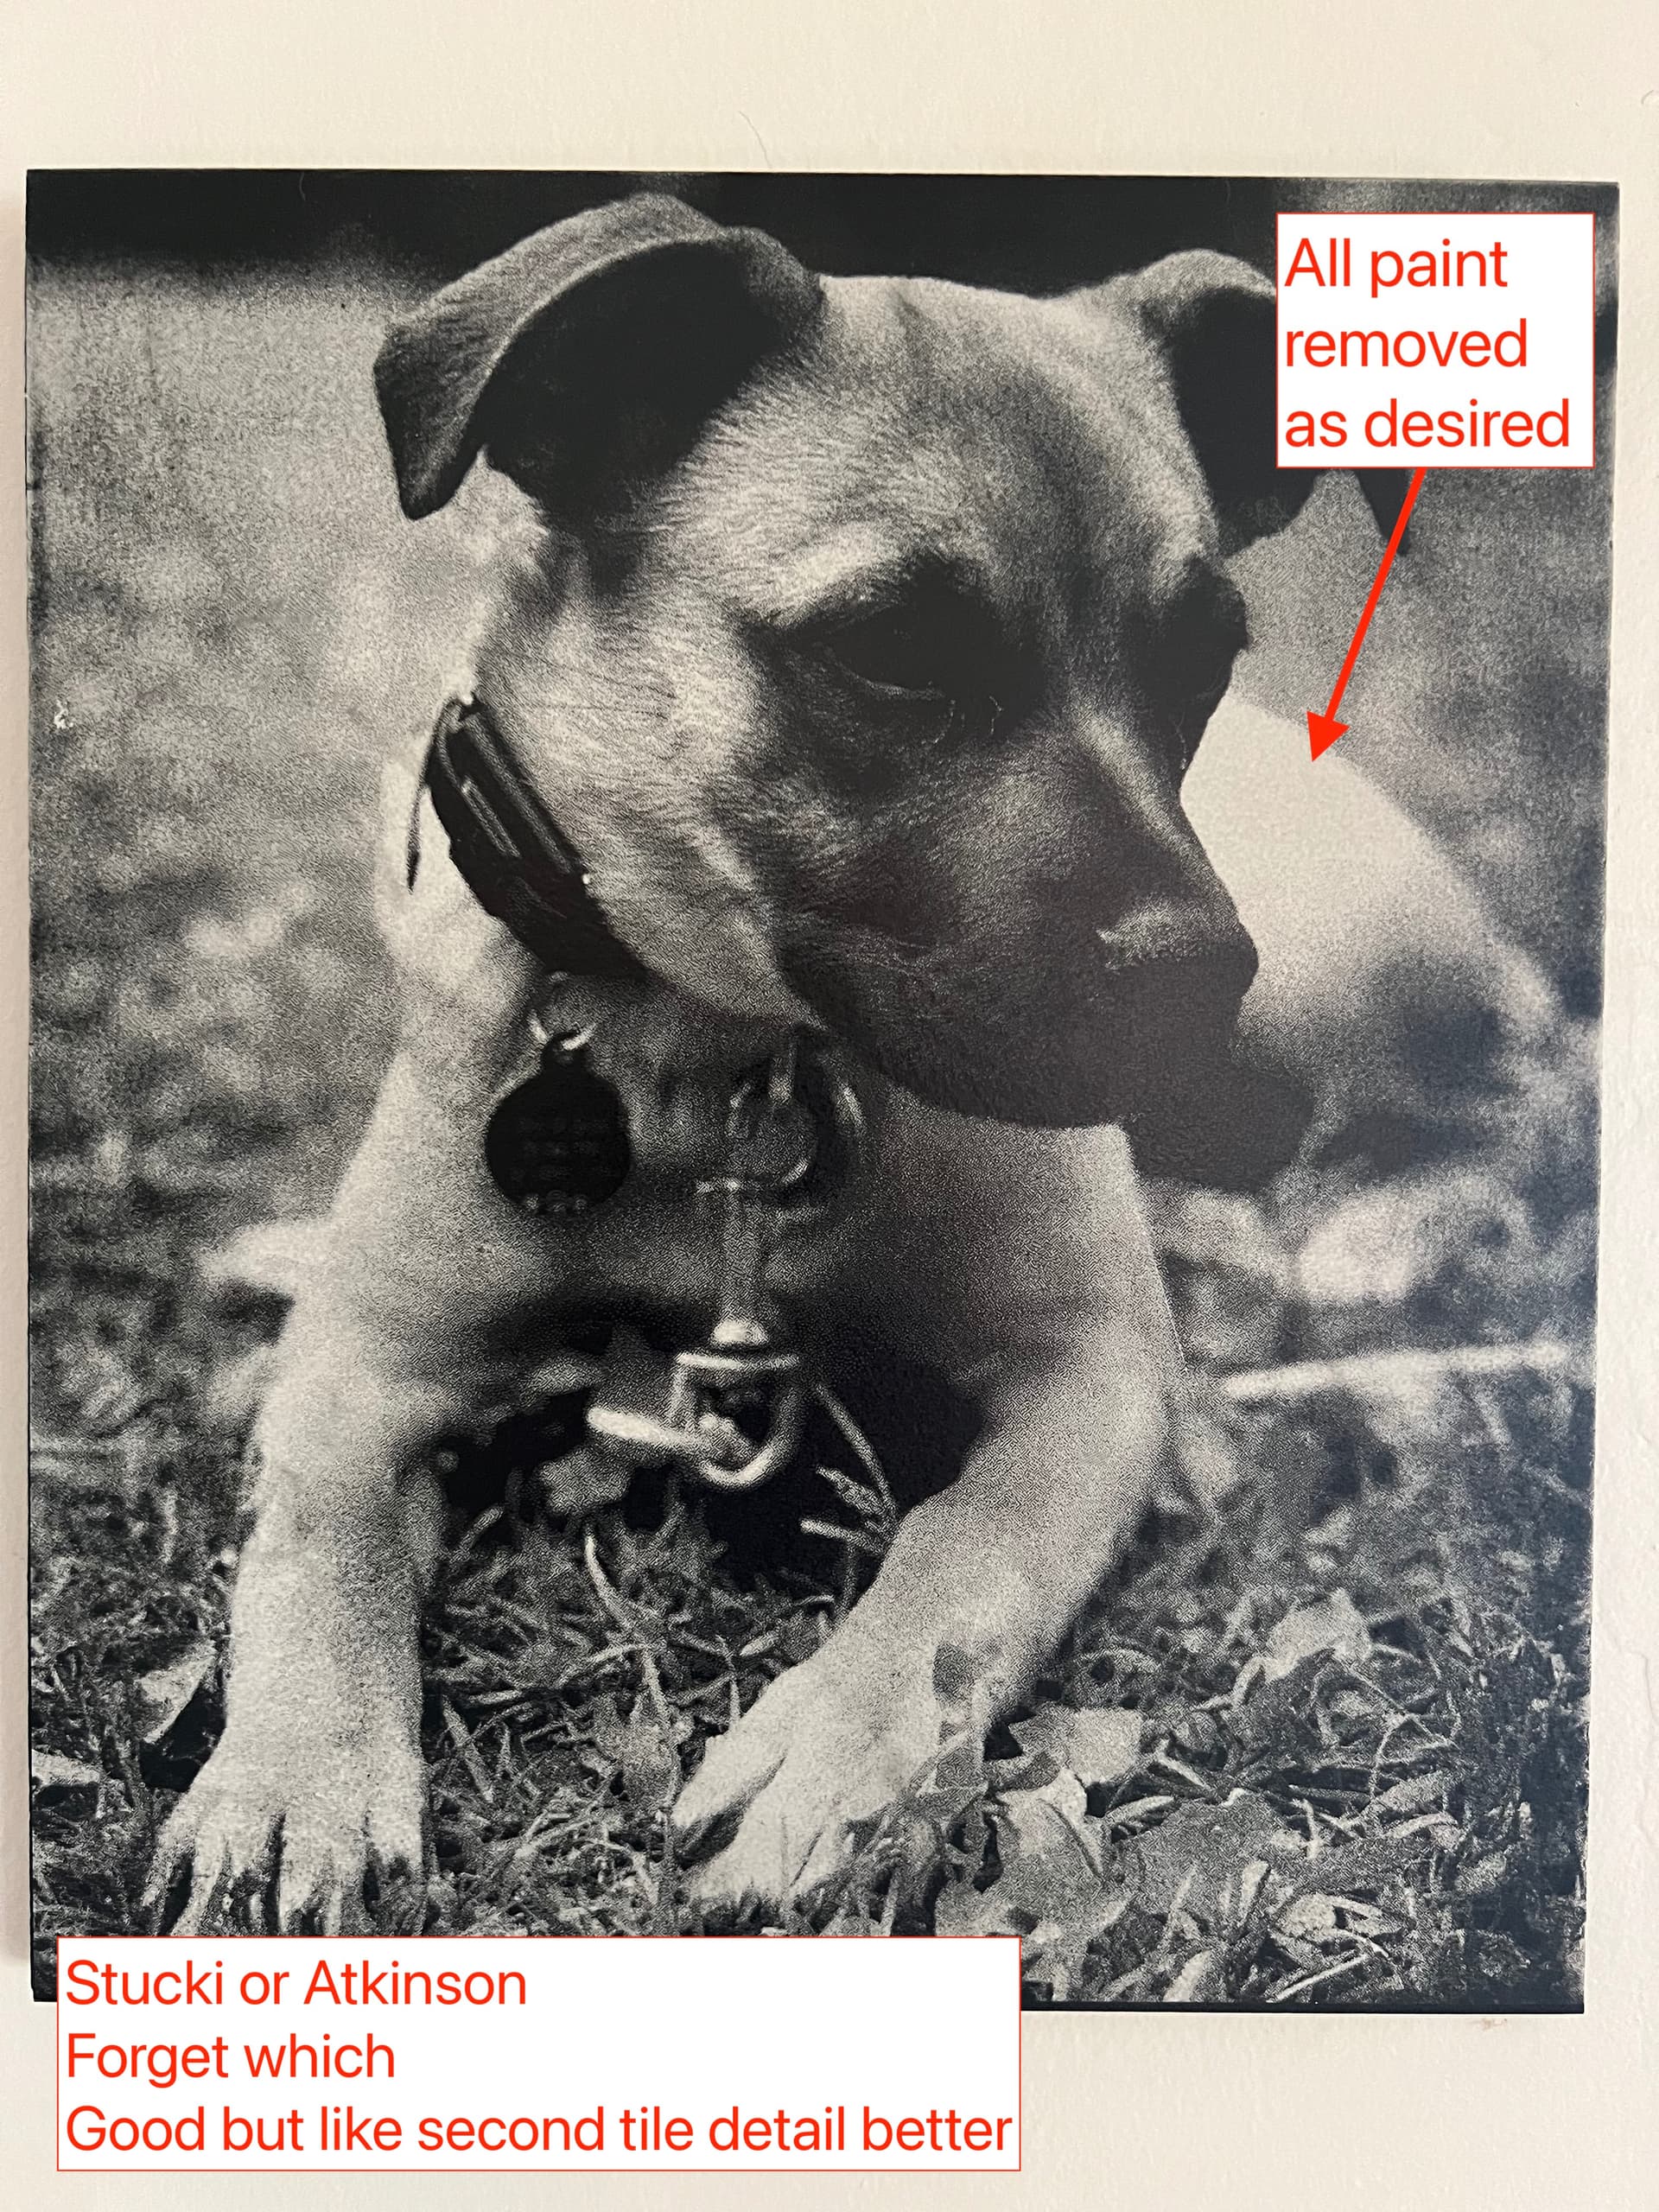
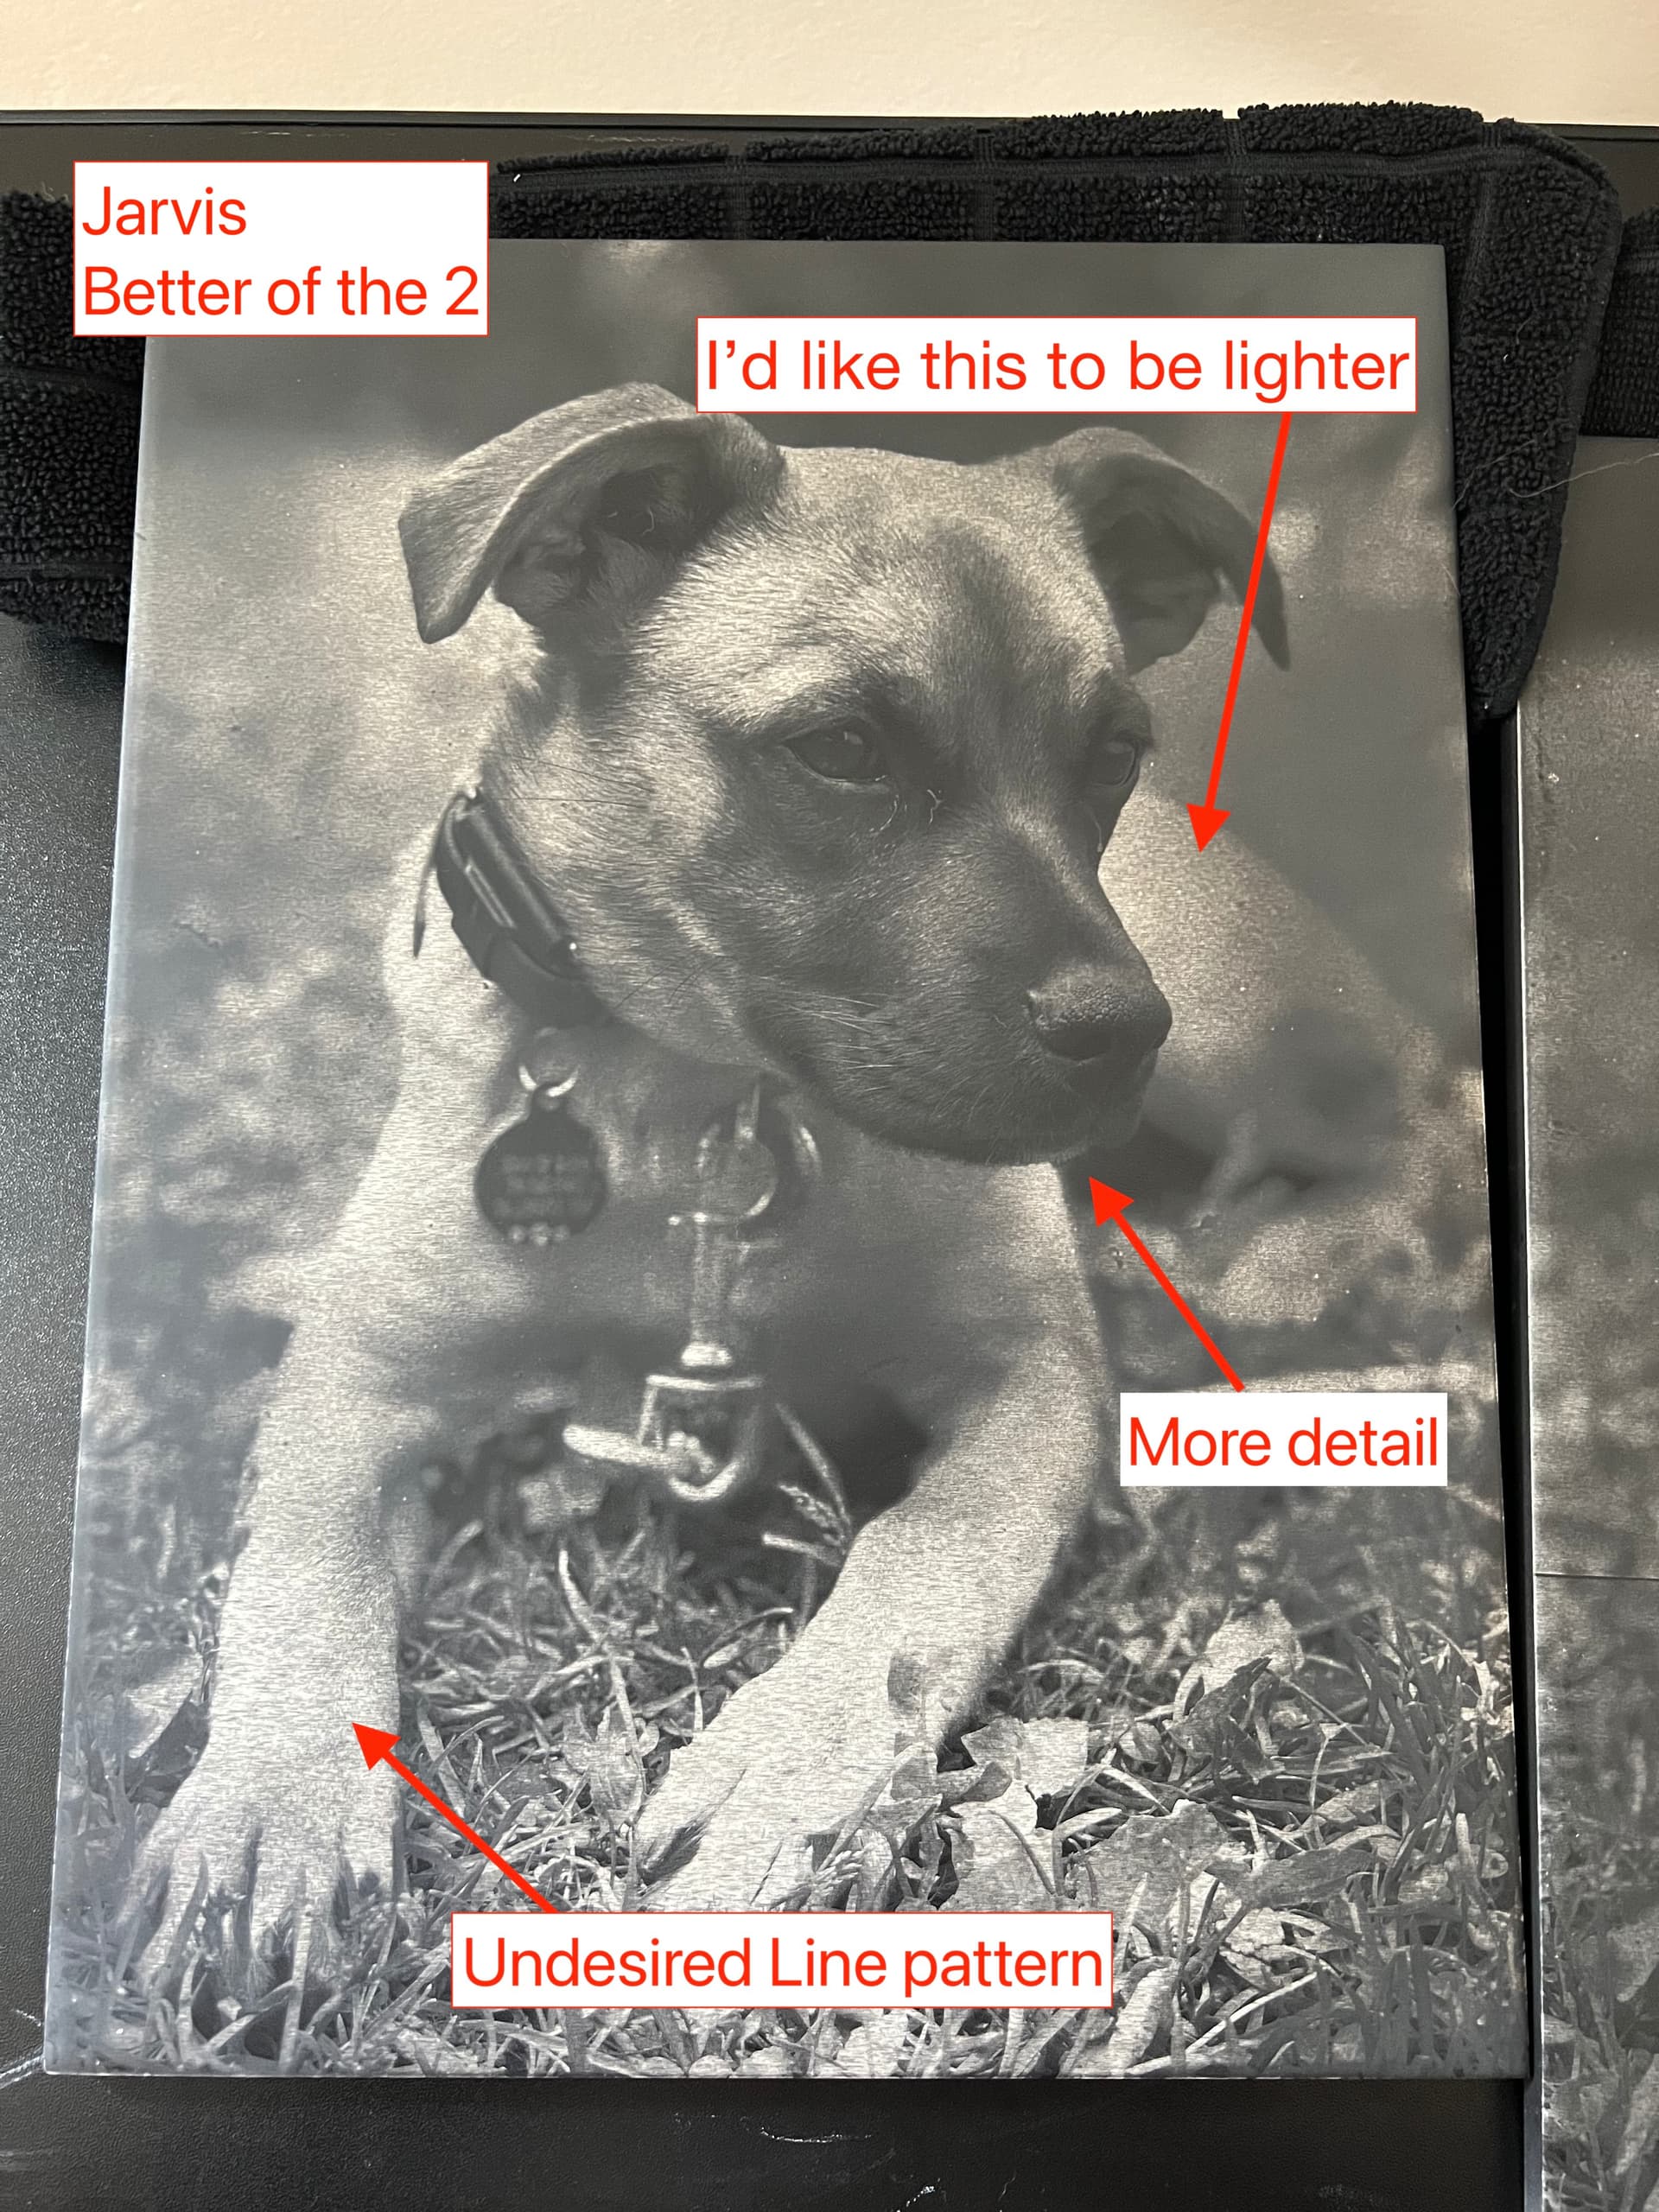
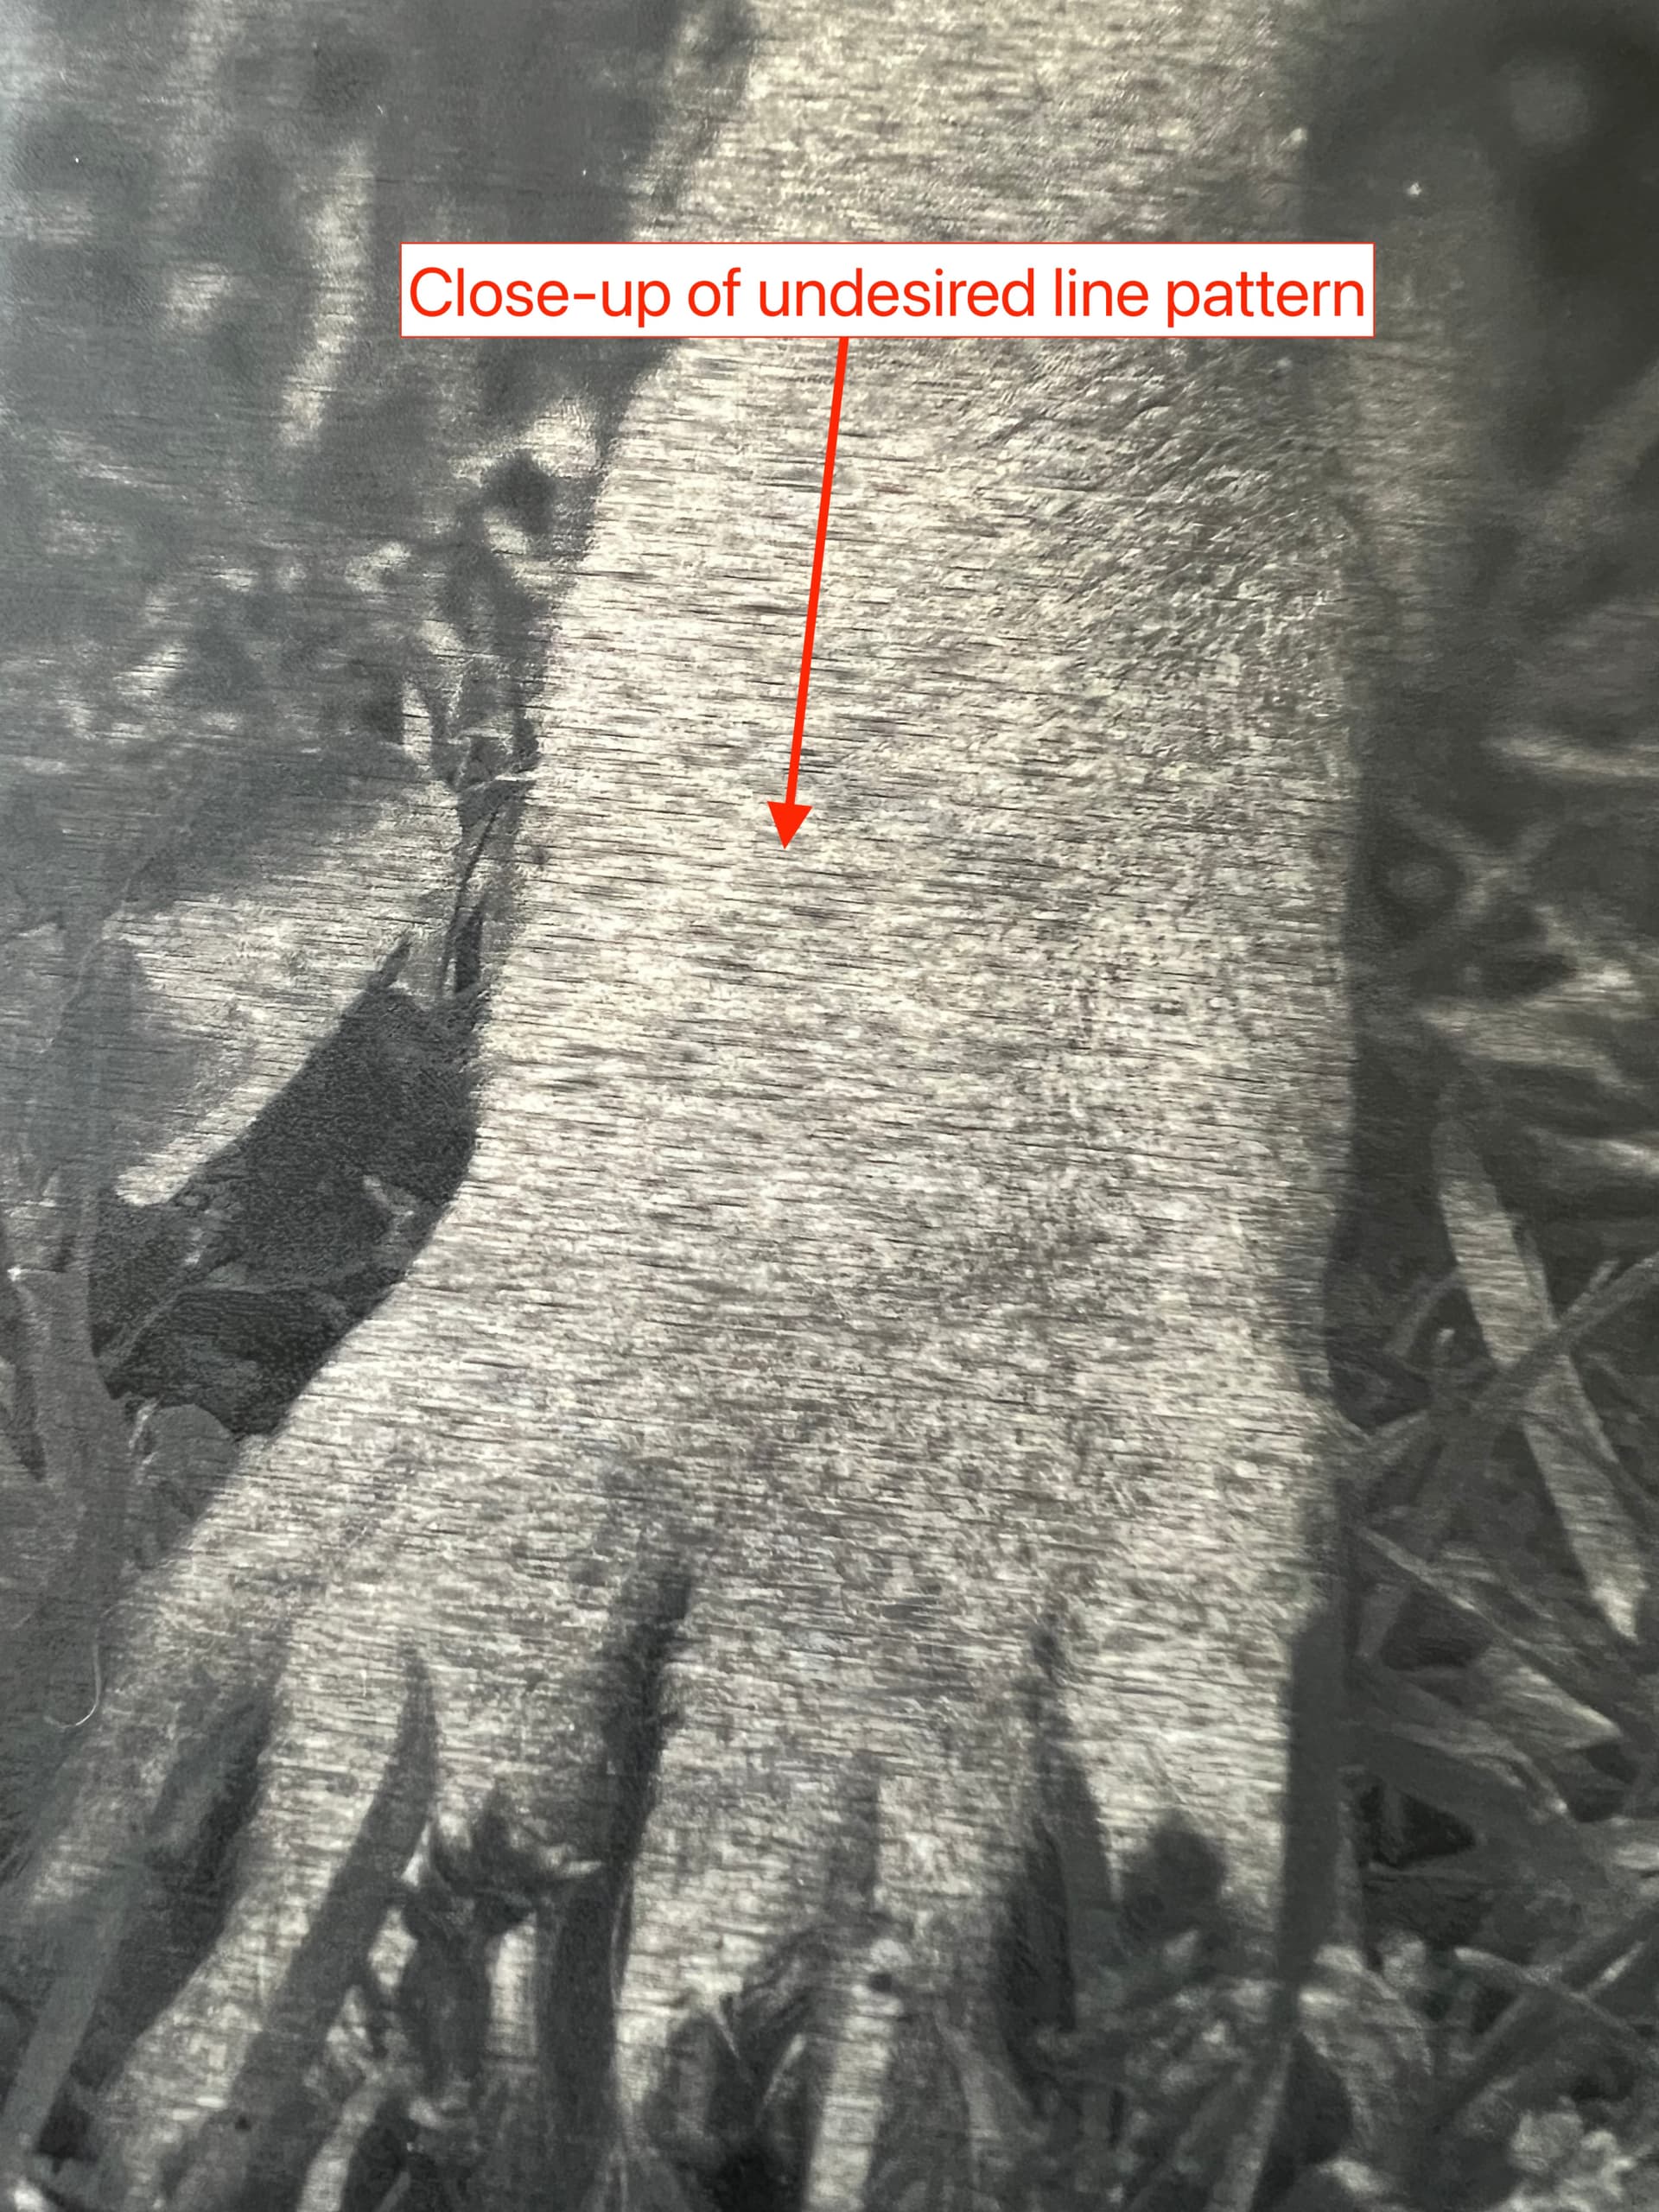
When I first got my Snapmaker, I did the Norton method and made some awesome greyscale tiles. They updated Luban since and now it can’t handle processing the size tiles I want to do with the same settings. So I got LightBurn. Lightburn seems to handle the file but no matter what I do I can’t seem to make a file without there being lines where it should be pure white. Before it used to remove the black paint entirely leaving bare tile underneath. I’ve ran more tests than I can count and I can’t seem to figure out why this is happening. My theories are that the Jarvis algorithm (although seems to produce the most detailed image) doesn’t create pure white or black areas (I used Stucki or Atkinson before). My other theory is that Luban has the option to do dots vs lines. I realize lines are faster but I’m afraid the line option is what’s causing the lines. But as far as I understand there isn’t really a way to do the dot option in Luban? Any insight would be appreciated.

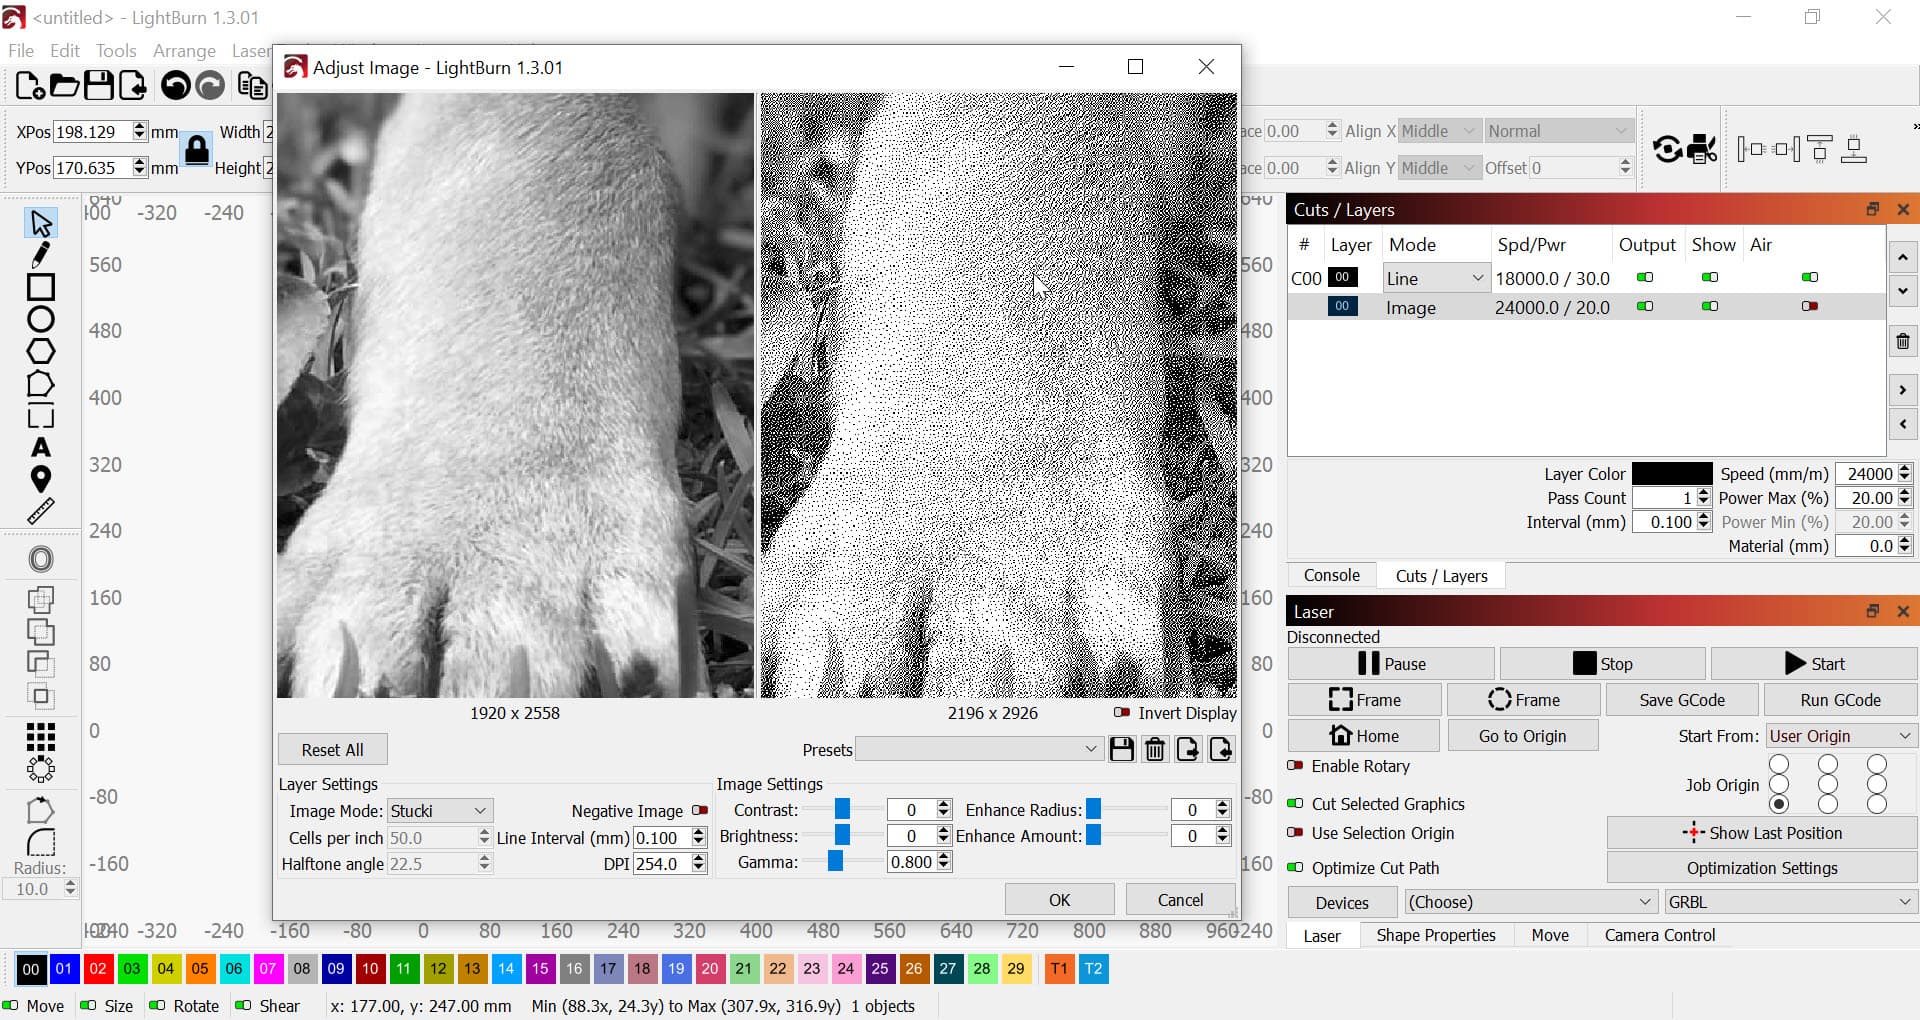
In LightBurn, Select the image then, right click the image and select Adjust Image.
Getting a pattern without hard horizontal lines wasn’t too bad with Stucki.
I fiddled with the settings a little bit more and until I got the dog’s eyes to my tastes…

Humans perceive light on a log scale but most of our hardware outputs aren’t log-scale so we have to curve-fit and fiddle with the art. The response of Norton White Tile isn’t linear either so it’s still a matter of testing and developing settings that work for you.
You may find that keeping a notebook next to the laser for testing and project notes is a worthy pursuit.
You may find this worth review:

There is also a Project Notes tool in LightBurn.

Thank you. The video and your response was helpful. I just ordered a usb magnifying glass so I can properly test the interval and I didn’t even know about the “adjust image” option so that was huge! Thanks again.
I’m getting closer to better results, however I’m afraid that the Lightburn software will not produce the same high quality results that Snapmaker produces with the Dot movement feature as opposed to Line movement. I would be happy to just use Snapmaker but it can’t process images after a certain size and quality and that’s the whole reason I switched to Lightburn. I understand that it will take longer to laser each dot and it will be louder… but I don’t care. I want the quality results that I receive with Snapmaker’s Dot movement but be able to create the G-code in Lightburn because Snapmaker can’t handle the size. I wish Lightburn would add Dot movement as an option. The Line movement is what I believe is causing inconsistent line thickness because of the varying power levels. My theory is that solid white areas (lasering negative image) tend to get breezed over and actually turn out darker because the laser isn’t taking it’s time in those areas. Sigh. Any more insight?
I know the regular GRBL will play with the power levels when the speeds are over the maximum or the laser is Close to the maximum and makes a corner.
Please confirm that you’re working in mm/minute or inches per minute and please share your engrave speed.
Your comments give me the impression that you might be running a little fast. This could be bias on my part but the answer is, more often than not, slow down.
To reduce the difference in speeds between the selected engrave speed and the Fast Whitespace Scan speed for your SnapMaker, you can adjust the Fast Whitespace Scan speed in Device Settings in LightBurn. It’s an unusual setting and it’s worth exploring.
I’m in mm/min. My settings were 1500mm/min, .089 interval, 14% power.
I ran more tests after purchasing a usb microscope and I’m testing the optimal settings that I found with that which seem to be 60mm/min (the slowest it can go) .048 interval, 6% power. We’ll see how it turns out but because of the settings being so slow it’s going to take 4 days to complete a 150mm x 150mm tile which I don’t love.
a higher interval for testing will be easier to measure the offset. you should not have to engrave at such slow speeds to get good results. at 1500mm/min you should be able to get a good measurement for adjustment. to run the laser head for 4 days straight isn’t healthy for the laser head IMO.
i would run 10mm x 10mm raster tests at roughly 250 lines per inch until you get the results you want
Here is how I arrived at my settings using a usb microscope…
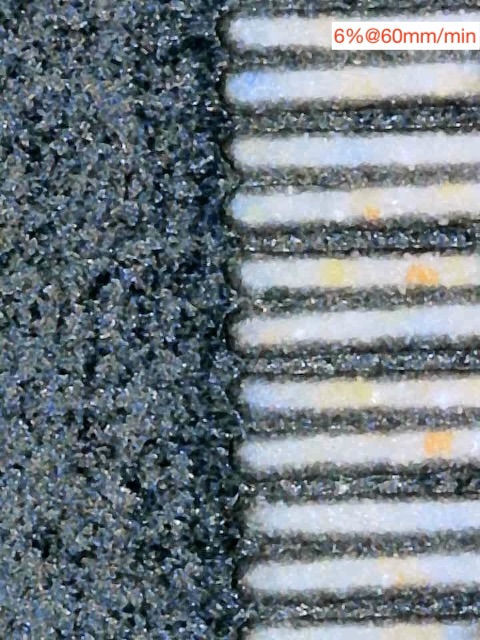
These settings appear to give the best straight line while burning away the black paint and not burning the tile.
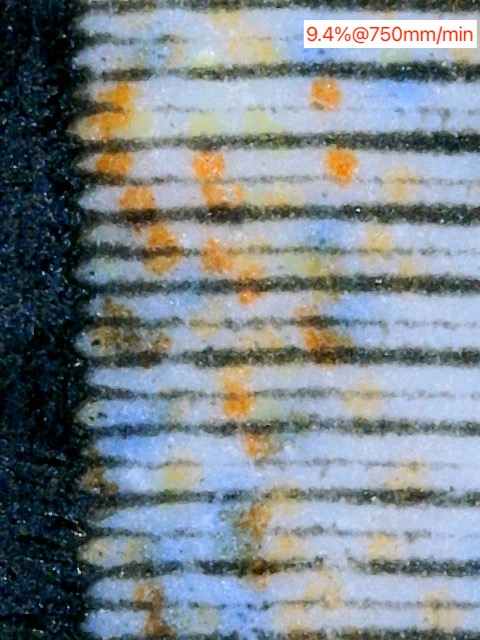
Bumping up the speed and percentage a lil brings about less straight lines.
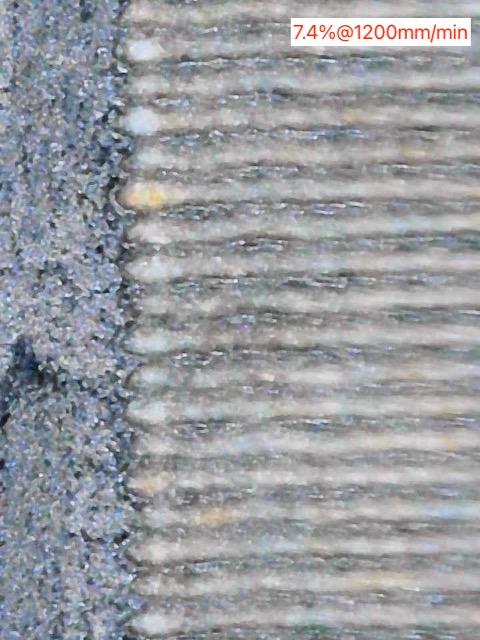
Higher speed with not enough power doesn’t burn through the black paint.

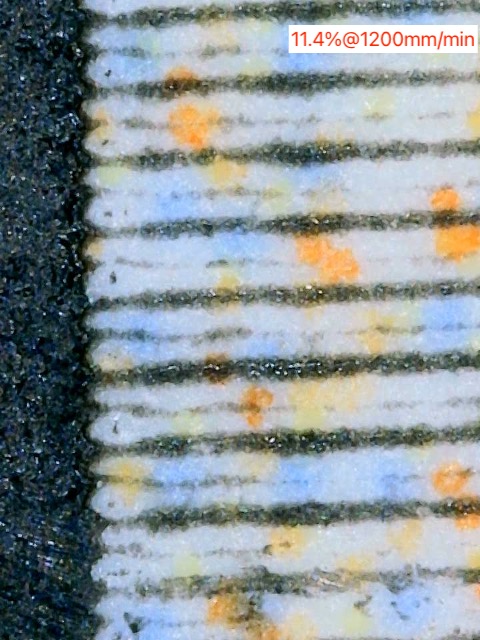
Slightly higher power at higher speed is still giving squiggly lines.
Just another example with a slightly higher power again.
Unless I’m being a perfectionist (which maybe I am) I don’t see how the other options will bring about the results I want. Note: These tests do not test the interval.
have you tried using “overscan” can you post a screenshot of your layer settings window?
overscanning at a higher percentage will help the laser stop wiggling by the time it comes back the other way. then you can bump the speed of quite a bit.
This thread has been solved… maybe someone @JohnJohn can move it to a new thread …
It’s difficult to find information when the thread is solved with one problem and another issues is piled on the previously solved post…
I have found that a gentle touch is better with ntm method, so high power isn’t what I’d think you’d want to do… IMHO… ![]()
Good luck
![]()
I am aware of overscan and I have tried it but it doesn’t effect what I’m doing as far as I know because that just helps the edges of the scan and I have the image go off the edge of the tile anyway to take care of that. My issues are mostly occurring in the solid white areas in the middle of the photo (note I’m doing the negative). I realize I sent pictures of the ends of the lines but that’s just because it felt easier to read. I realize some of the ends can be funky but my concern is the consistent line. Every other option seems to be inconsistent and causes the black lines as shown in the first post.
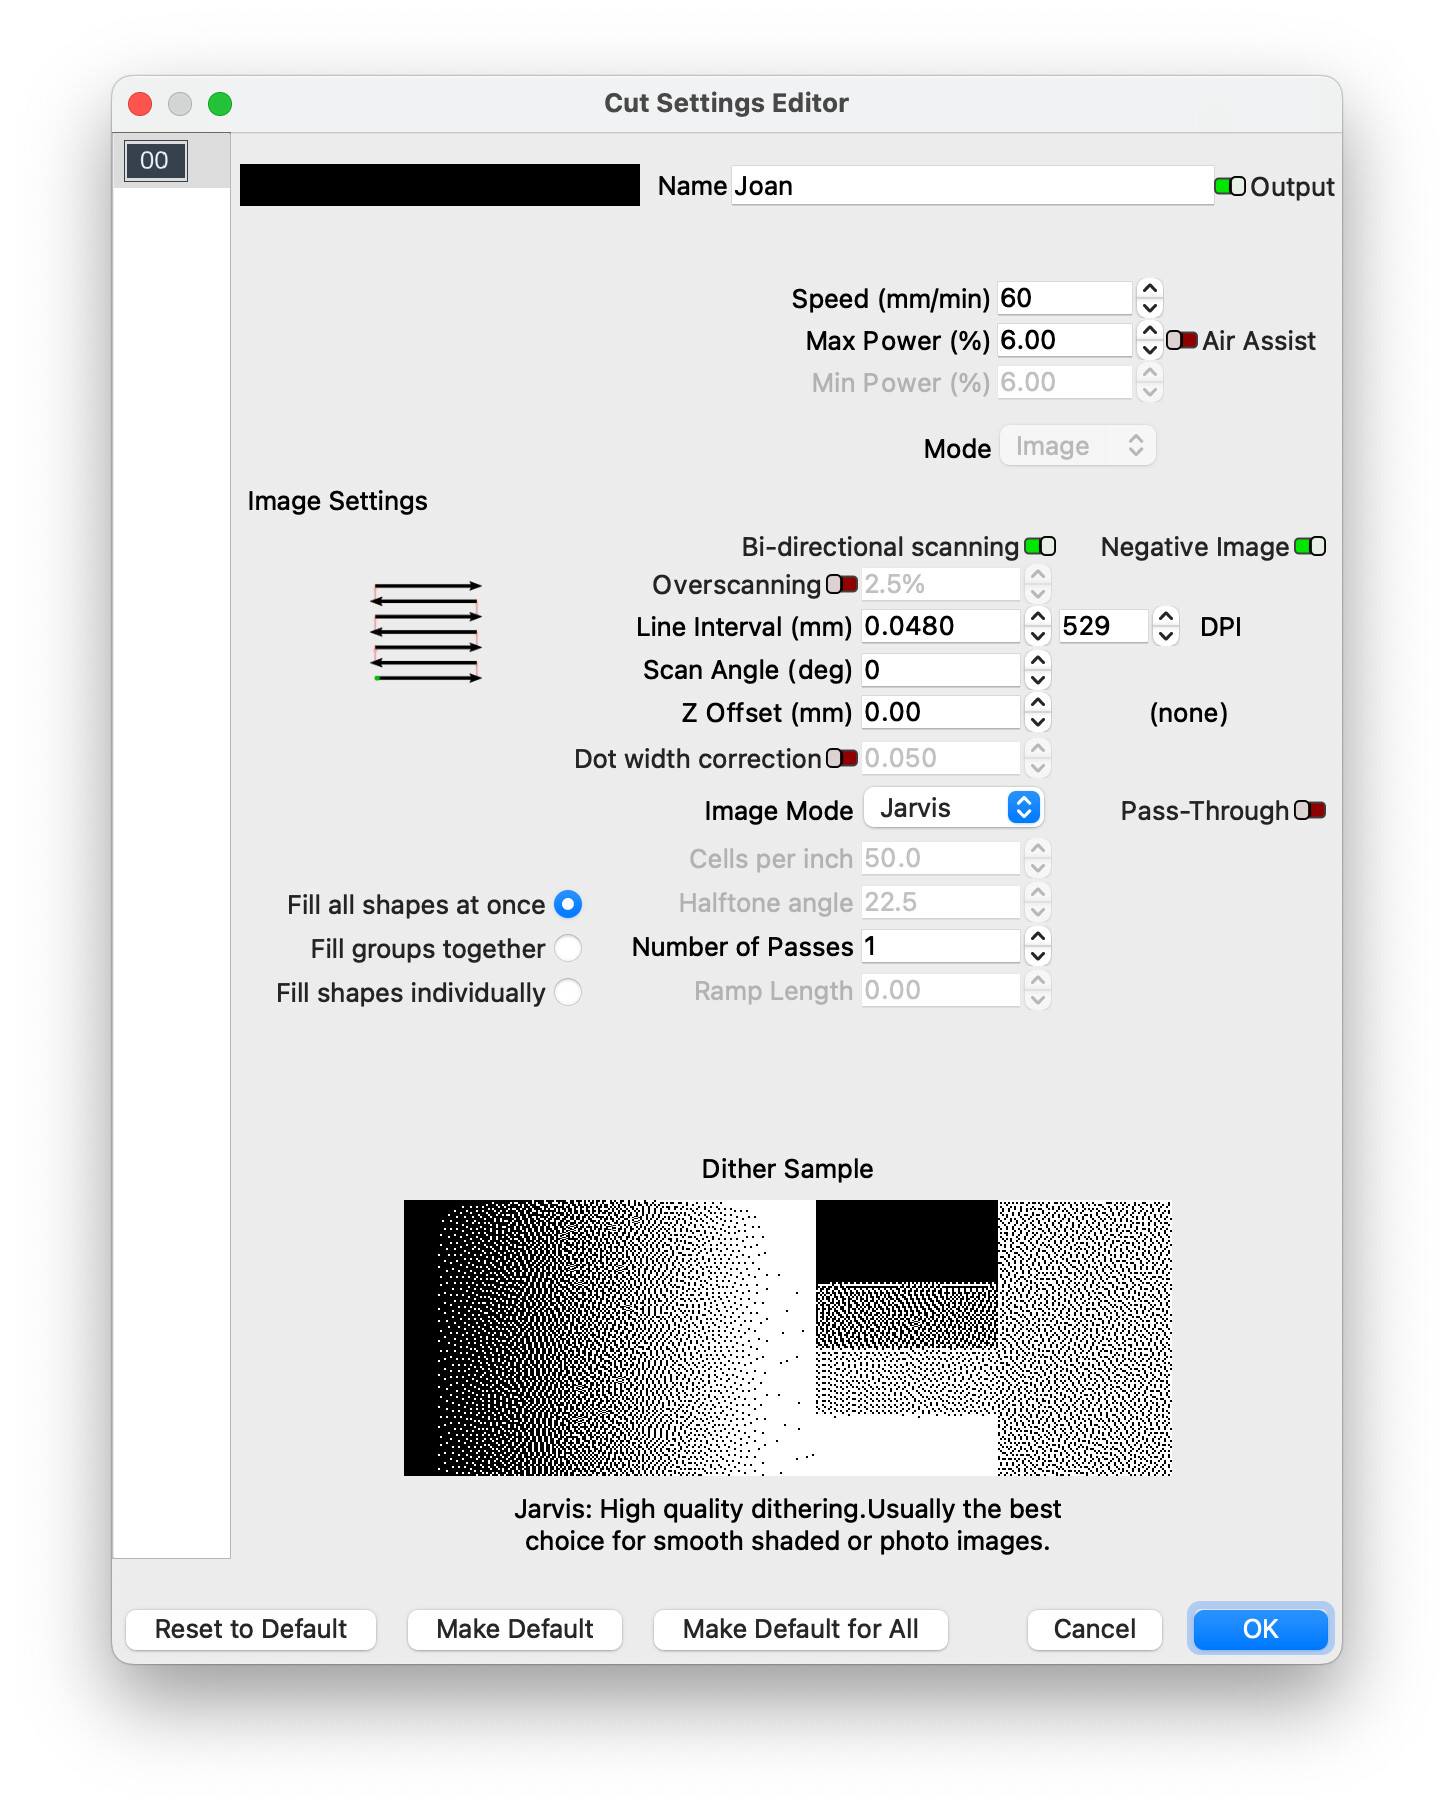
I don’t know which screenshot you’re asking for but this is the 6x6 tile I’m lasering now that will take 4 days to complete.
This is all the same issue, maybe it’s marked as resolved but it’s not? Also I’m not sure what you’re saying. What do mean by “gentle touch” and what is “ntm method”?
does it take you this long jkwilborn ?
ok, I thought it might be referring to the Norton method but the abbreviation didn’t make sense to me. Thanks
I don’t do these on the led… I use the co2 or the fiber… But that’s a long time…
Good luck
![]()
These can take a long time.
Another approach that may be worth investigating is defocusing the laser very slightly and increasing the line interval ( or decrease DPI from 529…) ![]()
What you’re doing looks perfect but if the material behavior is limited to too hot or too fast, slight defocus can buy you some of each.
I have never done one is why i was asking. just thought 4 days was a bit long. with this thread info i will probably try one now.
thanks again John
Oh that’s an interesting thought. So the theory here is that a defocused dot would be larger and therefore take up a little more space allowing me to increase the interval. Is that right? My 150mmx150mm tile should be done tomorrow and I shall post my results.