Changing tools during your Job

I have a tool change issue. I haven’t had a chance to implement the suggestions from Support but was asked if I could provide copies of the responses I received from Support. Thanks to Support for all their assistance. I tried to use MM Documentation but it was very unclear. If you have encountered this issue, please feel free to comment here with your problem, and if you resolved it, your solution. I’m going to try to resolve this over the weekend. I’ll post my results next week.

I had an issue when running a Job in MillMage. There were two operations; the first using a V-bit and the second using an End-mill. The Job run went through both operations without stopping to allow a tool change. I asked support what changes I had to implement.

Here’s how it started:

Sent to Support:

How does MM allow for a tool change when it moves to the next operation?

My project has 2 operations. Operation 1 uses a V-bit and operation 2 uses an End-Mill.

When I ran the Job, it ran through both operations without pausing to change tool.

Response from Support:

Did you select the correct tool in the Operation settings?

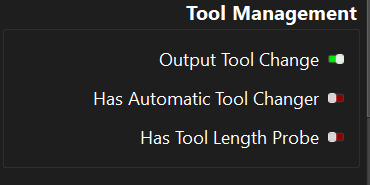
You will also need to enable “Has Automatic Tool Changer” in the Device Settings, and program your tool change macro.

By default, the Tool Change macro in the generated GCode is simply “T1”. You can either set up your firmware to handle the sequence, or enter the macro in the Custom GCode in MillMage.

I realize, our documentation is a little thin on the topic, but SparksTech on YouTube made a good video about this:
https://www.youtube.com/watch?v=bi8vkCKIYNY

Here, he explains, how to program the firmware to know what to do when it receives a T1 command:
https://www.youtube.com/watch?v=TY_6vGJG5wI

Next from Support:

If your machine does not have an ATC, the option “Has Automatic Tool Changer” needs to be turned off!

“Output Tool Change” will also add the pause command (defaults to ! in GRBL) for a manual tool change. (This Happens in the Device Setting →Custom Gcode screen.)

Note, that you will need to zero the Z-Axis again if you change tools to accomodate for the new height.
I’m not sure, how you would need to do that, and if you simply press “Resume” after the manual change.

My response:

I have turned off ATC. In the Tool Library, do I have to give each tool a unique Tool Number to enable the pause to change the tool?

From Support:

If your machine does not have an ATC, the option “Has Automatic Tool Changer” needs to be turned off!

“Output Tool Change” will also add the pause command (defaults to ! in GRBL) for a manual tool change.

Note, that you will need to zero the Z-Axis again if you change tools to accommodate for the new height.
I’m not sure, how you would need to do that, and if you simply press “Resume” after the manual change.

It won’t hurt to give them a different number each, but I don’t think that’s needed if you are doing a manual change.

End of Interactions so far with Support on this issue.

I think you tried to run all the operations in sequence.

Enable output on the first operation, and none of the others. Run the first operation. Make the tool change and set zero for the new tool. Run the next operation with the first turned off. This is how you would run a manual mill with no tool changer, right?

If your machine doesn’t have an ATC why not just output the operations using different tools separately?

Good morning Mike.

I look at the issue of “changing bits when changing operations” is more choice than required. From a machine vendors’ perspective, the ability to change bits on the fly is is a sales advantage. From the users’ position, this becomes a complexity because of the learning curve. I’ve found the learning curve quite steep and this would become a barrier to the full use of my machine’s capabilities. From the simple approach (one operation at a time with manual bit change and then manually resetting the CNC and starting the next operation) to full automation using tool changers as well as comprehensive planning for the whole project is a choice having to be addressed. For you and me, the easier approach simplifies our project. For the production environment, efficiency is paramount to improve production times, keep costs lower, and remaining competitive.

Thus, our choices are made in light of the task we are facing. For me, I am making one-off items and also creating projects that combine different art forms. I do stained glass (25 years experience), beading (10 years), and CNC laser and router projects (<2 years). So everything I build is usually a unique project with no repetitions. Makes for some interesting challenges.

Thanks for your post as it has inspired me to think about how and why we all take different approaches to what we love to do. From one-off projects for your pleasure or gifting to production runs as your side-hustle as a craft fair vendor or your full-time hustle as a production shop.

I agree with pretty much everything you said except “resetting the CNC”. If you Home the machine and use Absolute Coords, you can go from one operation to the next without having to reset anything except TLO (I even have a “trick” for that). For the tool change operation, Custom GCode will let you retract and move to a safe tool change position. Make the change, enable the next operation, and hit Run.

Of course, good planning is required to avoid hitting fixture or material clamps if used.

I confess I was never a machinist, but I was a CNC Service Tech in a 10 acre machine shop for some years.

1 Like

Hey, the guy who wrote the tool change logic in MillMage here… let me try to explain a few things.

We have 3 tool changing options, seen below:

And I know this will still be a little confusing. There are a lot of permutations of how this *can* work and we’ve tried to cover most of them.

If `Output Tool Change` is *off*, we won’t even output any of the code in the `Tool Change` block. We assume in this mode that you have no tool changer and that you will be exporting the operations for each tool separately either using the operation output toggles or the export wizard (Which allows you to automatically split file by tool).

If `Output Tool Change` is *on* but the other options are off, we will emit the `Tool Change` block if the selected tool is different at all, even if the tool index is the same.

However, `Output Tool Change` without `Has Tool Length Probe` is a tricky situation: this assumes that your tool changes are manual but that all of your tools are the same length. Because there WILL NOT be any way for you to probe Z after the tool change without splitting up the job.

But, if you also have a tool length probe: In this state we assume that your `Tool Change` block is a manual tool macro.

First, please note that this is currently only supported on GRBL machines.

Also, the note from support that this will default to the `!` pause command is wrong. You must configure this yourself and you cannot use the `!` pause command, as we have our own pause function for this, see below.

A typical, manual tool change macro would be something like:

```

M5 ; stop spindle

G0 Z0 ;move up

G0 X600 Y600 ;move to front right corner for change

@P Please insert {tool_name}

```

Again, when the `@P` macro is hit, this merely tells MillMage to stop streaming the job and wait for the user to click continue. There will be not options to jog or to manually re-zero Z. If you need to do any of that when manually changing a tool, please just split the job into separate parts that you run manually.

If you have `Has tool length probe` checked it will then also run your tool length probe macro automatically. Again, if you DO NOT have a tool length probe you should probably not be using tool changes in this way.

If you have `Has Automatic Tool Changer` selected it will output the `Tool Change` block only if the tool index is different! In this case we are assuming your `Tool Change` block is something simple like:

`T{tool_num}`

and that the controller handles the rest.

At this time we do not support the ability to program complete tool change macros inside of MillMage. As in the ability all the movement logic for getting and picking up a tool is in MillMage instead of the controller. This will be coming at a later date.

I expect 95%+ of our early users to need all 3 of those options off and will be doing tool changes manually but require running each job as separate parts, per tool.

2 Likes

Thanks Adam. Your explanation added some clarity to this process that isn’t in the MM documentation.

It might be a good idea to add explanations like this for more of the complex processes. MM has so many options (in the various menu selections) that newbies like me look and see so many choices and we have no idea why all these choices and how they will affect our projects.

Tom Friedrich

1 Like

It might be a good idea to add explanations like this for more of the complex processes. MM has so many options (in the various menu selections) that newbies like me look and see so many choices and we have no idea why all these choices and how they will affect our projects.

That’s the plan! It’s exciting to watch MillMage grow and be more accessible. Thank you for being an early user!

2 Likes