HI IM SUPER NEW JUST GOT MY FIRST LASER LAST WEEK IM ABOUT TO FIRE IT UP AND START MY FIRST CUT HOPEFULLY SOON
I OWN A CAR AUDIO SHOP AND WANT TO USE THE LASER TO MAKE SPEAKER BRACKETS AND SPACERS
IM STARTING SUPER BASIC AND I WANT TO MAKE A CIRCLE RING AND PUT 8 SPEAKER MOUNTING HOLES AROUND THE CIRCLE
I HAVE CREATED WHAT I WANT BUT I KNOW WHEN IM CREATING THE MOUNTING HOLES IM NOT DOING IT RIGHT
IT TAKE 30 SECONDS TO MAKE THE MAIN RING AND ITS TAKING ME 5-10 MINUTES TO CREATE THE MOUNTING HOLES AND POSITION THEM WHERE I WANT
IM USING THE CIRCLE ARRAY TOOL AND CREATING 8 CIRCLES AROUND A SMALL CIRCLE THEN DELETING THE SMALL CIRCLE AND EXPANDING THE CIRCLE ARRAY TO THE SIZE I NEED BUT THAT CAUSES THE MOUNTING HOLS TO EXPAND SO THEN I CLICK ON EACH INDIVIDUAL MOUNTING HOLE AND CHANGE THE SIZE MANUALLY IDK IF THIS MAKES SENSE LOL
I GUESS MY QUESTION IS WHAT IT THE MOST EFFICIENT WAY OF CREATING THIS?
IF I CAN LEARN THIS IT WILL GET ME STARTED ON MY LASER AND I CAN PRACTICE AND SLOWLY GROW FROM THERE
THANKS EVERYBODY HOPEFULLY ONE DAY ILL BE GOOD ENOUGH TO HELP SOMEBODY OUT
While the circular array thing is nice, the problem I have with it is that there is no easy way (that I know of) to specify a specific distance and angle from the center of two points. I suppose you could define a circle as the center point. Then create a second circle some distance from the first in line (either horizontal or vertically aligned) THEN run the circle routine.
If you need accuracy, I would suggest something like Fusion360 (which is free). You can export DFX files from Fusion360 and then import the DFX file into LightBurn.
so the learning curve will be steep at the start, but in a short while you will be dancing around the software.
it may be helpful for you to know how long it SHOULD take… i would expect to lay out this accurately on lightburn in under 60 seconds.
if you make a pencil sketch first and dimension it , using the centre of the speaker as 0,0, that can help
then once you have all elements correctly laid out in lightburn relative to 0,0 you can group everything (control-G) and move it all to where you need it on the baffle.
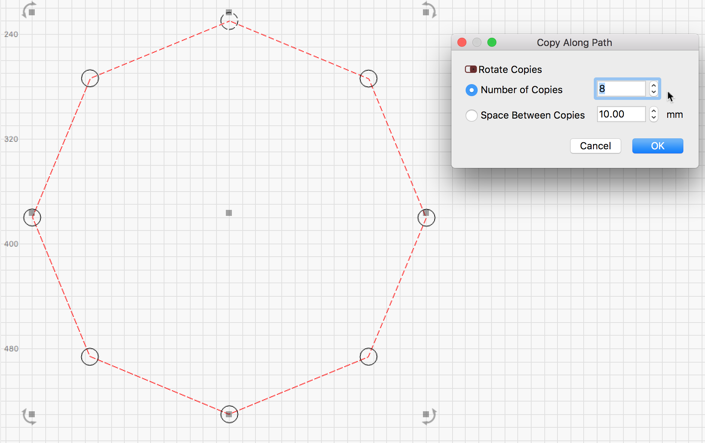
For this layout, I would use ‘Tools’->‘Copy Along Path’. In this example, I used an Octagon, but copy along path works with any shape path.
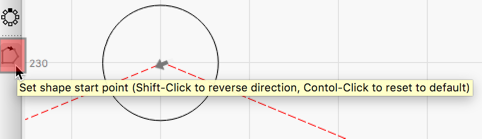
Create a small circle for the desired mount hole. Create an octagon the size of the path you want the mounting holes to follow. Place the center of the initial small circle at the corner point of the octagon start point. Click the ‘Set start point’ to display the objects start location.
Once positioned, select the small circle and then the octagon. Now select ‘Tools’->‘Copy Along Path’ to display the options and enter “8” into the ‘Number of Copies’ field. Notice that a copy of the small circle will be copied eight times and placed at each corner point of the octagon used as the path.
Thank you very much for the help this does make total sense the only problem is that I’m stupid/new at this software and now I have been messing around with the software for about 20 minutes and trying to google how to create an octagon lol
I did get better at circle arrays and then found out how to group the circles together so now its easier than before
do you happen to know of any youtube or forums thats like light burn 101? most of the videos and stuff on the forum are way more advanced topics Im just trying to learn how to make basic shapes in the software and I would hate to just keep asking rookie questions over and over day after day on the forum
I have played with fusion360 and like it a lot but im still new at CAD/CAM software stuff so im not the best at that either lol I would google my issue play with software and practice and eventually was able to create a few basic speakers mounts and spacers with oddball tabs for mounting
as far as my current speaker ring in lightburn this is what worked for me…
make a small circle the size I needed for the bolts
make a big circle to be the size I want the bolt holes to go around
Lined up the center of the small circle with the top center of the big circle using x & y coordinates
used circle array tool x 8 holes
deleted big circle
selected all small circles and grouped them together
after that they were the size i needed with the right spacing and i could then select that group and the ring i made before hand and center them up
after practicing a few times it got quicker but Im not sure that is the most efficient way
is there a way to pencil sketch an very rough octagon shape and then somewhere in the software tools it will make it a perfect octagon? then I can size it to the size I need and do a copy along path like rick was suggesting?
yeah I had them the size I wanted but once i went to expand the grouped holes to fit my main ring the bolt holes also expanded so that was part of what my issue was… Got that part figured out now so I’m headed in the right direction lol
yes after playing with it and taking some of the tips i got it down pretty good now setting at 0-0 is also helpful to design from there and then just move the piece so thanks for that
my next thing to try and tackle is going to be the odd factory shaped speaker brackets that we will be recreating in 2d and modifying to accommodate our new speakers ill include a fusion 360 designs I was doing a while back
You could do something like import a photo of your sketch and then use the trace function which will provide you with vectors which you could manipulate or use as a baseline for what you are trying to do. This would get you close but again, without being able to set specific dimensional constraints it may not be as precise as you need it to be.
Now you are getting into the realm of what some refer to as “2D+ Construction”. You will find that accuracy and precision are critically important. LightBurn is great software for controlling your laser and has some great features but it is not a CAD system.
If those Fusion 360 files are dimensioned properly, you can export DXFs and then import that into Lightburn. You’ll have to probably do a bit of editing in LB after that, but it could be a good direction to go.
Ah, you are here. There are some great resources on this forum that can be found by category, topic headings or using the search tool found at the top of each page. I picked an octagon in my example as it was the easiest way to share. You can do the same ‘Copy to Path’ with any shape. You might want to try a circle as well.
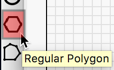
LightBurn provides drawing tools on the default ‘Tools’ toolbar.
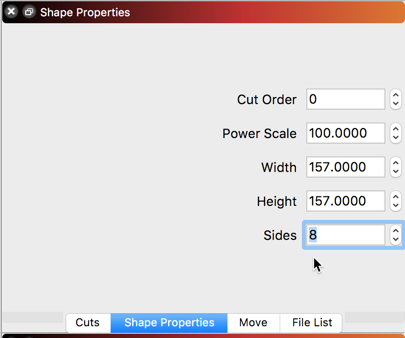
To create an octagon, select the ‘Regular Polygon’ tool.
Drag out the size you want (hold SHIFT key to drag uniformly or CTRL to create from center), then look to the ‘Shape Properties’ window to adjust the number of sides you want your polygon to have.
No need to whip-out the 3D apps for something like this. A vector-based app like Illustrator or Inkscape can very accurately and quickly get something down for import into LB. Even complicated objects can be made if you think in sides, elevations, and stacked layers.
I used to use Illustrator, but now use Inkscape exclusively due to its better snapping, line editing, and scriptability.
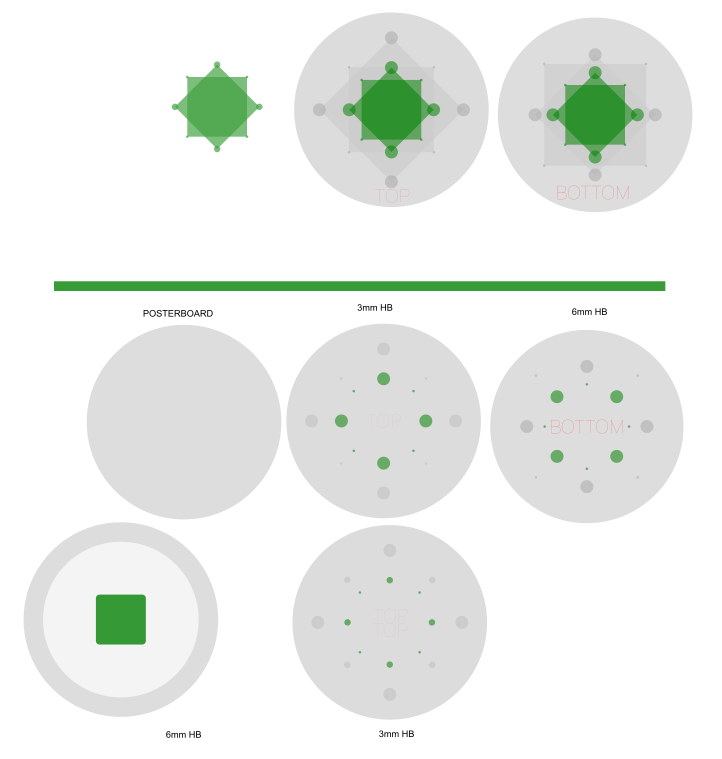
This is the design for a rotating painting platform allowing a couple different lazy-susan bearing sizes:
There’s five layers of three different materials stacked on top of each other (with the bearing in between), including a skirt to prevent paint from getting into a bearing. The items under the green line get imported into LB. The items above the line are templates used to make all the shapes (kept in case I want to go back and fix something).
Here you can see I used squares to place the mounting holes (by snapping to the corners) because of all the interrelated dimensions (plus it’s a lot faster). The squares are deleted on the final copies leaving only the mounting holes. Colours are used to identify parts. Usually it’s not necessary to weld objects together – simply grouping is enough. However LB doesn’t handle grouping very well yet so welding is sometimes desirable if things are going to be modified within LB.
I also exclusively use filled-shapes with NO STROKES. The fill is set to 10-20% opacity so you can see through them when stacked. This means that when you set a size it stays EXACTLY that size, and snaps are EXACTLY at the corners. Basically Inkscape works just like a CAD program this way. The Inkscape SVGs import perfectly into LB.
This took around 20 minutes to put together, including measuring the bearings with calipers and figuring stuff out.
I’d probably argue all of those points. I’m not sure how your snapping is better in InkScape. I’m not sure what you mean by line editing. And you can script in Javascript all day long, so I don’t get that either.


 .
.