Controlling the Rotation Frame for Burning a Tumbler with Handle

Hello.
I have an Omtech 80w red one laser with a PiBurn 4.0 rotary tool and using Lightburn.
I’m trying to print a logo on both sides of a tumbler, but the rotary tool keeps rotating so that the handle crashes into the laser head.

I have followed the steps of this video ( https://www.youtube.com/watch?v=1BmRZohfyRo ) but seemingly, the frame always rotates around the topside so that the handle swings up and would hit the laser head.

The Roller Diameter and Steps of Rotation are set based on the manufacturer’s recommended settings - and I have properly measured my tumbler and image.

Is there a way to control the framing? Because I am unsure of the proper terminology, let me phrase my question another way: I would like to set my tumbler handle-down, tell the laser to turn counter-clockwise - print one side, then re-center, then turn clockwise and print the other side. Can anyone please help me find the settings to do this? I have just about hit every button or variable in the menus, searched up and down these forums and have still not found success.

Thank you in advance.
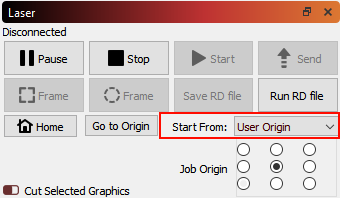
If you set your start from to Current Position and the job origin to the midlepoint.
Position your laser head at middle opposite side to the handle (handle down)

2 Likes

Thank you so much for the reply.
Unfortunately, the handle still rotates around to the top. :confused:

Maybe try with the same center button, but with Current Position.

By the way, there is no need to bash cup handles into the laser. Stick some tape on the chuck until you get it figured out.

By the way again, we are all guilty of using the “I hope it works” test method.

2 Likes

Thanks for the reminder - “I hope this works” is a time-honored tradition in my house.
I have been setting the laser pointer off to the side - so the handle is not actually bashing the laser anymore (Only the first few times) haha

Unfortunately, current position didn’t work either. It actually spun the handle around twice - instead of just once.

This is so complicated, I wonder why are you doing this as multiple jobs? I also watched (tried) the video, and he lost me with way too many computations and assertions.

I’ve done a bunch of mugs, cups and other round items, many with handles or places that the laser shouldn’t touch. Seems to me your process is way too complicated and error prone.

I’ll take you through how I do it with my PiBurn 3.0 rotary, then you can explain what you are doing that appears to be different. I think I did these with LBT100 laser spray.

One - is the PiBurn working correctly with a normal mug… without handles does it work correctly?

Two, is this an image or line?


I measure the mug, by diameter or more simply just a tape measure. I wrap it around to tell me how much real estate I have, less the handle. I assume that’s why you’re measuring it?

I set the Job Origin to center left and the start from as User Origin. I don’t use current position as I commonly move the head out of my way and that changes where it’s going to start from.

I do my art work to fit in the prescribed rectangle. Do the proper rotation for the mug.

I place the mug, handle side down, so center of the job is up… You don’t need a micrometer to do this… I’ve done bunches of these, all by eye and haven’t had a complaint.

With the handle down, that means the job origin is set properly for center left of the artwork. Sometimes you have a logo, that also helps alignment, as it’s usually opposite the handle.

Should be able to frame and run the job without issues. You can always remove or lower the rotary to ensure it’s all going the right direction.


@MikeyH has a good suggestion of using tape on the object and run at a lower power to ensure it’s doing the image how you intend.

I have a machine setting file for using the rotary where I slow down the acceleration and jump off speed to keep it from slipping…

When I read this, I assume the handles is down… if you move the rotary either direction the only place the handle can go it up… ?

:smile_cat:

2 Likes

Good morning, and thanks so much for the help with this!

You’re right. No real reason for it to do one side, then the other - it is just my rotary keeps spinning the mug all the way around to reach the opposite side of the mug. I can print a single side - but not properly centered where I want it. I’d really like to be able to have my entire canvas useable at one pass.

Yes, the laser works with a handle-less tumbler… but I am going to run another of these today to watch and see how it rotates the tumbler as the job progresses. I hadn’t paid attention to this, at the time.

Currently trying to burn an image.

Yes - measuring the mug to generate my canvas size, set my image equidistant on both sides of the mug and to accommodate for the area with the handle.

“I assume the handles is down… if you move the rotary either direction the only place the handle can go it up… ?”

Yes - but it swings all the way up and around… Instead of just moving the few inches it would need to begin burning.

Today I’m starting with a fresh re-start and switching from rotary, to normal laser. Going to successfully burn something, then set-up the rotary and burn something round sans-handle - then I’m going to try again with a handle. If there are any screenshots of settings or processes that would be helpful in diagnoses, I’m happy to take and post them.

This community is wonderful! I learned a lot yesterday searching and reading through the forums. Thank you so much.

Forget the handle, that’s just area that you can’t lase.

If you use a tool layer to outline the image, there is no need to deal with the handle… Just engrave from the handle around the mug and up to the handles other side

If it’s setup like I stated, framing should roll to the handle then outline the area on the mug passing the other side of the handle.

When engraving an image, it will rotate the handle to one side, and continue rotating and engraving to the other side of the handle.


Always use the KISS principle.

Good luck

:smile_cat:

@jkwilborn beat me to it! Instead of placing the handle down, place it on the side (you have to figure out which side) and let the rotary do its thing. Push the gantry back a few inches while testing.

I place the handle down, because it’s an easy reference to center. The Job origin tells it that it’s at the center and will rotate it to the correct position before it starts lasing.

If you try and index off the handle and the image doesn’t run handle to handle it’s likely your handle offset will be positioned incorrectly.

I think it’s much more wise to let the machine/software figure out the image center on the mug than I :face_with_spiral_eyes:


@vallesan, you need to update your profile to include the co2 machine or at least the controller.

It’s possible you may have to roll your rotary machine to a position more center to allow it to work properly. The art can’t drive the image off the mug or the Ruida will choke.

In the end, whatever works… That video was way too complicated for me.

Good luck

:smile_cat:

3 Likes

Yes - I thought about this, but putting the handle down really helps me center the image - so I would like to be able to use it properly.

But even still, the problem is the rotary keeps rotating a full rotation - so regardless of where I position the handle, during the frame it always does a full 360.

Full rotation when framing? That is either (1) the rotary is not set up properly, or (2) thr drawing is too large for the available space on the mug. I have been guilty of both so I am not going to offer a guess on which to check first.

Let’s look at this another way. Visualize your slicing through the center-line of handle then removing the bottom of the mud. Now take each half of the handle and open the cup so that the inside is against the bench surface. Now, you have a flat surface with a half-handle at each end. Next set a Frame that covers the area for both logos, Insert the logo designs where they would be if the cup were no longer flat. What you have is a Frame on a flat surface with two logos inside. Set your origin to the top left corner and bi-directional lasing and press Start. You should be able to burn both logos in one pass. This is no different on a rotary except you convert linear motion to rotary. If your rotary is set up properly the engraving on the mug will look no different to the laser than engraving on a flat surface.

Exactly. Tapered mugs are a bit different to visualize, but basically the same.

If you keep messing with it long enough, you will eventually understand what is happening.

1 Like

I learned how to setup my rotary by watching this video on Paw Paws Workshop. You can skip most of the first part. Paw decided to do another logo on the cup towards the end and he shows a simple way to do it.