My biggest pet peeve is when I have all my cuts set up in order, and I make changes to objects or move them around the cut paths move out of order. Why is this, and can the just be set stay in the order I want them. I have to make sure everything is in the order I want my job to process. Example the Final Cut May jump to the beginning of the job, not good.
How are you achieving this? How is the order set?
This will determine potential course of action.
By in large the largest impact to cut order is determined by the Cut Planner/Optimization Settings:
Optimization Settings - LightBurn Documentation (lightburnsoftware.com)
All cut paths are moved to be in the order I want them in, I just wish they stayed that way. When I edit something the corrisponding cut path moves to the bottom of the list. I can’t figure out what order or option to achieve this in the optimization setting. Tried that already.
I have made a master for doing 2 sided graphic, the back is output the back get engraved first, then the front with cut.
I have 5 different cut paths. There are several step I do.
Step 1. I turn off all output except the first cut path. This is a master hole in my project. (now jig hole)
Step 2.Next I turn off that cut path and do step 2 which is it to cut a piece which I have front and back graphics placed but not output. This creates the blank work space.
Step 3. I then put that cut piece in the jig hole, and turn off cut and then output the back graphic.
Step 4. I flip the piece in the jig hole. Front is now up. Turn off the back output, and turn on the front graphic output and cut output.
When all is said and done I have graphics that are cut out and have graphics engraved on both sides.
All cut paths need to stay in order or everything can get all screwed up.
I had to come up with a process to keep my cut paths on the master which now only has 2 objects when I save the master, because you can’t make templates. That wasn’t hard, but a pain in the neck.
Assigning priorities only works on a single objects, and isn’t a viable option.
I use this for all sorts of things. 2 side earrings, Christmas ornaments etc… The cool thing is the 2 sided object can be any shape you want and can contain multiple objects, as long as it fits in the box.
I am new to laser (2 months). I like to push the envelope.
Hopefully I explained it well enough to follow.
Can you explain what this means? I’m trying to understand what the complication would be for making templates.
As for the original problem statement, it sounds like you’re manually enabling and disabling which shapes to cut at each step. If so, I’m not following how the cut order is changing and how that’s affecting what you’re trying to do since it sounds like you’re deciding that based on what’s being enabled.
Overall, your workflow sounds a bit convoluted. I can’t tell strictly from what you’ve described if all steps are strictly necessary or if there’s opportunity for simplifying. Overall, it sounds like you’re trying to engrave on one side of the material, and cut from the other side. Is that correct?
It’s not clear to me what you mean by this. I’m having a gap in understanding of the terminology being used. Can you provide some visuals that demonstrate what you mean by cut path and order?
2 sided master.lbrn2 (244.7 KB)
Hopefully this comes thru. This is my Lightburn file that I created as a master
This what I do. It may sound complicated, but the output process is simple. Too lengthy to explain the process in detail.
It involves traced, and masked images that are flattened and stacked on top of each other for output.
Keeping the output order is important, because it would be confusing as to what order to do them in.
Is there a setting that locks the cut paths in my order?
I can’t figure out how to explain it any better.
Thanks,
Jay
Still not clear to me. Are you referring to the order of layers in the Cuts/Layers window?
And is your concern that the layers themselves change positions? Or are you referring to the order of cut at run time?
Yes, the order of the cut paths widow, not on output order.
Under what circumstances are they changing?
Normally they would only potentially change position if you removed all shapes from a layer such that the layer disappeared entirely, then created shapes onto a new layer, and then reintroduced shapes to the original layer such that it reappears.
If specific layer order is important to you then I’d suggest retaining at least one shape for every layer so that the layer is never removed. Alternatively, I’d suggest adopting a workflow that’s not heavily dependent on layer position.
1 Like
I did create a permanent group of objects for all cut layers. Hopefully that fixes it.
I don’t delete any object in the projects. I may add them, but assign the to the appropriate layers after import, but that may be what is happening. I’ll keep an eye out, and see if I can figure out what I am doing when it occurs.
Thanks.
1 Like
Searching for a fix to this myself. Currently working with 1.4.05 on Win11
Let me first say I’m working on a 100% Lightburn origin design. Other than a reference image, there are NO imported objects. Every vector was created by hand (no tracing) inside Lightburn, so this re-ordering problem is NOT an import or translation issue; at least not solely.
When developing a layered design, I often use filled rendering and specific layer order to visualize how the various layer features interact. The physical cut layers are glued to one another and certain lower layers are larger than the cutouts in the layer on top of it to allow a glue flange. That flange must be there but I don’t want to SEE it. Editing shapes moves the layer order which ruins visualization.
Imagine the side of a house where the exterior has window cutouts. I want the glass and sash of the window to sit physically underneath the exterior, but I need material overlap to allow assembly. If the layer order is wrong the overlap becomes visible.
Further, if using an image layer for reference, it must also be in a specific order to render properly. Ie, output=no and set to bottom of layer order stack. This makes the image translucent. If I move it in the layer order, some (or all) fill layers will totally obscure the image.
Unfortunately, I have not been able to determine what actions actually cause the re-ordering. I’m focused on the shape edits, usually zoomed in significantly and editing nodes, and finish an edit when I zoom out to review and see my layer order is messed up. It’s not a huge problem to pre-order, but it does get frustrating not understanding why or knowing how to prevent.
These edits may be quite extensive involving breaking, copying, reassigning layer to the copy, rejoining, etc.
A simple example…
black image layer is set to output for full contrast reference.
red image layer set to no output for transparency.
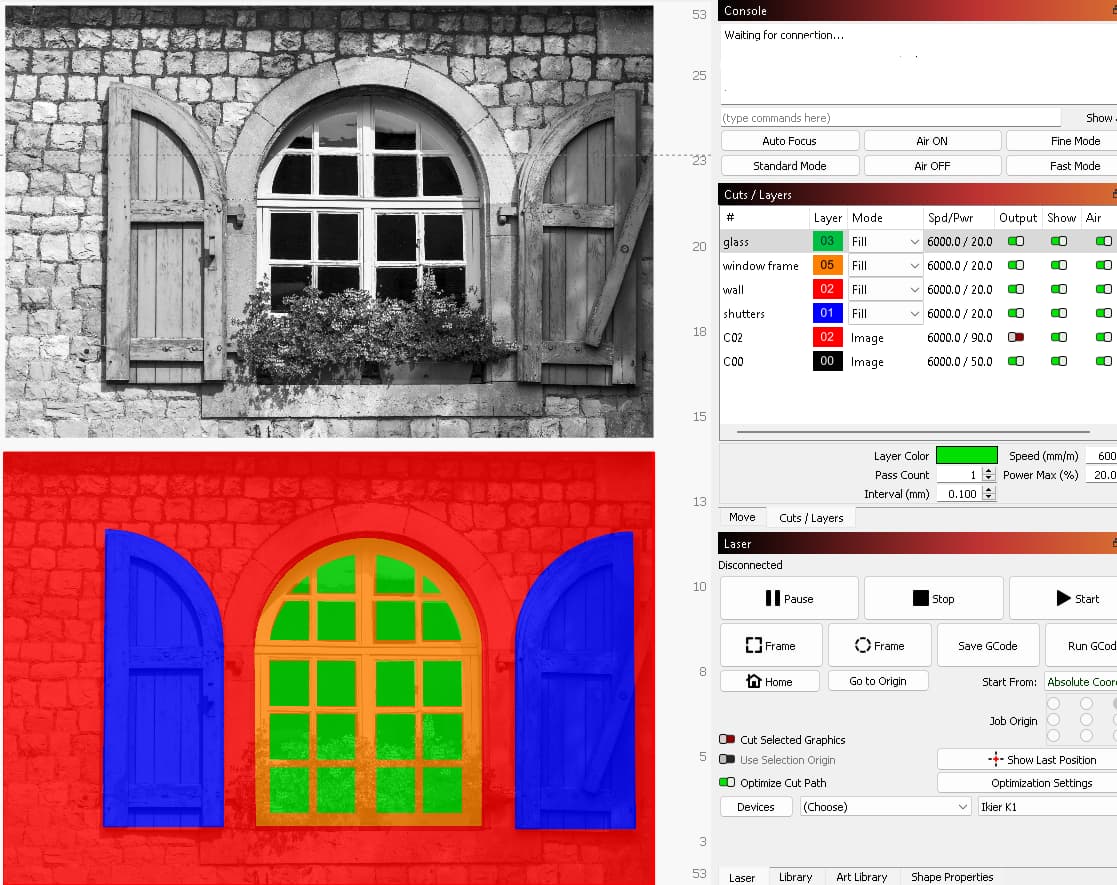
Wireframe to show actual cut lines for each layer. Notice overlapping areas.
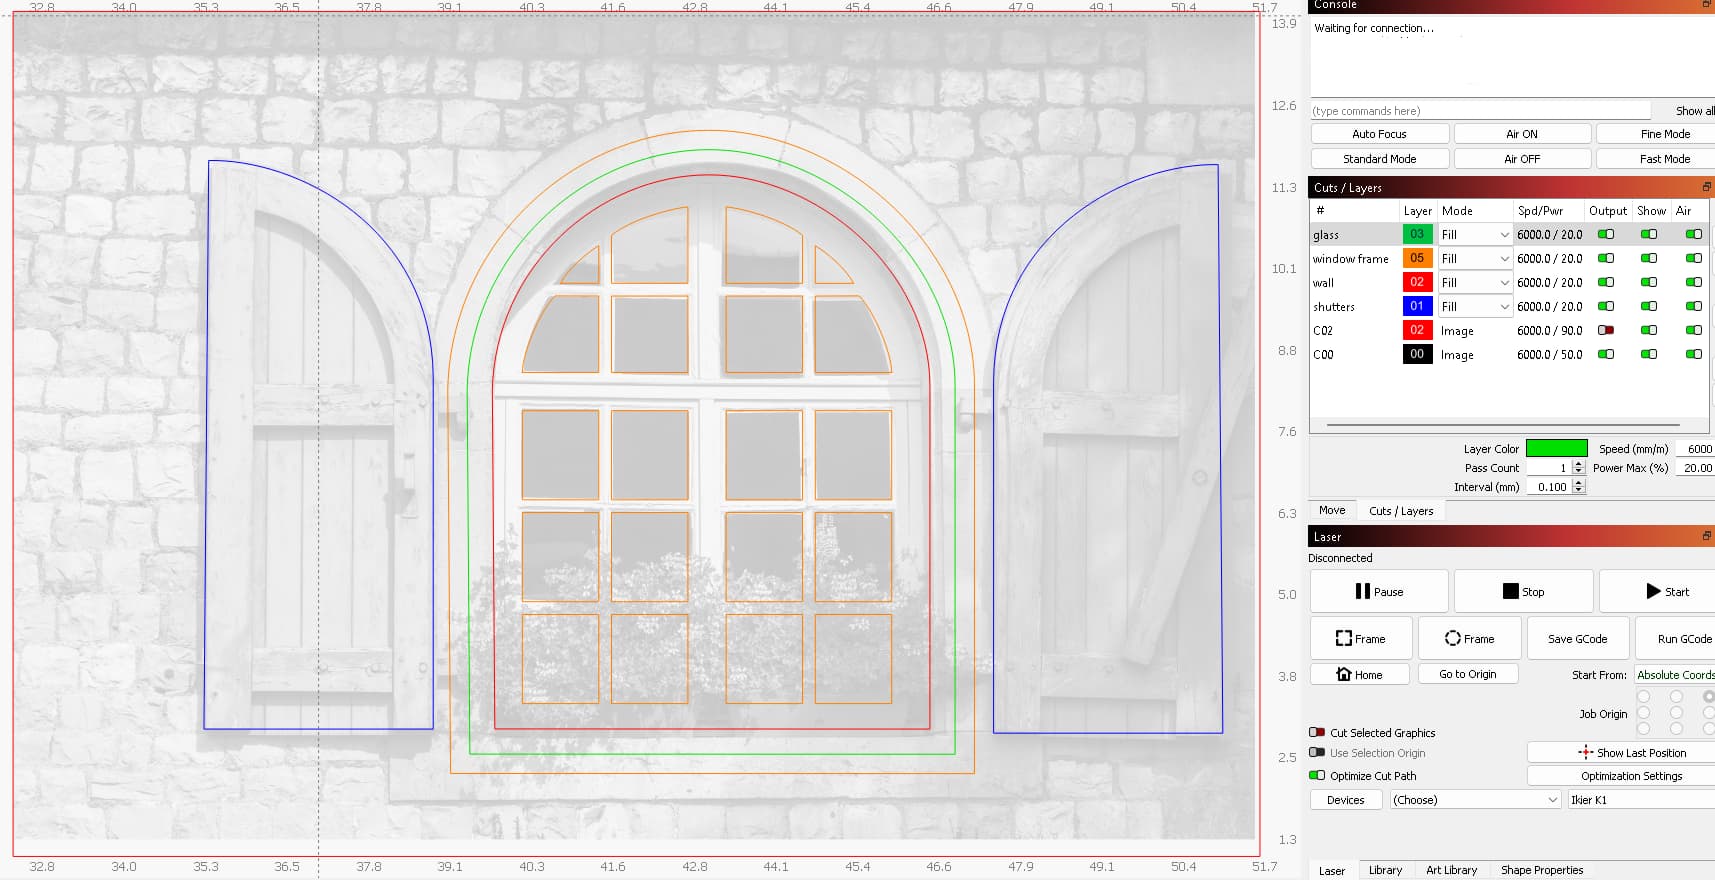
Just a change in layer order…

Working with the example, it seems clicking on the palette to reassign a layer moves that layer to the bottom of the list. I do this often and that may be the trigger.
If it’s a previously unused layer, that’s no problem. If an in-use layer is getting additional elements, it should NOT alter layer ordering. IMO.
Not sure this qualifies as a bug, per se, but I fail to see how this is useful if intended behavior.
Also if you undo, the changed order remains.
I have the same problem, and have mentioned it, but it didn’t seem to matter to the developers, or they didn’t understand the issue. Your example is exactly what I was trying to explain to them. I would like to see a lock on the layer order.
I have project that are multiple steps, because I do 2 sided burns which require some layers to burn on one side, then I flip the over and turn off those layers, and turn on others to finish the project. If the layer order is changed because I edited something, bad news.
This is a pet peeve of mine as well. I don’t use LB to edit my designs, and a single project of mine might have fifteen A2 “sheets” to be cut so they can be pretty big. I’d like to be able to delete everything in a project before importing a modified DXF, but instead I have to zoom out far enough to not overlap any existing sheet, import the DXF, select the obsolete sheets, delete them, select the new sheets, and finally move them to position. If I just delete the old sheets and import the new ones then BOOM, layer order vanishes.
This topic was automatically closed 30 days after the last reply. New replies are no longer allowed.