Am currently in the process of buying my first laser and my decision will highly depend on how easy it is to cut designs larger than bed without having a passthrough door .
I found a lot of videos about print and cut but all of themn use a passthrough door so was wondering if it wouldn’t just be possible to rotate your sheet 180 degrees with print and cut if you only have a front door for access .
And in case that’s not possible, would there be other way to achieve this in a single cut without using puzzle pieces ?
This is fine. Specific orientation does not matter for Print and Cut. What does matter is that your laser has clearance to reach all required areas of the material and that your reference marks are visible and reachable by the laser.
@berainlb thanks, so just to be sure, even if the image was rotated 180 degrees either horizontally or vertically print and cut would still be able to do all in 1 piece ?
I was concerned that without flipping the image manually in lightburn it would have no way to know that it needs to cut basically a mirrored.image from bottom to top opposed to keep cutting in same direction when you have a pass through door .
This would mean lightburn print and cut needs to automatically invert the cut paths
It’s not clear to me what you’re describing. The word rotate matched with horizontally or vertically is throwing me off.
I want to make sure I’m truly understanding what you’re trying to accomplish. My initial understanding was that you were trying to use Print and Cut to cut a single piece of material marger than your work area. The stated complication was that you only have a single opening and cannot pass the material through the back end of the machine.
In this scenario, I had assumed you’d simply run the fist half of the job, rotate the material 180 (not mirror), then complete the second half of the burn. Note that what I’m describing is all in 2D space, no 3D rotation of either the material or the design. Have I misunderstood this? If so, please clarify. An illustrated example would help remove ambiguity.
Print and Cut could be used with a flipped design but your workflow would need to be designed for it. Not sure under what circumstance you’d want to do this but I could see this being useful for cutting through both sides of a piece of material. I’d expect this to be more easily done with jig approach though rather than print and cut.
Tyvm for your detailed explanation, I am sorry I have introduced that confusion element by using words like mirroring and horizontally / vertically (I was referring to being able to rotate the image 180 degrees either on the X or Y axis) .
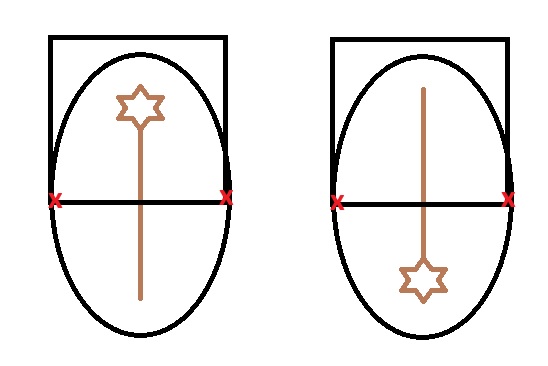
I think you understood exactly what I am trying to accomplish, as can be ilustrated by this quick mockup I just made :
So in such situation, doing print and cut would not require any changes in the design as far as I understand ?
Lightburn would cut the first part from top to bottom and continue the cut of the second part after rotating the image and placing the laser on the marked spots from bottom to top ?
This is still problematic from a language perspective. Based on the photo, your design seems symmetric along the Y axis so the wording might work if it’s indeed perfectly symmetrical. However, when I’m talking about rotation I’m talking about rotating the design like the hands of a watch, from 12 o’clock to 6 o’clock. That would be on the Z-axis if you wanted to insist on referencing an axis of rotation.
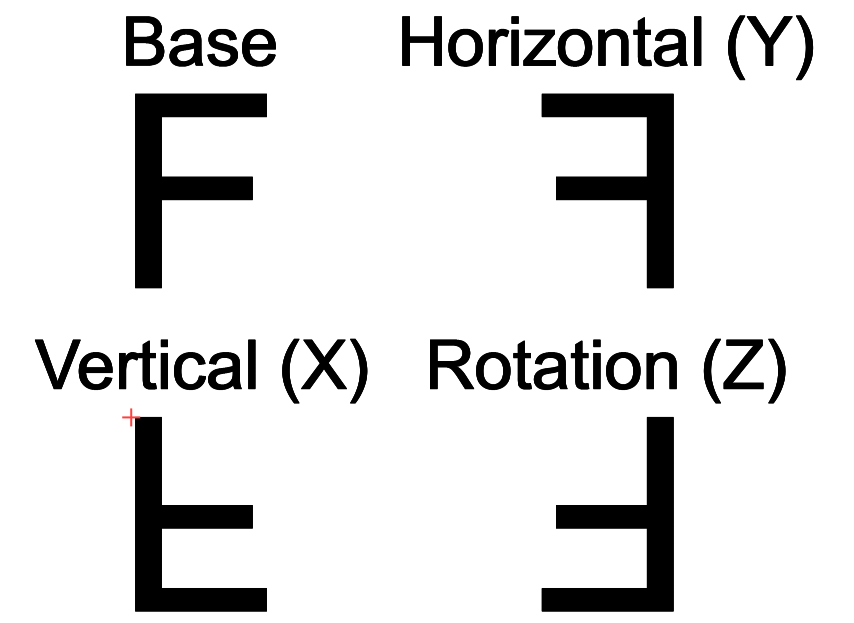
I’m being particular on this point because it actually has an impact on the outcome. Here’s an illustrated example. Note that the horizontally and vertically flipped designs do not match the original base no matter how much you turn your head. The rotated design matches the original if you turn your head 180 degrees.
You need to prepare the design for each half of the cut. So whatever will be cut for the first half in one design, and the whatever will be cut in the second half in another.
I’m getting the impression that you think this is an automated mechanism. That’s not the case. Print and Cut at the end of the day is a mechanism that allows for precise alignment of the job to specific points on the material irrespective of the actual position of the design or the material. Once that alignment is achieved, you can cut any design with respect to that alignment. In your scenario, it just happens that your second design/material would be rotated 180 degrees from the first.
Alright so, for the sake of simplicity let’s assume I am just rotating my image 180 degrees as in the mockup I provided .
From what is my understanding and what I’ve read from other tutorials , the alignment doesn’t matter , so I am assuming the second part of the cut will basically just be the second part of my design without any changes .
Now this is where the confusion lies for me . Assuming I am using the x marks from the first cut and follow the procedure to place the laser on the center of each mark before proceeding with the next part of the cut, from what I saw people were just moving their sheets through the passthrough door and didn’t have to change anything in the design (which was already previously cut in 2 or 3 pieces along with the respective X marks) regardless of it being misaligned in comparison with the previous sheet placement .
So if someone with a passthrough door pushes the sheet forward to resume cutting , even if they rotate it 30 or 40 degrees lightburn should be able to resume the cut exactly where it left (that’s what the X marks are for) .
My question is if the same will work with 180 degrees rotation (without any z axis movement) , in which case I would expect lightburn to do the rest of the cutting in the opposite direction i started (first cut being top to bottom and second cut being bottom to top) without having to change anything on my design .
The only difference is my x marks will be at the bottom of my bed after rotating my sheet 180 degrees , so lightburn should still proceed with the cut from bottom to top after identifying the marks are at the bottom.
Does it make sense ? Usually people will push the sheet forward and keep cutting in the same direction while using the X marks for lightburn to resume, just because i rotated my sheet 180 degrees it shouldnt be any different as long as the laser is correctly placed over each mark, right ?
No changes other than what’s required for the base preparation including the alignment markers and the pre-split design.
If I’m reading this correctly, then yes, no additional changes after the splitting of the design and positioning of the alignment markers.
Yes, precisely.
If I read this in context to the previous statements that I affirmed as yes, then this is also correct. However, to keep your head on straight it may be easier to also rotate your design in LightBurn oriented approximately to how the material would fit in the laser. It’s not strictly necessary since it will do as you say but you’ll have to do the association of the design to the material in your head.
Yes. Just make sure you’re associating the correct mark in the design with the correct mark on the material.