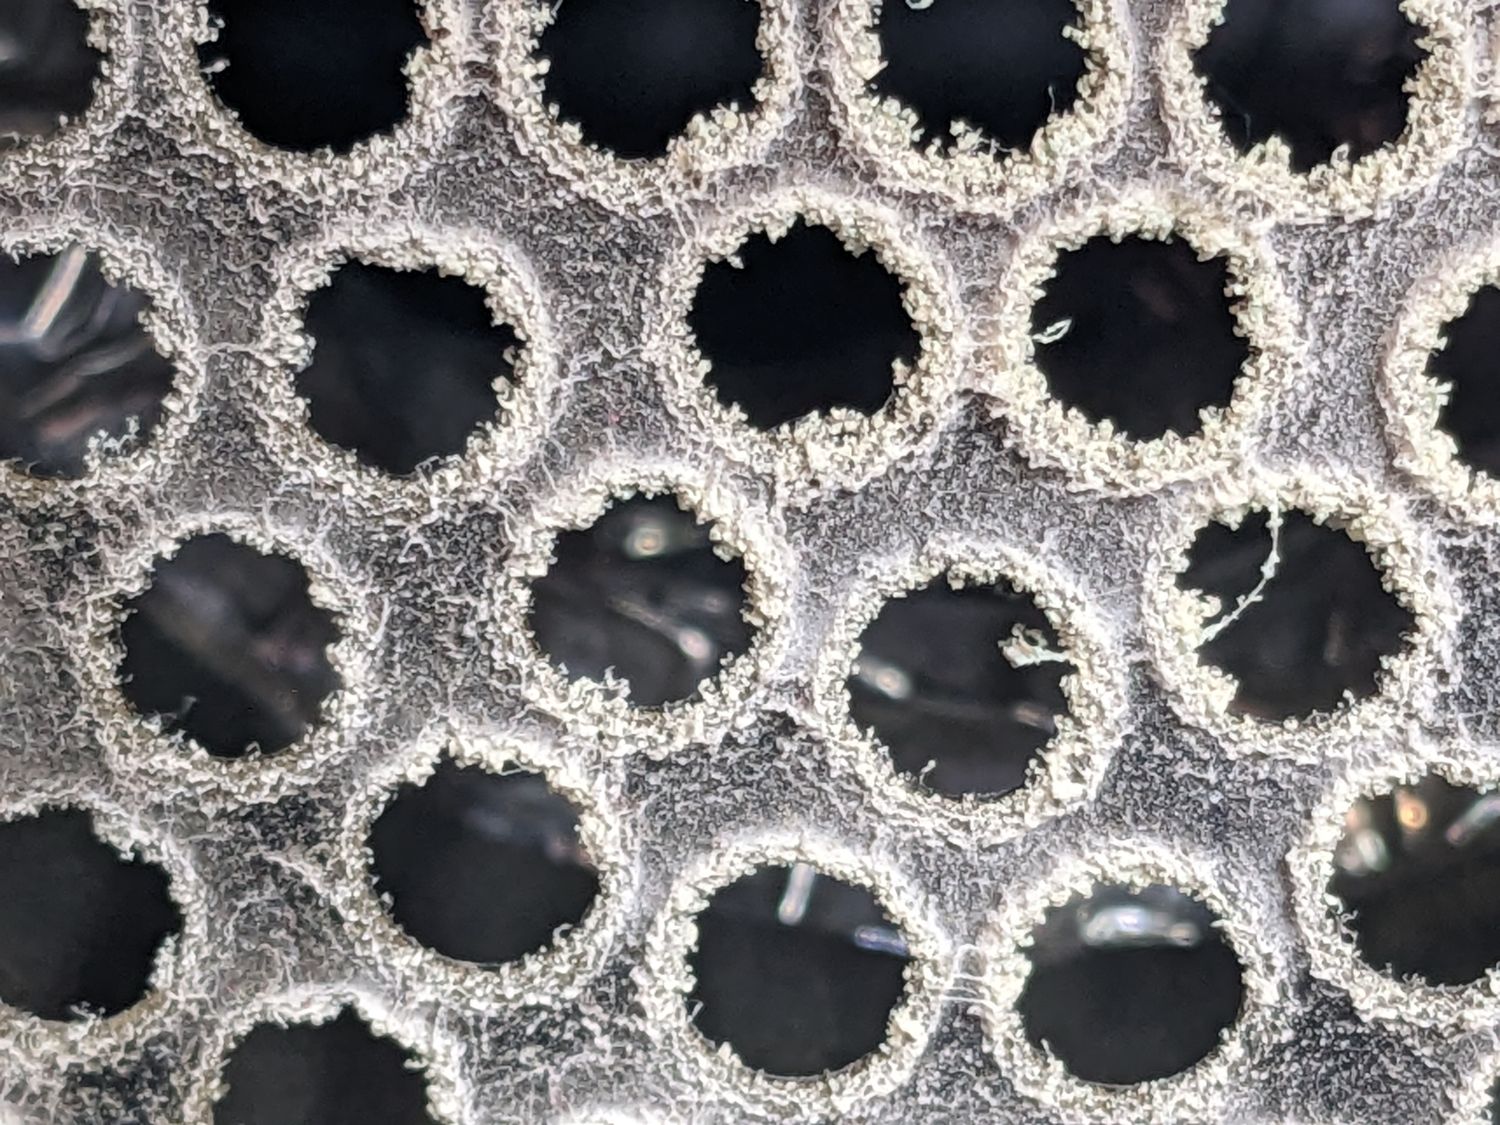
Today I cut and engraved a Lid for a 3D Printed Herb / Seasoning Box and when cleaning the Lid, I noticed the Honeycomb Bed Mesh occasionally having gotten patterned along the cut edge not exactly ruining it but giving me a moment of pause - Most of it could be removed with rubbing it away but still.
With it only being my 2nd “Project” ( besides the plethora of Material Tests I’ve done ) I’m still lacking the experience soo… What is the general census regarding the Protective Sheets you’d find come pre applied on Acrylic Panels?
Do you leave both sides on? ( even with intricate Engravings? )
Do you only remove what will be the top side while Cutting / Engraving?
Do you remove them from on both sides? If so - How do you deal with the Pattern Problem?
So far, I went with the last option by removing the protective Sheets on both sides
It’s been years and years since I worked with acrylic, and back then it was with a 60W CO2 laser…
My guess is that you are getting smoke/fume condensation on the back side of the acrylic as you are cutting it. The honeycomb grid will interact with that condensation and you will be able to see the pattern on the back side of the cut. It shouldn’t be too difficult to remove.
The protective sheet on the back side of a cut will limit some of that condensation, so it may be better to leave that on. On the front side, it should not make much difference whether it is on or off.
How to minimize the patterning?
Air assist should help a lot.
Downflow fume exhaust helps even more. That means that you need to somehow have airflow vertically down through the honeycomb. With hobby lasers, not many people have that, and it might take some creative engineering to make it work.
Lower power and/or faster cut speeds (with more passes), especially combined with air assist could result in less smoke and fumes impacting the bottom side of the acrylic as the laser breaks through the bottom.
Just a few ideas that might help. The only problem is that I think I’ve forgotten more about Laser Engraving than I ever knew! The hazards of getting old!
I do not remove the protective film during laser cutting. As @DaveK-OR writes, lots of compressed air and lots of extraction and I put my acrylic sheets on spikes approx. 25mm above the machine bed, it effectively prevents the pattern from honeycomb beds, but you will probably rarely get rid of a little smoke marks completely. Remember, never clean acrylic with anything other than water and a few drops of soap.
@bernd.dk & @DaveK-OR I’m a bit surprised you two suggesting Air Assist when working with Acrylic…
During my Material Patterning Tests, I ran one such test with Air Assist and it immediately clouded the surrounding areas around both the Cuts and Engravings whereas running it without Air Assist would result in both a nice and clear Cut and Engrave Leaving the Protective Sheathing on might have helped ( for the Engrave ) but the Project made use of a Font with incredibly intricate Outlining and removing the Sheathing just from a clean Cut was already a R.P.I.T.A. hence my idea of removing it beforehand than dealing with the atrocity of getting all the tiny bits between the Engrave removed
Airflow unfortunately seems to be something I’d have trouble modifying on the Machine… There’s just no space for redirecting it from its current path and using tall Spikes seems to be somewhat of an issue too as Z-Clearance is a bit of a premium - I guess the best Solution for now would either be using very small ones or simply keeping the bottom Sheathing on.
If you have an extraction system that can suck out more as you blow in, it works fine (in my experience), otherwise you get “white snow” when engraving Acrylic.
I pitched the honeycomb out of my machine when I first got it. I have a sheet of rolled steel in there.
I have 5mmX15mm magnets I stand on edge to hold the material off the bed if I’m cutting. Most solvents will allow you to wipe off the residue or debris left from the cut. It’s solidifies fast when it hits cold steel…
Take 15 minutes and watch this video… It’s something to keep in mind about honeycomb beds… I thought they were like sliced bread for innovation.
I leave the underside covering on, and remove the top… I think it works better…
About air pressure… Mine is set to the minimum amount to protect the lens from debris… In the end, it’s how the emf reacts with the material and I think with acrylic you want the beam to vaporize the material and not a cold air stream…
Most of my experience is to cut highest comfortable power and fastest speed. Multiple cuts in acrylic can leave issues around the cut… so I avoid that.
Funny you mentioning it… At some point I noticed strange white flakes making a sudden appearance ON the surface which at first, I couldn’t link to anything until by chance I noticed it originating from the Nozzle like Stalagties. The Air Assist of the G·Weike Cloud is situated inside the Machine so essentially recirculating
Highly informative and yeaa… Not leaving the Machine unattended should be a given… It’s a rule I already learned to stick to when working on my CNC and that one is in - my mind - far safer than the Laser with Heat Buildup on the Tool only becoming an issue if the Job makes an unscheduled stop, but the Spindle still keeps spindling
It’s also the reason why both machines now have a spray bottle of demineralized water near them
Unfortunately, mine is either On or Off - The G·Weike Cloud used to have a Needle Valve for adjusting the Airflow in their 1st Gen Machines that still had an externally mounted Air Assist / Filtration Unit but the new ones ( aka mine ) with the internally mounted Air Assist appear to have lost that feature.
