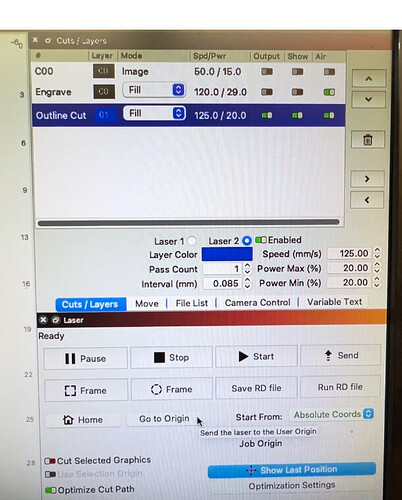
I just recently purchased a OmTech dual laser, I have been able to get it calibrated, completed a ramp test on the lasers and all seems to be working. The issue I am having is on Lightburn for the 2nd laser how can I use the “Frame” function to know what area is going to be engraved? As it currently just goes up and down and doesn’t go in a circle which is what it would do for the design. It does go around in a circle for the first laser, but not for the second, even though I have selected “Laser 2”. Any suggestions would be great.
Thanks for reaching out. When you say "the “Trace” function”, I am reading this as you intend to have the laser travel the boundary of this project, with the beam off, to check alignment on your material. Do I have that correct?
If yes, we refer to this functionality as “Framing”. ![]()
To assist with tracking down what you are observing and why, it might be faster if you can document / provide video and images with illustrations, showing us what you “see”. Include several screenshots of LightBurn, showing the full screen, your settings for each layer and tab used for this project. Also share the OS and version number for LightBurn.
Out of curiosity, have you tried running this job using RDWorks, the software that comes with the Ruida motion control system in your laser? This could help in troubleshooting hardware vs software.
This way, we can review all relevant information at once, while trying to assist in resolution. ![]()
I have not tried using RDWorks. I am only familiar with Lightburn at the moment.
What I am wanting to do is cut the same design on two laser heads at the same time. Lightburn currently does see both laser heads. I would like to use the “Frame” option within Lightburn to show the outline of where the design will be cut on the item being cut on the 2nd laser head. As I don’t want to mess up and engrave an area that I don’t want engraved.
Both laser heads are working, that isn’t the issue. The issue I can’t seem to figure out why the first laser head (the one on the right) will “Frame” a graphic that I am going to engrave, but the second graphic, when I try to place it on another layer to use the 2nd laser head, it just moves up and down, but doesn’t go in a circle like it is out lining the graphic or “Frame” the graphic. The first laser does frame the graphic. And if I place the graphics on one layer together, how will I know where it will be engraving if I cannot use the Frame option?
If you have both lasers enabled for a given layer, each laser will run the layer simultaneously in place, so wherever you see both the 1st and 2nd lasers frame is where the layer will output.
If you have only one laser enabled for a given layer, it will output in the location the 1st laser framed, regardless of whether only the 1st or only the 2nd laser is enabled.
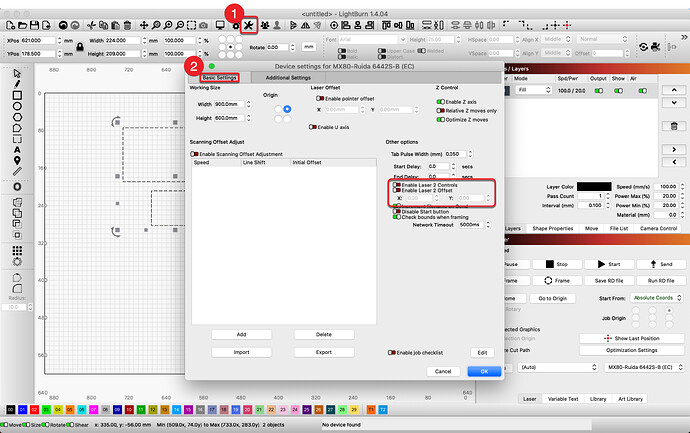
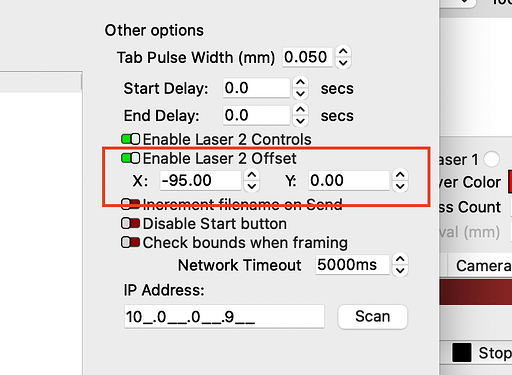
Crucially, you’ll need to apply a Laser 2 Offset in Edit > Device Settings in order to get your 2nd laser to fire where the 1st laser frames, when you output a layer with only the 2nd laser enabled.
In my case, the 2nd laser head is 95mm to the left (away from X0) of the 1st laser head, so I set an offset of -95.00.
Thank you for the details this has been helpful. How do I know for my particular setup what I should use for the X and Y? For the 2nd laser offset? Sorry I don’t quite understand how I should measure it.
Your supplier should have this information from when they initially configured the laser. Worth asking.
Tip to tip. You measure from one output to the other. I would fire a test dot from each without moving the material, then measure their distance between.
As an additional helper, with many things in LightBurn, hovering your mouse over a thing should produce a helpful tool-tip about that thing. Hovering, then hitting F1, should take you to additional information as well. ![]()
This topic was automatically closed 30 days after the last reply. New replies are no longer allowed.


