I’m working on some Christmas ornaments and I want to engrave both sides and then cut them out. I created a grid to maximize the material.Not sure how to flip the material and get it to engrave in the correct location. Is print and cut what I want? I can burn the target locations thru the material so I can see them on both sides. Is this what I want to do?. I have attached the project file. I have not yet created the engraving for the back.
Light of the World Ornament.lbrn2 (449.1 KB)
In my opinion, the best way is to affix your workpiece so it cannot move. Use Absolute coordinates. Engrave then cut the front side. Without moving the substrate flip each ornament over and place into the cutout. Engrave the back.
3 Likes
As Tim recommended, And also if you can cut out a little space in the main material area to insert a tool to help remove the cut piece’s…it can be tight and time consuming to get them out.
Ps, Hold down the material firmly with one hand and remove pieces with the other hand.
Different strokes for different folks, but my approach might be almost the complete opposite of Tim and Peter. As it only requires one reference line and two mirrored stops, I find it’s really easy to work with, especially if I have large batches of things like double-sided Christmas tree ornaments.
I’ll try to break it down into a step-by-step process. I don’t always do things in this particular order, but it should be enough to get the idea across for anyone wanting to ponder what their particular process preferences may be.
-
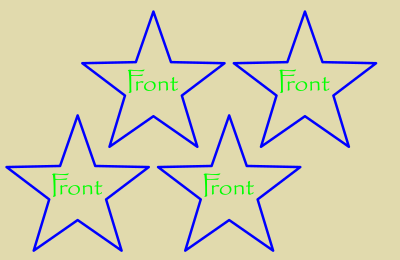
First, I’ll set up my design on the front, with a rectangle for the stock.
-
Next, I’ll mirror the entire design (on the stock rectangle) and fill in the design for the back.
-
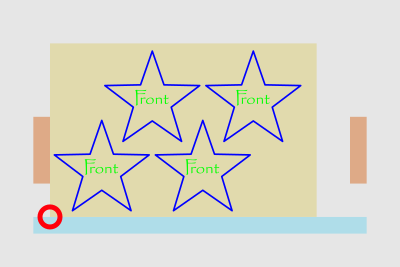
Then, I put a long bar (light blue) on the bed in my workspace and align it precisely with the Y axis (or just put a couple screws/pins in my other laser’s already aligned workspace). This is my Y-axis reference.
-
Now, I slide my stock against the bar/reference, slide it to the left, and add a left stop (orange). This is my X-axis reference for the fronts.
-
Sliding my stock to the right, then, I add a right stop (orange). This is my X-axis reference for the backs. (Note that there is a bit of free space on the X axis so the stock can only reference one stop block at a time.)
-
I can then jog to the front left corner (red circle) I have just defined and engrave the fronts of my project (green), starting from current position with the job origin on the bottom left, repeating for as many sheets as I want.
-
With all the fronts done and the sheets stacked, I can then jog to the right front corner (red circle) and have the machine engrave the backs (red) and then cut (blue) the parts free, starting from the current position with the job origin on the bottom right, repeating for each sheet in my stack.


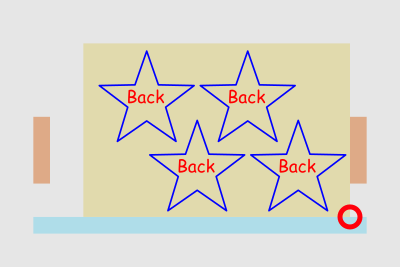
I personally prefer this method to the engrave-cut-flip-engrave method, as it doesn’t depend on kerf or keeping the stock still or whatever. It only depends on one reference line (the light blue bar) and two end stops (orange), and the same edge and end of the stock are referenced for both the front engraving and back engraving and cutting operations.
Definitely not saying it’s the right way, and one could argue whether it is even a right way, but it works for me.
2 Likes
As long as you’re careful where you put your registration marks this should work fine. Beats faffing about with trying to keep the workpiece in the correct place.
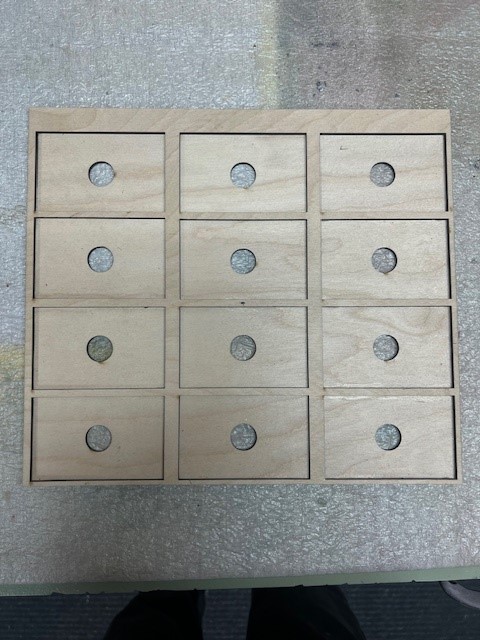
I had the same issue printing aluminum business cards on both sides. So i made a jig the size of my business cards. Then attached it to the honeycomb with some tape. Then i engrave the front of the cards flip them over and do the back. You could do something similar except with the design you wish to cut on both sides. This will keep everything in register and i can do 12 cards at one time. After you cut out and make the jig you can use the same file to place your designs, one for the front and one for the back. Once the jig is set and framed into the correct position your good to go and can product multiple sets of pieces very quickly
Business Card Jig.lbrn2 (17.0 KB)
2 Likes
Nice. I made jigs for cards, coasters, “woodallions”, et cetera, but my trick is that I make them with oversized rectangular spaces.
I have LightBurn templates for each with tool layers with my jig registration marks and all the oversized openings, and I then align copies of the design to the (usually bottom right) corner of each spot. One jig and template can then work for multiple things – round coasters, square coasters, business cards, bookmarks… – as long as the item size is consistent. (Standard template secret sauce is to always have a small 3/4 circle relief cut at the corner of the template openings so sharp-cornered objects don’t touch at the corner.)
The corner registration method doesn’t work for “live-edge coasters” cut as cookies from natural branches, on the other hand, as their size and shape isn’t consistent. For those, I have a piece of plywood (with registration marks) where I’ve engraved discs of concentric circles at each spot. It’s pretty easy to drop one branch cookie on each target and center it by eye, and since I’m only engraving on them, not cutting through, the solid jig is just fine.
1 Like
Do the front engrave and cutout, fix the sheet on the machine so it does not move, take the cutout part, flip it and place back in the cutout, flip the image, then place the reverse side over it. I test the position by firing a short low power pulse at strategic locations to verify position.
A lot of good ideas. Thank you all for chiming in.
Here’s an upgraded design for the business card engraving jig. I put a small registration mark in the center of the jig to make it easier to position on the bed. Just move your laser head to the center of your bed then move the jig until the laser dot is over the small mark in the center of the jig. Make sure the jig is parallel with your X axis and your good to go. You can make a copy of this file to do your designs. I included the file to make the jig and the file i used to engrave my business cards
Business Card Jig New.lbrn2 (21.3 KB)
1 Like
I have toyed with the print and cut feature to accomplish this. I place a + in the corners and cut through the material in waste area for alignment. Works decent. Sometimes not always 100% but I think that’s me and the design.
1 Like
This topic was automatically closed 30 days after the last reply. New replies are no longer allowed.