Engraving 256 layers in one go with variable power?

I’m considering buying a gantry CO2 laser (brand undecided) and am looking for some advice on a technique I saw at a trade show but haven’t found clear information for since.

What I Want to Do:
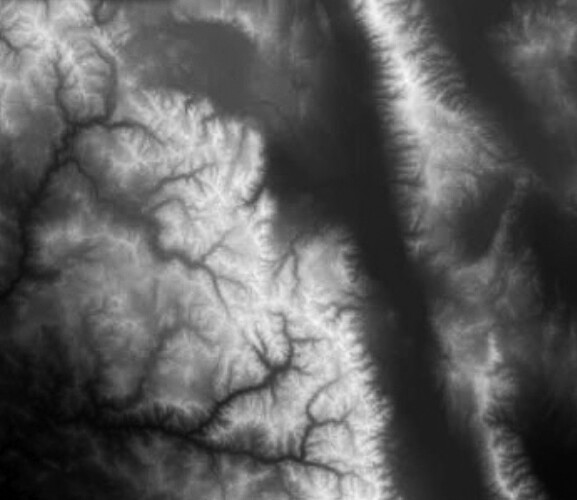
I plan to engrave a bunch of different 2”x2” map tiles on various plastics using 256 greyscale to determine engraving depth from 0.0mm to 1.2mm deep based on the greyscale value of each pixel.

Current Method I’ve seen:
I had 2 local shops create some samples a few months back, and it took about 2 hours for each tile (they used both galvo and gantry lasers). One used a 256 greyscale image in LightBurn, to engrave 256 total layers based on the greyscale value. The other converted the 256 greyscale image to an .STL to be used in Ezcad3, also engraving 256 total layers depending on height.

Efficient Method shown at Trade Show:
A salesman was demonstrating a laser with “variable power output” running LightBurn, using a method that would engrave the entire tile in fewer passes. Instead of engraving each 2x2” tile face one layer at a time (256 passes), the laser could engrave 1mm strips (hypothetical width for the sake of explaining), embedding all 256 “layers”/depths in a single pass based on the greyscale values, where darker pixels trigger higher power and lighter pixels, lower power. This method could reduce the total passes from 256 to around 50.

From what the salesman was explaining, the individual strips/passes would be slower, but overall the entire piece would be completed faster than the traditional 256 pass method.

Power Scaling:
I’ve seen the Power Scaling feature mentioned in LightBurn forms, from my understanding it looks to be more for finding the power range your laser/engraving material works best with (not to light, and not to strong to melt/burning the piece), rather than varying the power dynamically based on the image’s greyscale during the engraving process.

My Question:
Does anyone know if a gantry CO2 laser with variable power output, running LightBurnis able to vary the power dynamically while engraving, to engrave all 256 “layers” in one pass over multiple strips to complete the piece?

If not, does anyone have any other techniques or machine to speed up the engraving process, because 2-3 hours a piece isn’t worth it when I need to cut over 100 of them.

Thank you so much for the help, I’m just getting into all this and it is overwhelming how much there is to learn!
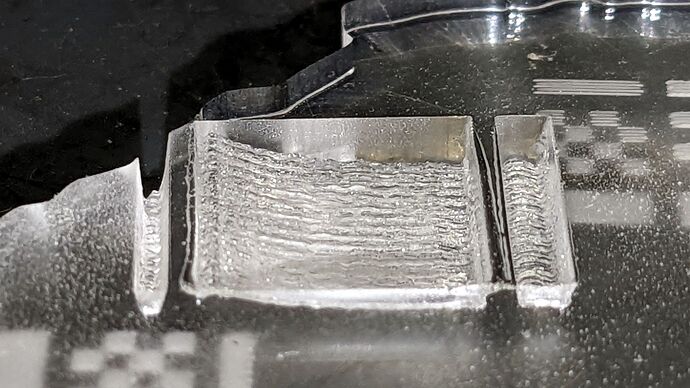
How is this different from grayscale engraving, where the grayscale value of each pixel determines the power? It sounds like bafflegab filtered through sales-speak.

Grayscale engraving works great in acrylic, although the depth is not linear with the power percentage:

That’s from a grayscale PNG image, inverted so white = 0% and black = 100%:

The bars are 1 mm wide and it’s obvious clean “digital” transitions on a per-pixel basis don’t happen.

More background on my blog, as part of exploring the controller’s PWM vs. analog power outputs and the frequency limits of each.

Thanks for the quick reply Ednisley, I haven’t had the chance to dig too far into this since I don’t have a laser of my own yet, but what you said in your blog looks promising! From what the people at the local shops said (not the original salesman), the laser still needs to run 256 passes, which is why it took so long. I’m hoping to get nice smooth slopes going down 1.2mm to give the tile a 3d feel/look (which cutting 256 passes did do), while the example image you posted has a ripply look to the slope. Do you think it would do well/quick with the image I’m attaching for a 2" x 2" tile?

This sounds like they’re pre-processing the image to produce 256 (or, more likely, 255) separate images that run in succession, hammering each pixel as many times as called for by the grayscale value, at a constant power on every pass.

The advantage: giving the whole image time to cool off between passes, so that each hit would remove roughly the same amount of material at each pixel on each pass. That would lead to a more linear depth-vs-grayscale relationship.

The disadvantage, as you observe: it takes roughly forever.

Protip: if I had to manually start a couple hundred nearly identical jobs in succession, I’d definitely charge you enough to make it well worth my time. :grin:

That won’t happen with a single-pass grayscale image, for several reasons:

  • Nonlinear power-vs-depth
  • Power supply response time
  • Terrible acrylic surface finish

That test piece was just to soak up the laser power while I captured oscilloscope traces, so it’s not optimized at all. You can surely do better, but getting consistently good-ish surface finish in acrylic is difficult.

The whole process sounds a lot like booting lithophane technology into the current millennium. I’m more familiar with 3D printed lithophanes, but there’s no reason it wouldn’t work with subtractive technology.

If it’s eventually intended to be backlit, that should hide some of the ugly surface finish, particularly in something like black acrylic.

Sounds like a fun project … :grin: