Falcon 5W - Position outline actually cuts a little into TPU

Hello, I just got a Falcon 5W engraver. I am engraving flat TPU material. It works great!

There is an “outline” being shown, so I know where it will cut. To my suprice, that outline actually cuts a little into the TPU. Is there a way to disable it or lower the strength to like 1% or something?

It doesn’t do this on wood or plastic, but on the TPU.

Is this framing being initiated from LightBurn? If so, you change power level in Move window. The Power level for Fire button determines framing power.

However, if this is a built-in function on the engraver then any changes would have to be done on the controller side.

1 Like

I am unsure at this point. I don’t even know what the “outline” is officially called.
It makes a square path, it just goes round and round to show the user (me) in what area it will cut. I think it’s a feature of the Creality Falcon which I have. But I am unsure.

Any idea what that feature is called?

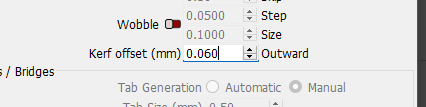
Laser beams have a width - typically somewhere between 0.05mm and 0.1mm. This is called the ‘kerf’. You can adjust your laser’s path inwards or outwards, depending on your intent, by half of your lasers kerf width, to prevent this.

In LightBurn, open up the Cut Settings window for the layer you wish to adjust:

image

Similarly, if you wish to adjust a Fill layer, use dot width correction.

1 Like

I’m not sure if you and I are on the same page, but I will try this!
I just want the framing/outline before the actual cutting is started, to not leave any marks.

These are the settings by default for the Creality Falcon 5W.

OH! I understand - by outline, you mean the laser diode is ON while framing. Yes, this can be adjusted from the ‘Move’ window here, next to the ‘Fire’ button (right side of image below).

image

These are the settings I have in move.

Make sure these are on.

I do not want the laser to be on when framing. It makes a uggly square box around the perimiter of where it will do the actual engraving.

Then you can disable that setting in ‘Edit > Device Settings’ from the top bar menu.

The % box that appears allows you to set a very low power - try down to 0.1-0.5%

Once it is turned on, lower the power way down so it will not leave a mark as in Colin’s screen shot.

If I lower the power then it will not make a nice cut once I click the button to start the actual engraving. Or is there two different power options? One for framing and one for engraving?

2 different settings.
But change it as Colin has shown. Not in the layers.

That’s good news. Now I just have to find the framing power setting. The ordinary power I know where it is, that’s set to 10% which makes a beautiful cut in the TPU once it’s actually doing the engraving. Can you assist me to find the power setting for framing?

image

Everyone is assuming you’re doing framing with LightBurn. I suspect you are not.

How are you initiating the “outline” process? Meaning how do you get it to happen? Are you pushing the square frame in Laser window in LightBurn or are you doing something at the laser?

This is the one. It was set to 3% originally, I tested 0.5% which didn’t make much of a difference so I went to 0.00% which should turn off the laser? Anyway, it’s still visible but the damge isn’t as bad as before.

I am all new to this, got the machine today. I am using LightBurn to make the gcode. So I am unsure how the framing is done. I suspect it’s a feature of the Creality Falcon that I use.

What do you do physically to get the framing to start?

I recall something about the Falcon having a hardcoded frame before running the gcode.

1 Like