Well, I finally have my first laser (Thunder Laser Bolt), and I tried to set it on fire twice LOL,
First attempt WAY too much power, and way too slow, I followed the wrong YouTube video for a 100w laser… OOPS…
But when I tried to trace a couple logos and engrave them I did not do so well but I am learning and progress has been made (Who says you can’t teach an old dog new tricks? Though starting a Laser journey at 60 might not be too smart ).
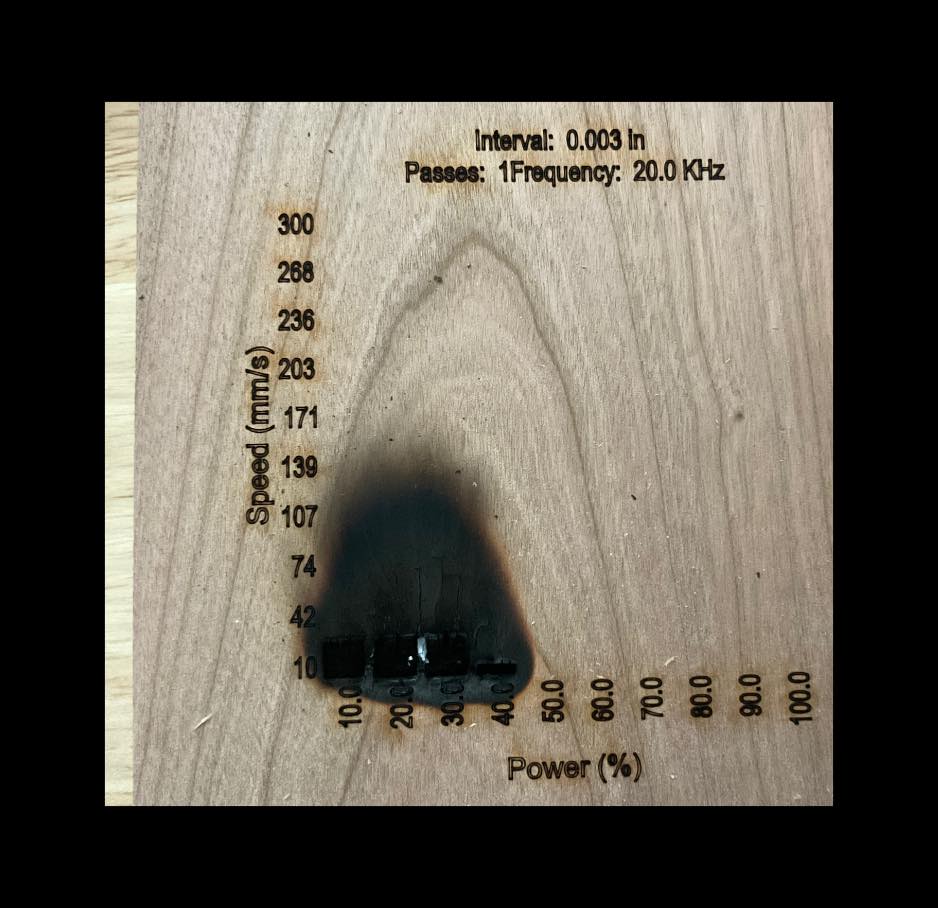
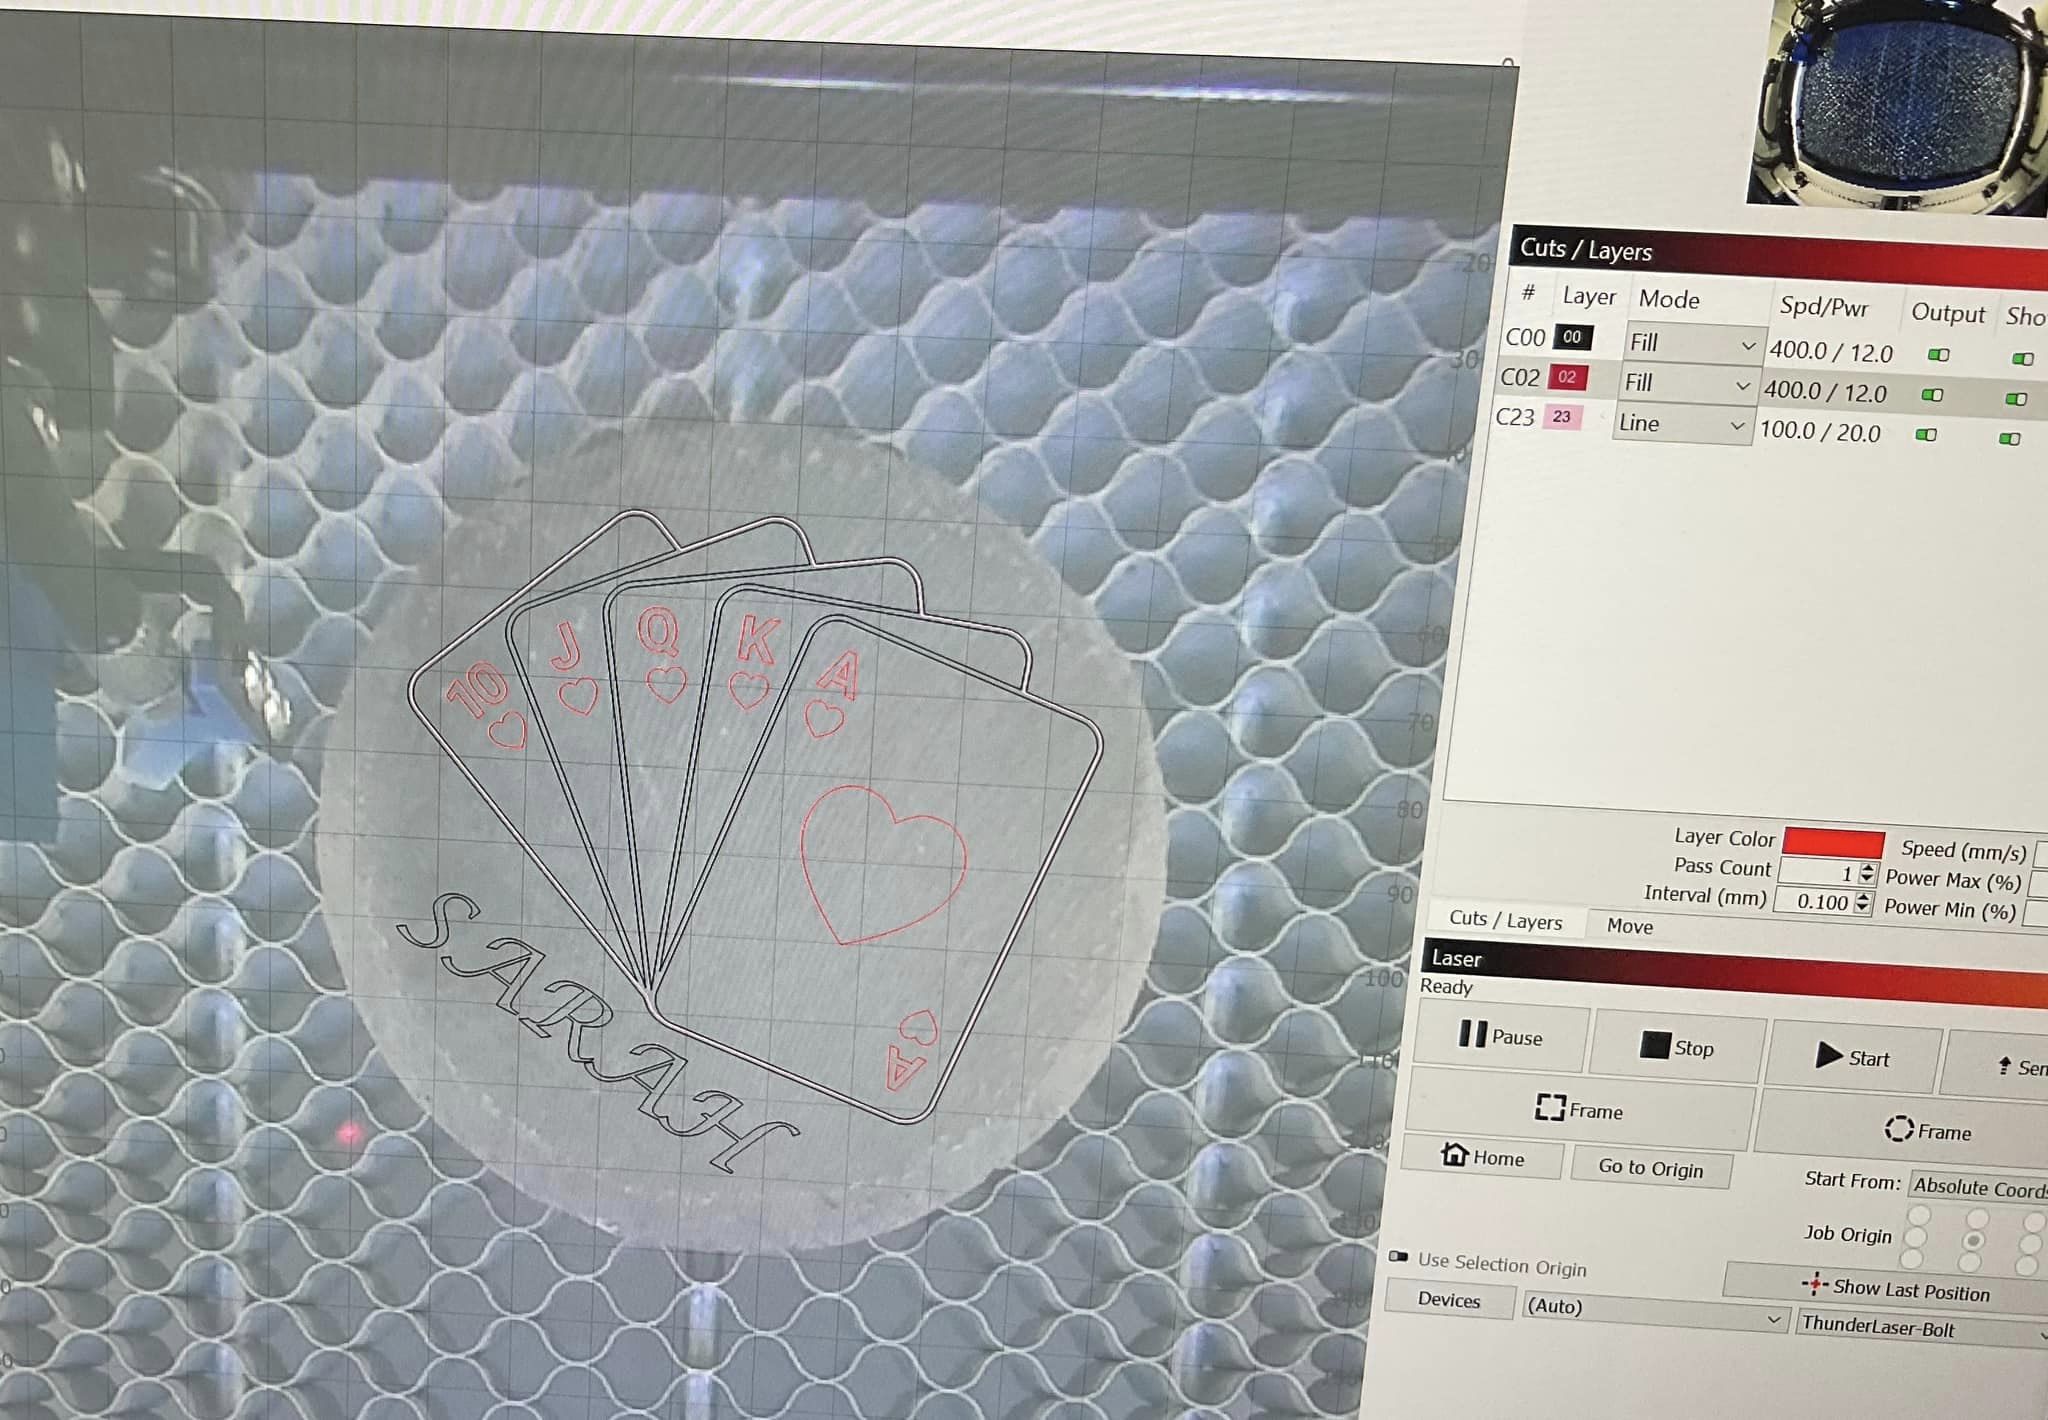
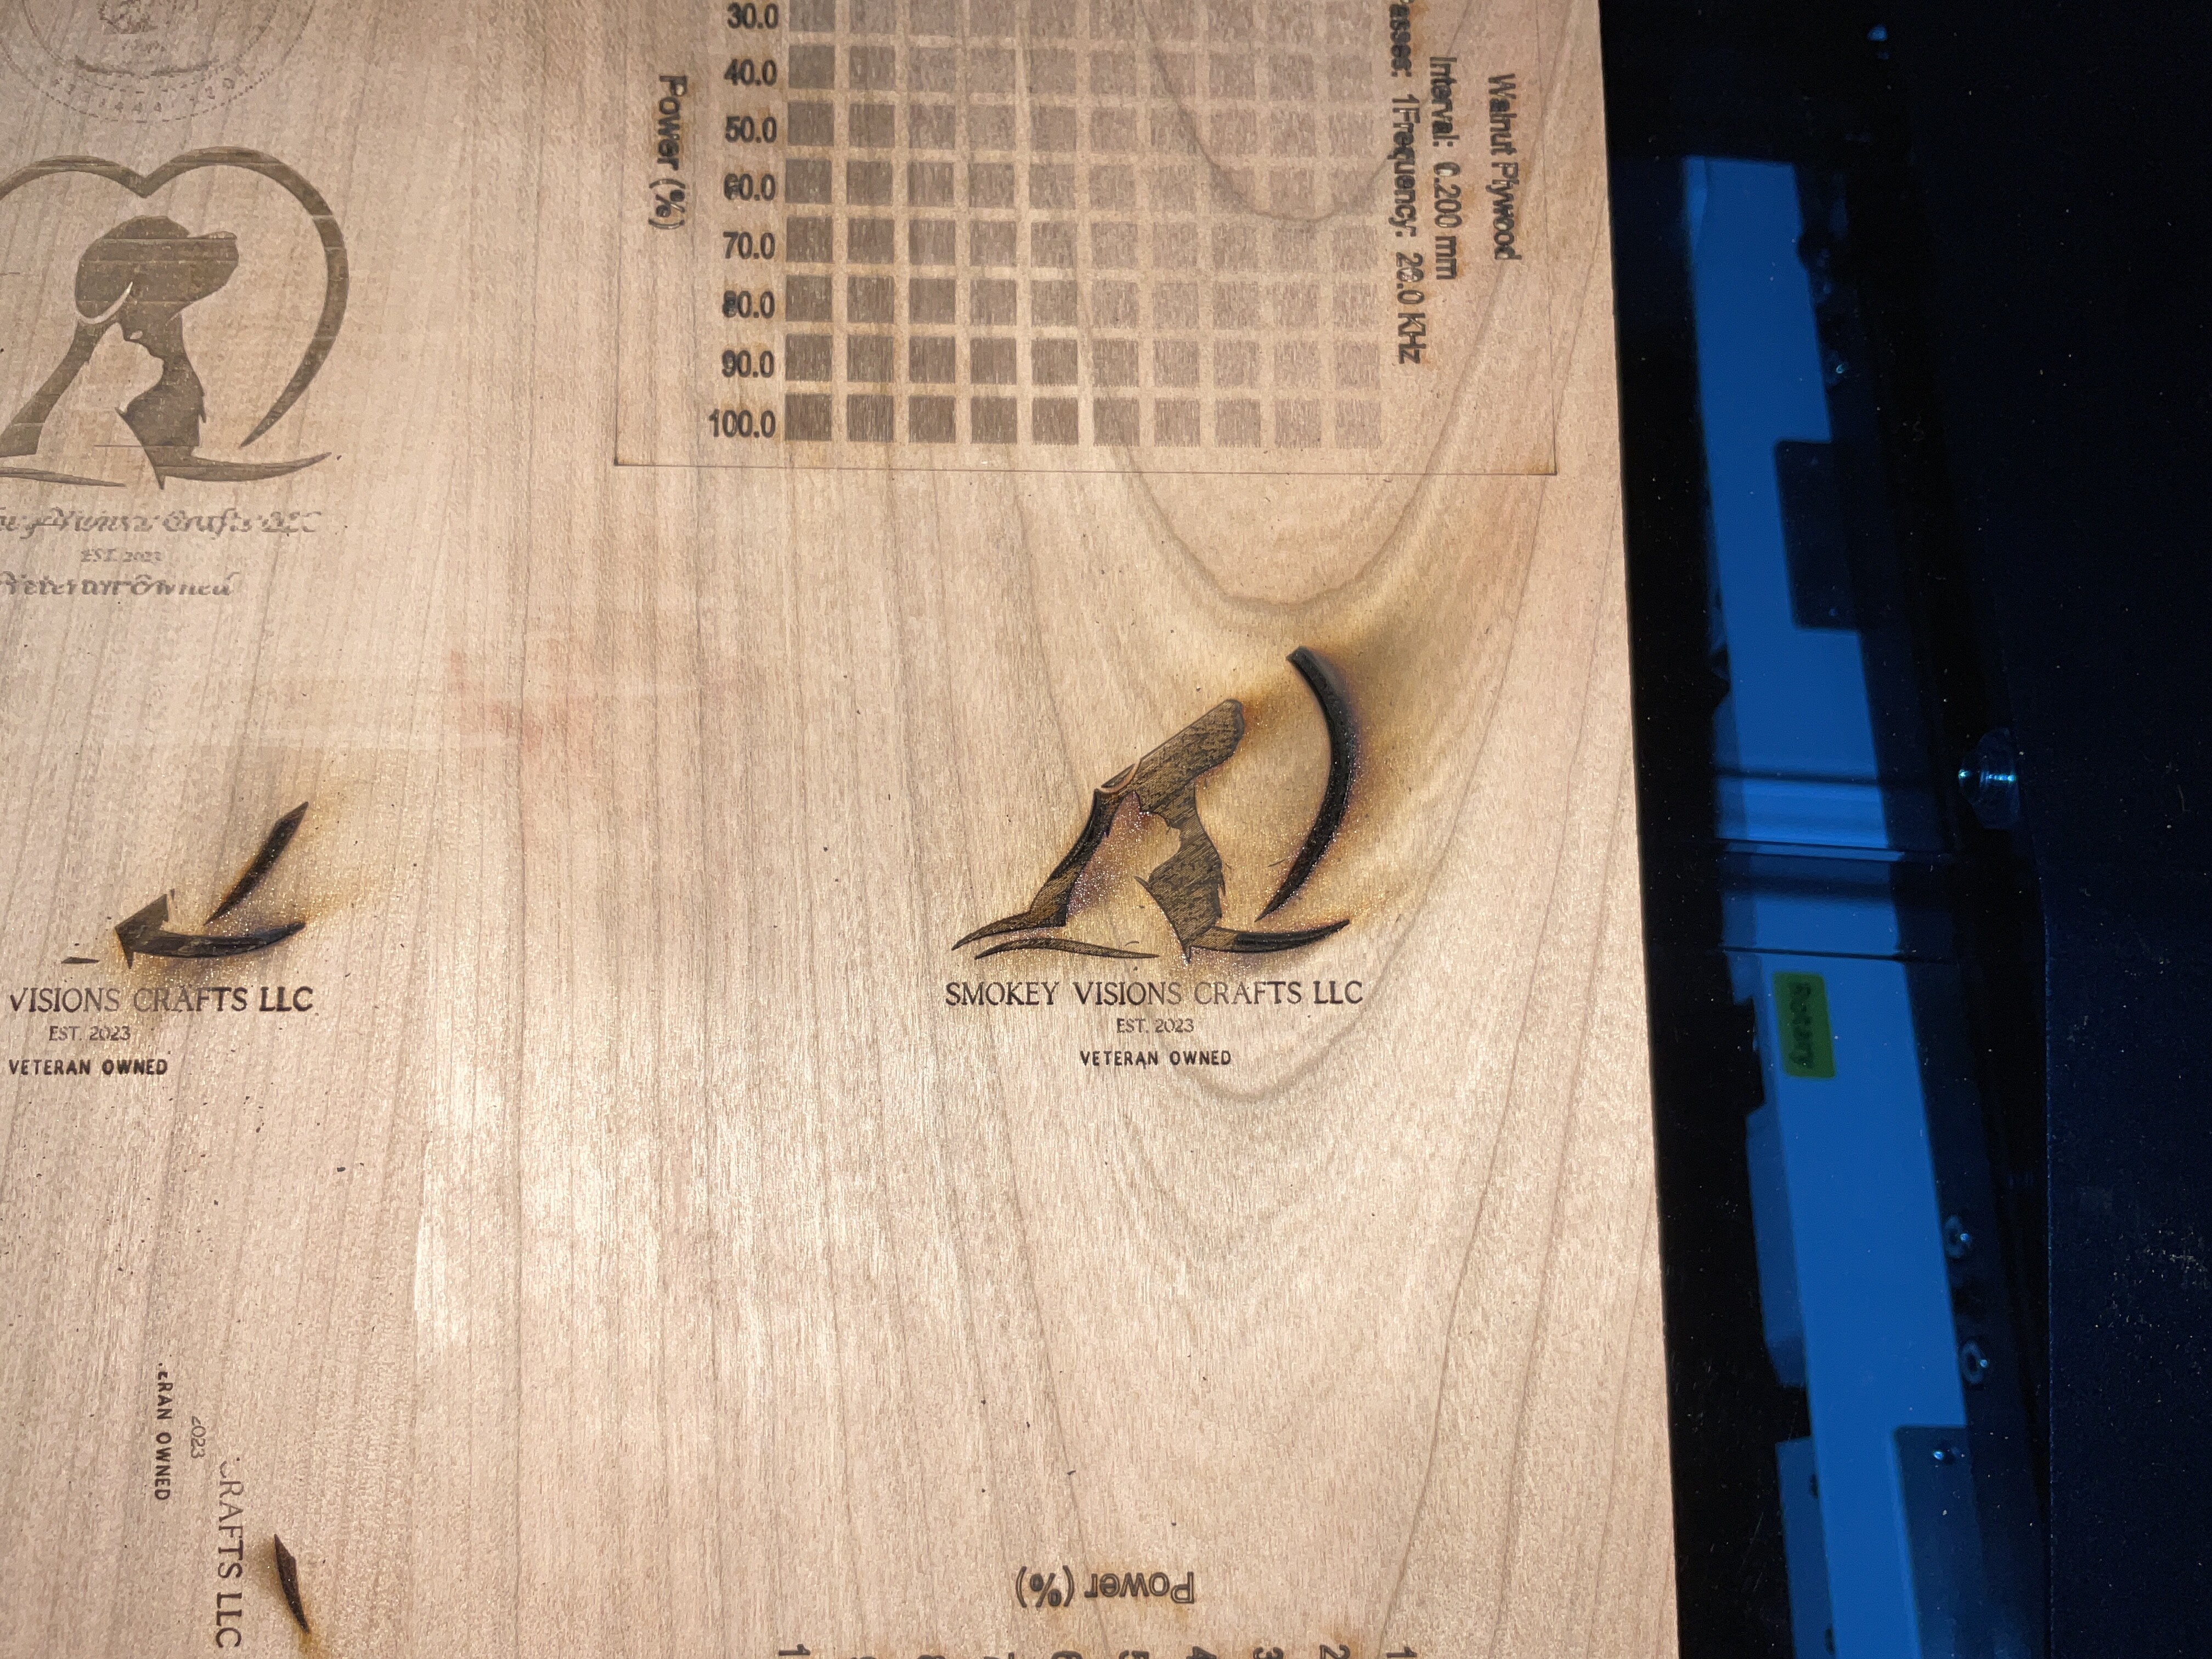
What the Engrave did. (The text is not the original as I could not get it to trace so I used the text in LightBurn, Is the speed too fast? The power could be lower, for sure. Speed 400/ Power 50, LPI 299.88 Line Interval 0.0847
Thunder Laser Bolt is the Laser I am using.
I just tried a coaster with an SVG file and it also messed up the text What am I doing wrong? Is the coaster moving on the bed? if so it is moving exactly the same amount each time it skips a line.
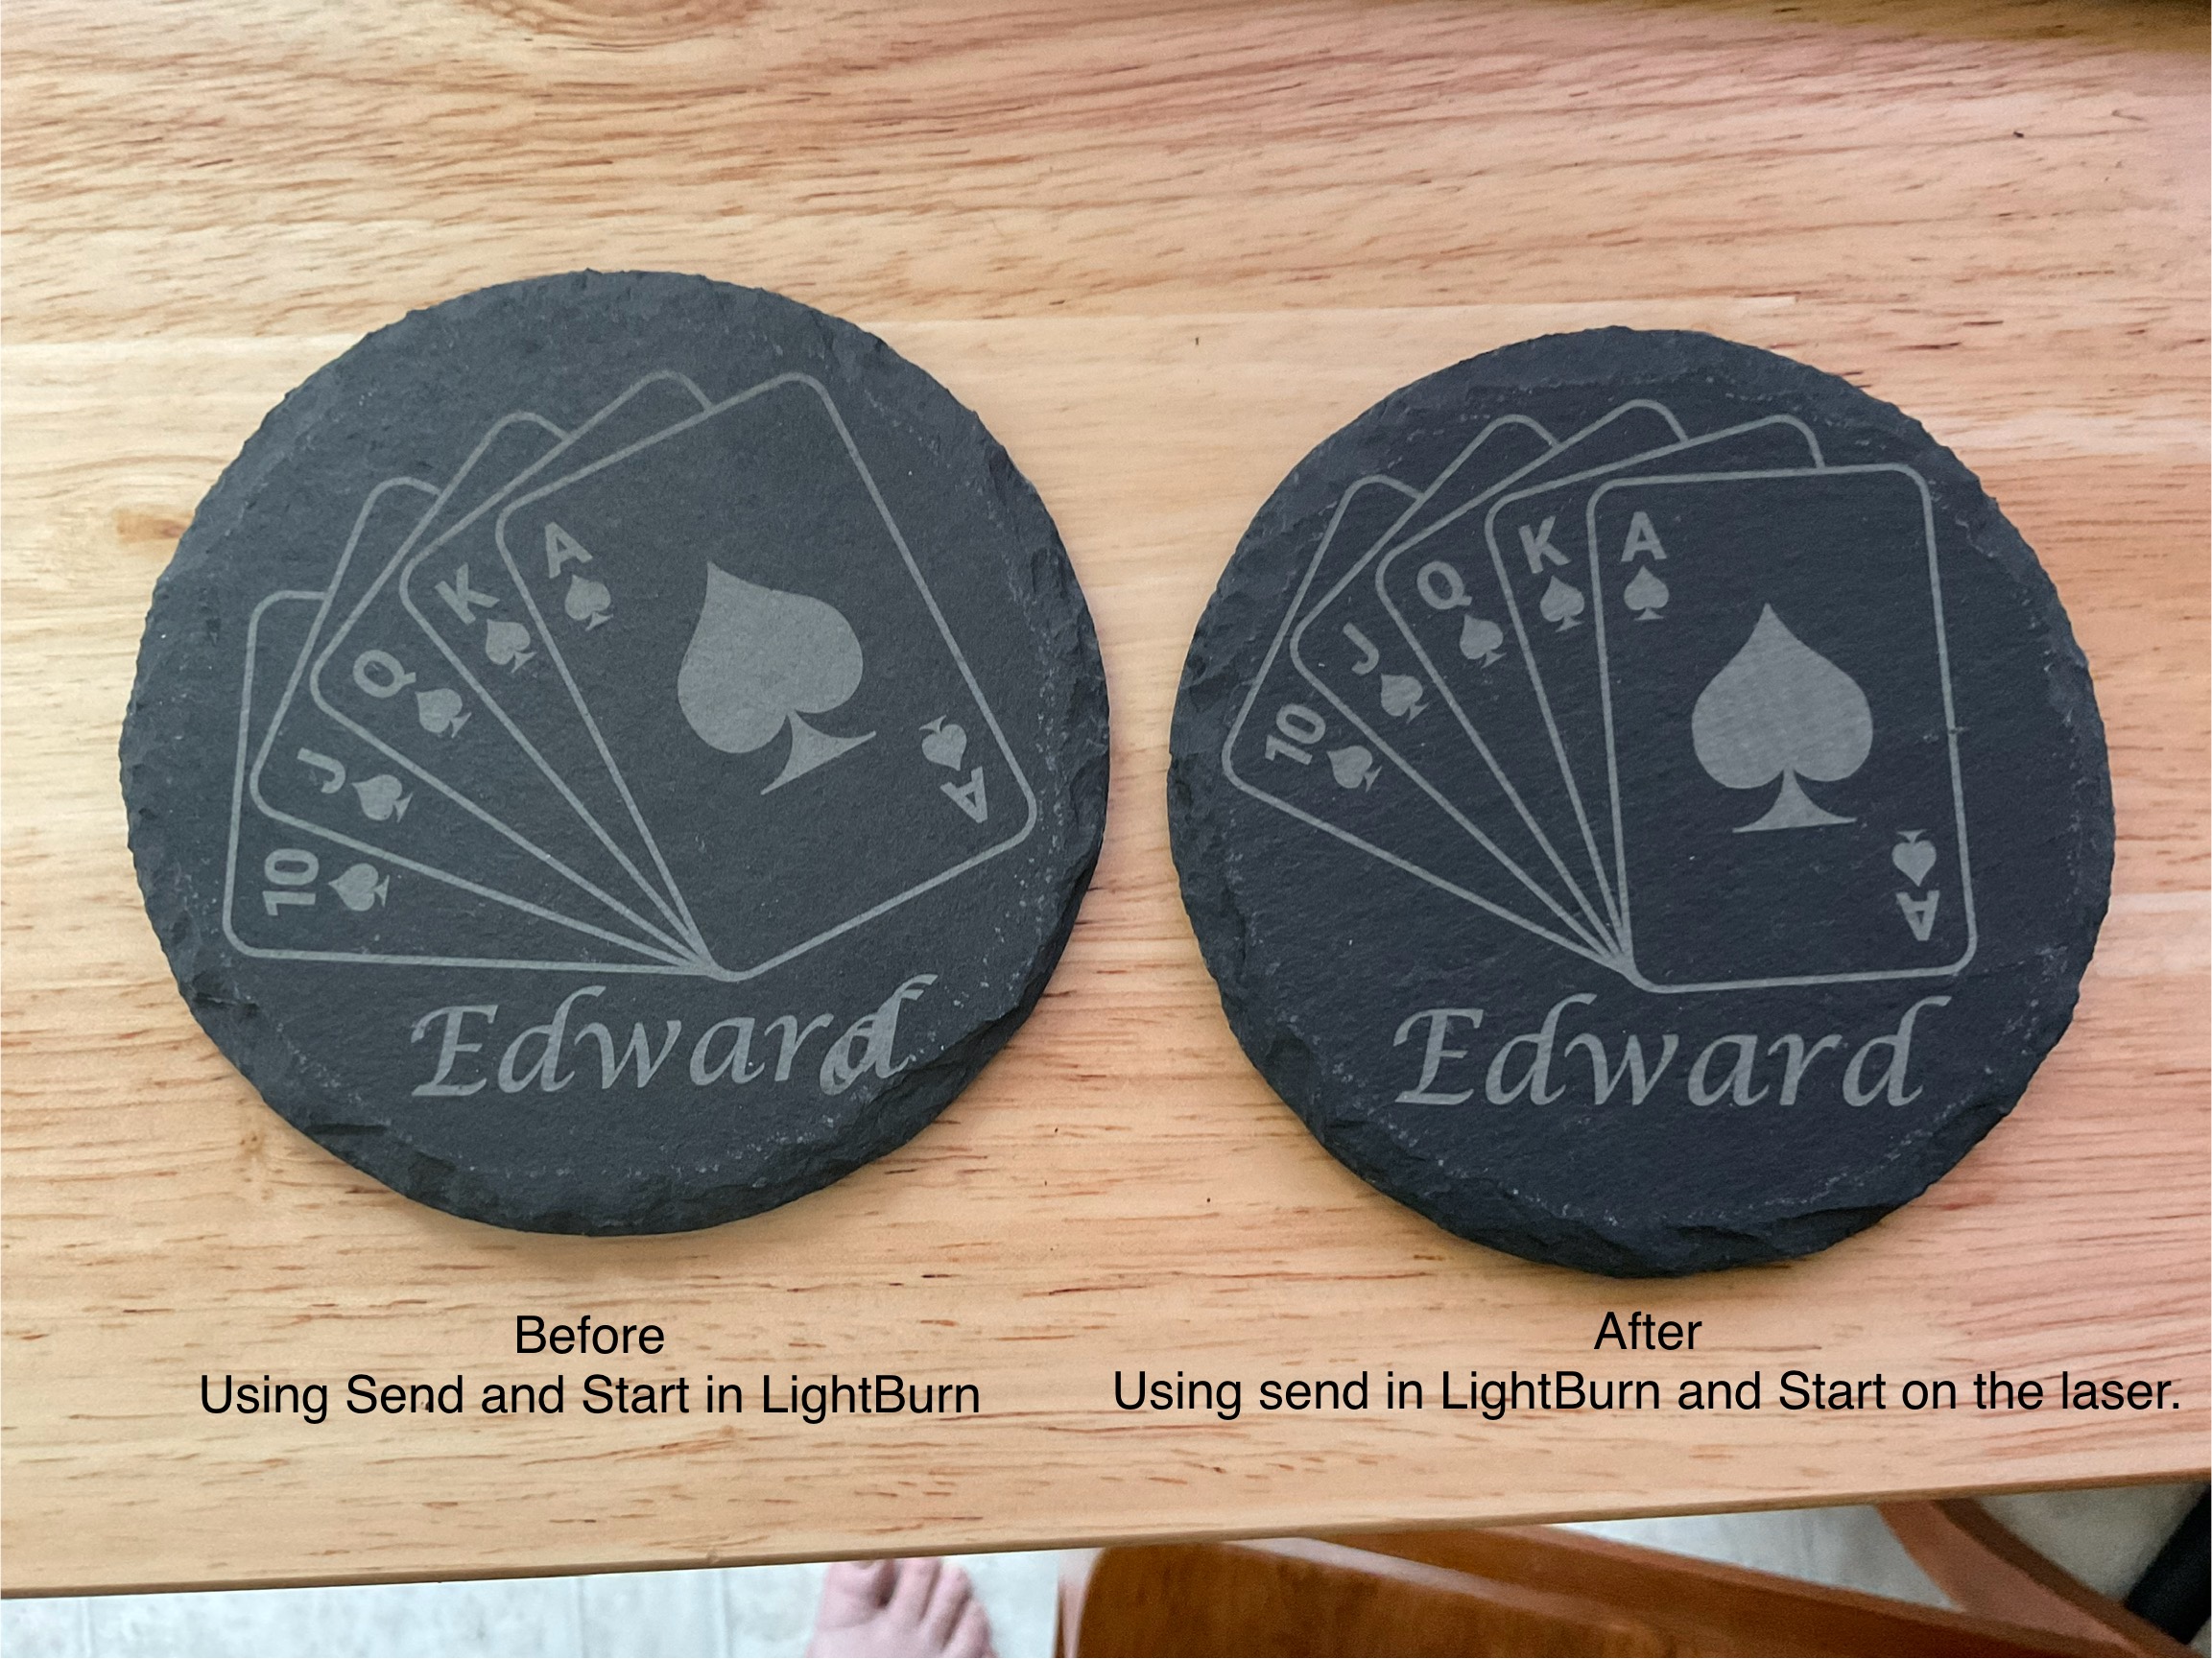
That is very weird how the laser head leaves the engrave and comes back. Are you using the start button or are you sending the file and starting the file from the bolt? I have heard, but not personally experienced that sometimes things get mixed up using the start button. Try it using send and start from bolt if you’re not already doing that.
Otherwise, more experienced people than me will have to jump in.
I used autofocus on the Thunder Laser Bolt, then find center of circle in LightBurn, then I set that to the origin, align my .SVG file, add text, and then hit send and then start both from LightBurn.
Does the preview show these movements? Enable show transversal moves, this will show where you head is supposed to be tracking.
Might want to slow down a bit from 400mm/s, it should work there, but we might not be able to see an issue that would be more pronounced, for human vision, at a lower speed…
Do you know what your machines kerf is? The interval, dpi/lpi are usually related to the machines kerf.
This video by Laser Everything, although on photo engraving and done on a fiber, is great at explaining how to use/set your kerf. I suggest it to people, to clarify how the kerf or interval/dpi is used. It also explains the dot width adjustment in Lightburn, by the Lightburn analyst that developed it. It works with any laser and any material.
Do you mind posting the .lbrn2 file that’s used in the video?
So the issue definitely was using load and start on lightburn, once I used start on the machine everything worked perfect, Now I need to figure out how to resize the material test file to use on my coasters to dial in better settings.
This is likely a false negative. Using Send and then Start would be redundant but the end result should be no different than if you hit Start by itself since ultimately you’re ending with a Start command.
Did you by chance also delete any files on the controller while doing this? If your controller storage were full it could lead to odd behaviors. Clearing the storage could have affected the outcome.
Typically you’d either use Start or use Send followed by initiating the burn from the machine.
Hey Ed. I have 2 bolts and every once in a while mine does this as well (maybe happened 5 or 6 times in four months) and I always start my job by pressing start in Lightburn. I think the file gets corrupted or something somehow as it get sent via usb and the laser kinda freaks out (technical terms). Are you connected with USB or by ethernet?
I recently bought a new USB cable and the problem hasn’t happened since. Good thing is Thunder has awesome costumer service, you may want to send this to them to see what they say. Since my new cables seemed to have fixed it I haven’t felt the need to contact support.
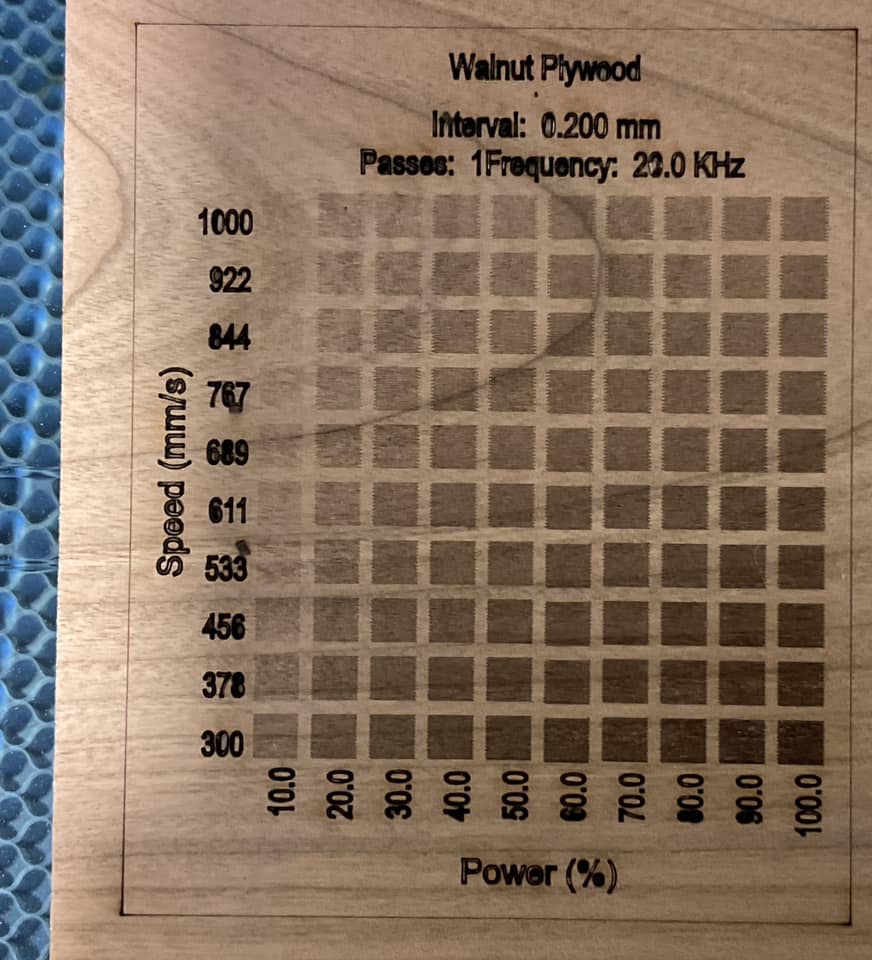
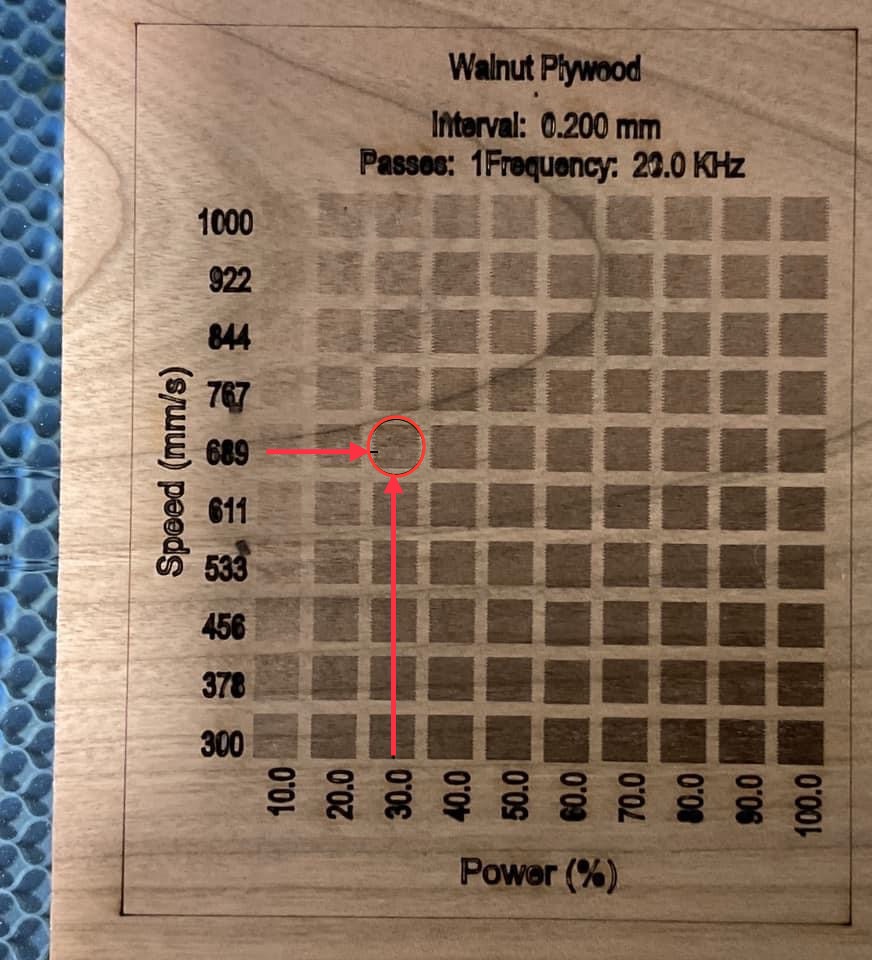
I have USB connected for camera, the machine connects through Ethernet currently as I was told this is the best option, Now I am trying to figure out how to setup a Material Cut test as I only did engrave so far, and how to resize the LightBurn material test to fit on my slate coasters as the text at default size hit the rough edge of my slate coasters, Then I want to try to learn photos as my main desire is to engrave Pets and wildlife photos I take.
Great, you’re right ethernet is a great connection but I’ve been fine with just USB. To resize the material tests just lower the “Count” field on both of your parameters (probably speed and power I’m assuming). You can also change the height and width of the squares as well. Just run a frame to make sure the size is right for your material before you run it.
I think you were misunderstanding how the start button in lightburn works. Using the start in lightburn is like streaming a movie, it sends info and the laser starts burning with a minimum amount of data and the rest of the data loads as it can. Using the send button is like downloading a movie, it sends the entire file to your machine then you choose the file and hit start on the machine. The entire file is loaded and nothing is streamed. Using the send then hitting start in lightburn is doing nothing for you, it is still streaming the data, not using the sent file.
There’s a difference between GRBL and Ruida controllers.
GRBL controllers use streamed G-Code because they have a relatively small internal buffer. Old-school Arduino-based controllers have about 100 bytes / characters available and the protocol allows sending partial commands to keep the buffer topped off. More recent STM32 controllers have more storage and may be able to “stream” an entire program before the buffer fills up.
Ruida controllers require getting the entire program as a single binary lump and create a file in the controller’s flash memory. The Start button sends the program to a file called TEMPFILE, then runs that file. The Send button also sends the program, but to a file named after the original LightBurn file (chopped to 8 characters); you can then run that file from the controller console.
Correct, and he has a Ruida. GRBL doesn’t have a “send” option, only start or save GCode.
If I understand correctly from other sources, it will start running the TEMPFILE as soon as it has enough information to begin and the file continues to load, while running, until it is completely loaded. Which is what I think was causing his issue.
If I’m not understanding how it works, please correct me.
Thank you all for your help, now off to tackle yet another dozen issues in my learning to use my laser lol. I really hope I can learn the basics soon so I can confidently make sellable products, for the time being I need to figure out how to setup material engrave test for each material, resize the test to various sizes, and do cut files. I have not tried cutting at all yet and at this stage can only safely engrave slate coasters.
Last night I gave up after using a selection from my Engrave material test for a darkness I liked to try and redo a logo, but after 3 attempts and it burning all the way through I gave up using my grid I chose Speed:700, and Power 30, then 20, then speed: 800 Power: 20 but none worked. All were set to fill not line, so I gave up before frustration made me stop thinking.
From where you stopped it, it looks like you are running a 45 degree scan angle. I’m not sure about the Bolt, but I don’t think you can achieve the same speed on the Y axis that you can on the X axis and a 45 is using both. You are probably not achieving the speed you are hoping for which is why it’s burning through. If that’s the case, set your scan angle to 0 and try it again.
My initial thought was that maybe you had offset fill set, which sometimes causes burning through too then I noticed the angle of the engraving.
USB transfers whole RD files or reads them from a USB stick
One UDP port chops those files into packets with an EOF marker at the end
Another UDP port seems to carry single “keystroke” commands intended for a handheld controller, rather than programmatic control
The first two definitely give off a “complete file” vibe, either read from a USB stick or transferred over USB / UDP with the EOF indicating the transfer is complete.
Given the total lack of UDP retry capability, you’d have to be crazy to start running before you received the EOF.
Which, of course, is not to say nobody’s ever been that crazy.