Hello,
I am currently using the trial software but find it much easier to use than RDworks so will likely buy it after. I bought my laser to mainly engrave text in Anodized aluminum CNC machined parts. I have other uses as well, but this is what I need help with at the moment. I have done this before with another laser, but never had to be accurate with my placement as I do on these parts. I have a scenario below and curious the best way to tackle it. My laser is a 100w Voiern 600x900 machine without auto focus.
I will be using this in a production setting so will load multiples of the same part (one at a time is fine) one after the other as I etch them. I need to etch a scale/ruler marking on two thin beams on a dovetail as a location marker for a film camera. When the camera is installed they use the marker to place it in the same spot each time. My issue is what is the best way to align my part with the motion axis of the machine and be repeatable between parts. I am willing to make or 3D print a jig if needed, but I think I have a possible idea.
I save my solidworks file as a DXF in top view and load it into Lightburn. I set the overall outline on a separate layer from my scale outline. I tape a piece of plywood or plexiglass to my honeycomb and etch the outer edge of my part in the plywood. Now I have a template I can use to set my part on to align it to the machines axis. I then refocus and burn just the scale layer. I remove part and place new one on same outline and continue to burn the scale one after the other? Is this a viable way without having a camera on my laser? These parts a quite expensive so I cant afford any mistakes so open to other ideas. 3D printing a fixture if needed is fine as well, but I dont have any reference to my machine motion axis so still think I would need to burn in an outline. Also can test etch in scrap anodized parts until I get the speed and intensity correct.
Also I have absolutely no familiarity with Lightburn so open to any video tutorials to learn from. I am in the Glendale CA area if anyone is local and willing to help. Will compensate however desired.
Hi Mark, welcome to Lightburn!
Personally I would not just rest the parts on an outline if accuracy is critical. All sorts of things can happen mid engrave to move the part. From simple axis vibration to you kicking the machine, or the air assist moving it. In my case I create a jig and screw it to the bed or at least fix it such that you can return it reliably to the same position. The jig should be a drop in type rather than just an eye ball alignment. Cut the outline right through in something thinner, like acrylic or thin ply, or even card. Then fix this to a base that can be screwed or fixed down. If you have homing switches fitted, which I assume you do, use absolute positioning rather than “current position”. when cutting the outline. This way you can screw the jig down, home the machine and then press go. You can be sure that the laser will go repeatably to the correct position with the accuracy of the homing.
Thanks for the reply. Mos t of my parts weigh a fair amount so would not worry about them moving by air or vibration, but its still good to consider. I also thought of a thin cutout to orient the part but was unsure how I would make sure I replace the jig template each time I need to run the same item. Say weeks down the road? To do that I would need to find a way to anchor my honeycomb and have some sort of repeatable set of pins or reference in the honeycomb. I could remove the honeycomb all together and use the knife edge supports or make new ones with jig plate mounting. I am planning to try a few ideas today on scrap. I am open to any advice should you have done this before. I wish my machine had an integrated scale in X&Y as I had seen on other machines.
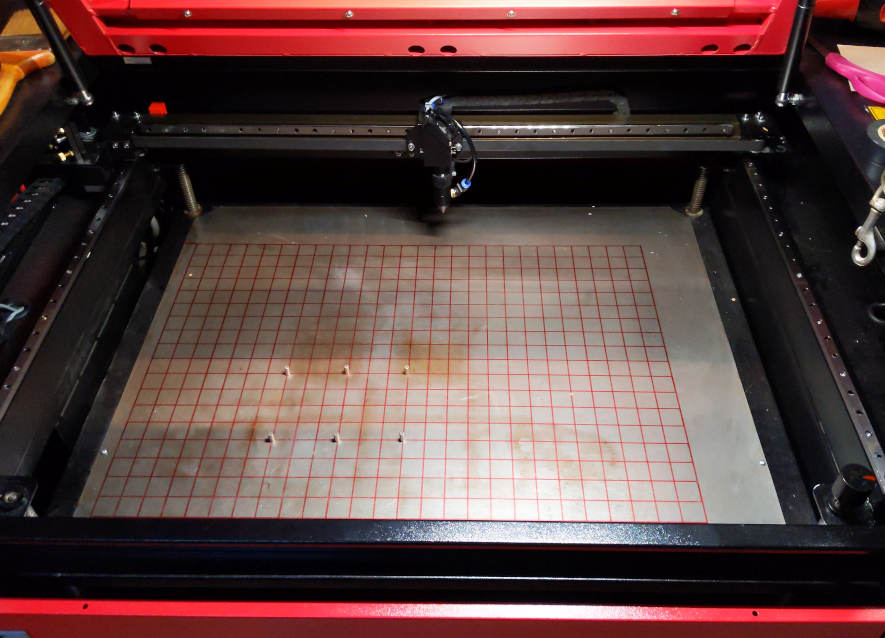
I rarely use the honeycomb so I removed it.
I cut a piece of sheet steel and laid it on top of the knife supports and drilled some holes through the sheet and the table frame so I can pin the sheet steel in place without it moving.
I use a lot of nasty little neodymium magnets to support work above the steel table. (there’s a few shown in the photo) For stuff like acrylic or thin plywood I support the work on top of some magnets then use a few more magnets on top of the work to help hold it flat and in place.
To help with aligning stuff I made a simple holder to hold a sharpie and temporarily taped it to the laser head. I drew a 1" grid pattern in LB and let the laser drag the sharpie around the table…
Additional holes could be drilled in the sheet steel to attach alignment jigs for best accuracy but I usually just use magnets to hold things in place.
It’s not elegant, but it’s simple and adaptable and suits my purpose most of the time.
Use a coroplast spoilboard that you will lightly secure to your bed and index your position into the coro with an object outline thus creating an inlay to place your object.
Yes, I got rid of the honeycomb as well, found left too many marks on the back. I build a knife edge bed, but again still leaves some marks. I like the smoke extraction it gives, but I also will add a steel sheet and magnets in the future.