Hi All:
(TL/DR: if you have warped nylon sheeting 0.060", it can be flattened using heat @ 90C for 2 hours under ~10-15# of weight then let cool completely.)
I have this “thing” that I want to make. I’ve successfully made it in 3mm acrylic, but the shape of the part and the intended use make it not strong enough (the inside sections can be broken; not easily, but it’s certainly not with any great difficult). Looking at other materials that I might be able to cut and engrave with my 10W (optical power, 455nm) diode laser module, that also would not break, either during shipping or during use.
At this time I’m looking at using black nylon. It doesn’t give off poisonous gasses when cut, but it tends to accumulate heat in the cut. So, I’ll be using some careful planning there! Thankfully it takes ~40% elongation before it will break. Tough stuff that Nylon!
The biggest problems I’m seeing is that when they manufacture the 0.060" (~1.5mm) sheeting, it’s extruded and then rolled onto huge industrial rolls. Then when a customer wants some, they just unroll it and cut it off. At the level I’m buying, 12x24" sheets, they’re cutting it off a pretty significantly curled/warped hunk of source material. Unfortunately, both the work process and the final product wants to be flat. To within ~0.020" is fine (the lasering fixture I built will hold it sufficiently flat during processing), but more than that makes me an unhappy camper.
So, flatification is needed!
The following method is what appears–after some testing–to work pretty well. It’s actually a derivative/adaptation of a set of steps someone posted about warped acrylic in their press-together signs.
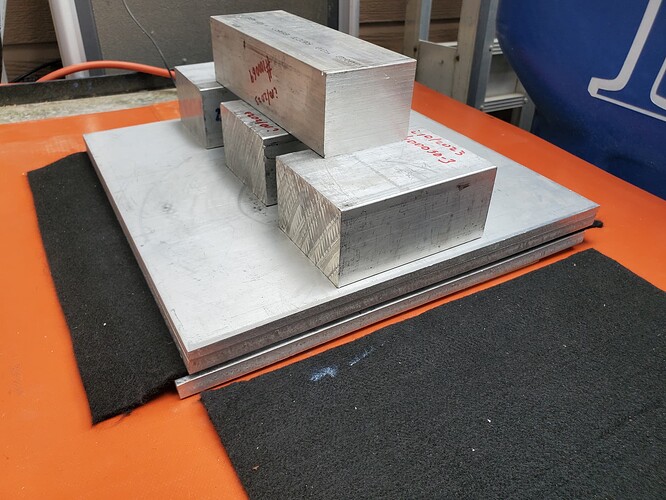
The mechanical setup I’m using to flatten it involves, from top to bottom (heat comes from the bottom):
Top: ~12 # of aluminum blocks
1/4" thick 12x12" aluminum plate*
3/8" thick 12x12 aluminum plate
carbon felt welding blanket material (link below)
3/8" thick 12x12 aluminum plate with temperature probe hole drilled into the side
<<the nylon sheet to be flattened, cup pointing down>>
0.0625" thick double-sided PCB blank ~8 x 12" (200x300mm) (link below)
Silicone heater pad, putting out ~500W @ 110V (~5A) **
(optional) metal welding table ***
- Don’t use bar…use plate. Bar in high-aspect ratio configuration will have warp, kinda like the plastic
 Also, the plate needs to have a pretty decent surface, as it can potentially be imprinted on the Nylon suface
** My heater pad, that I’ve had for years, is (too big!) at 2x2ft. A 12x12" one might be more suitable, like from a 3d printer pad (link below, but that’s not one I have experience with)
*** it’s gonna get HOT, so you don’t want to ruin you mahogany dining room table
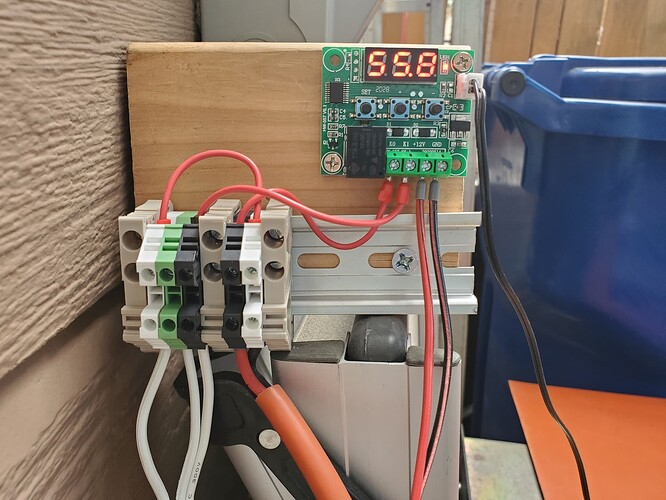
I have a cheap temperature controller module (link below) set to heat it up to 91C (yes, 194F), with 1 degree hysteresis, so it only goes down to about 89C before it comes back on.
To perform the processing, I let it heat the weighted plastic for about 2 hours, and then let it cool naturally down to ambient temperature (too darned hot in this Idaho summer, BTW!). That seems to have flattened it pretty well, as shown in the attached photos.
Links:
Carbon Felt Welding Blanket: https://www.amazon.com/gp/product/B0CC5C62RM
Temperature controller: https://www.amazon.com/gp/product/B0887X2ZW6
(be sure to set it to heating mode, default is cooling)
Silicone Heater Pad: https://www.amazon.com/gp/product/B0B6Q3FYHH
double-sided PCB blanks: Amazon.com
Photos:
This is the before and after. Quite a bit of warp in the material, but not afterwards!
This shows the wiring; white incoming wires are the 120VAC powering the silicone mat heater. Big Orange cable feeds that heater. The red/black pair is 12V to power the temperature controller. At the time of the photo, it’s in its cool-down phase. And yes, the display is in degrees Centigrade. Fer God’s sake, don’t electrocute youself. I’m an EE with a lot of experience making these kind of things…so be careful! And yes, it’s all screwed into a piece of 2x4 ![]()
This shows the stack of material. The PCB blank and the material being processed can’t be seen in this. The welding blanket between the two plates keeps the weights from dissipating the heat, so it stays in the bottom plate, which is on top of the nylon.
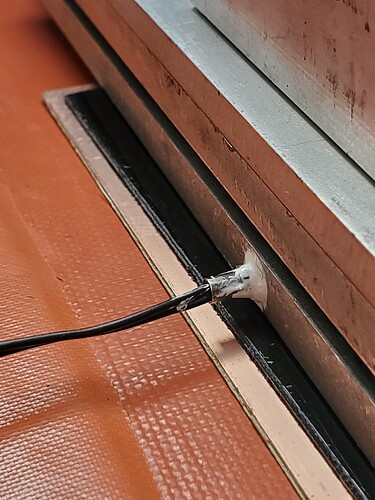
For the material to actually get to (at least) the set temperature, the temp sensor really needs to be ABOVE the material in the stack. Otherwise, you can’t really say that the material is getting to temperature. So, that temp probe is inserted into a 0.160" hole drilled 1/2" into the edge of the bottom 3/8" thick aluminum plate. Once the temp sensing probe is like that, the heating is WAY more accurate. In this photo, you see the double-sided pcb blank, then the flattened material, and then the bottom aluminum plate. The probe has white lithium-based heat-sink grease on it. The actual sensor is in the tip, so it doesn’t really need to be all the way in.
One final thought: do NOT use isopropyl alcohol to clean nylon…apparently they are NOT compatible, and the alcohol will fog/damage the surface. That can be good or bad, depending on whether you WANT a matte finish.
Anyway, so far so good. I did some tests on a nylon light-switch panel, and I think I might be able to get it to work.
Just thought I’d share: otherwise nobody else will, since typically I’m the only one doing insane stuff like this. Enjoy!


