My first post - and I’ve had a laser about 3 days so please go easy on me…
I’ve got a 10W Blulaser diode laser that I’ve mounted onto a Bluecarve CNC router. I’m using the latest version of Lightburn (in fact I’m still within my 30 day trial period) - this gives you an idea of how green I am).
I’m very used to using easel for the CNC machine and have no issues with that “logic” system.
I’m struggling however to understand how Lightburn “zeros” the laser, remembers where it is and then moves to burn to the right point.
For example I’m trying to cut a design on a 100mm circular coaster - and I’ll have an ongoing need for these - I can’t do them all at once - so I need to be able to store the location of the “start point” and place the work in a jig to make sure the design is central when it burns.
I have a right angle jig in the bottom left hand corner of my CNC spoil board that is basically where I wedge my CNC work to ensure it’s square. I’ve “offset” this with a second removable right angle piece (to allow for the fact the CNC bit point is not where the laser is) Through trial and error with the “fire” button and a piece of 13mm ply I’ve located the bottom LH point - which I’d like to nominate FOREVER as the (0,0) point in Lightburn. I can’t seem to do this - every time I try and start a piece of work it jumps backwards and "towards me, bashes into the end stops and tries to go through the wall - I end up having to yank out the USB to stop it burning out the motors on the CNC. I can’t seem to get my head around absolute, origins, home etc. My logic is that if I can tell the machine that (0,0) is the point I’ve got with my jig , then EVERY piece I work with I can wedge into this corner and then I know where I am - in terms of using the grid paper to place the designs away from this (0,0) and I know where it will cut. Can any of you explain to me how I can do this ? I don’t want to have to “refind” the centre of the coaster each time I need to cut more of these - I want to load up the project, send my machine to my (0,0) (which I know is the LH bottom corner of the right-angled jig that I will wedge the work against) slap in my coaster against the right angle jig and hit go… I’m sure this must be possible - and it’s just understanding the nuances of the software - but I’ve been at it for 2 days now trying to get it to do what I think it should and am getting nowhere other than closer to burning out my motors on the x and y axis of the CNC by hitting the limiters every time I turn it on…Any help greatly appreciated.
Regards
Andy
Yes the machine will home - easel software will do this no problem - send the z access up high then brings x an y back to the bottom lh corner.
And this position is remembered by easel - I can get it to go there regardless of what it has being doing.
My issue is that this zero point can’t be the same for Lightburn as the laser is mounted on the side of the CNC Makita router - meaning it’s (0,0) needs to be in a different place.
I’ve made a right angled flat jig that sits in my lh corner and lines up any work I push up against it with my required Lightburn “0,0” so I’d like to set up Lightburn to believe this point is “0,0” and then any work on the graph paper would match reality straight away.
I think this would be possible - but I don’t understand the settings needed.
Thanks for that - I’ll do the following:
(1) Turn on my CNC
(2) Use Easel to Home my machine.
(3) turn off Easel and start the Lightburn app
(4) Jog the head in the move command with the fire button on until it reaches the corner of my jig
(5) Save this position as you described as “Laser 00”
Then each time I decide to use the laser I would use easel to send the head to the machine (0,0) then start LightBurn and use move to the saved position before I do any work. Once I’ve done this - what settings would I need regarding origin etc to interpret the graph paper (0,0) as being at this saved 0,0? For example if I’ve got a piece up against my jig and I want to draw a circle on that piece centred on 50,50 diameter 25 (this is what my graph paper window is showing, with my laser currently hovering over the saved “fake” 0,0. what setting do I have in the laser window in terms of origin and start point etc - I’m guessing that I’d have to click on the dot that is bottom left for position but what do I use in terms of user, absolute, current? Can’t get my head around the combinations of these…
You shouldn’t need to use Easel to home your machine each time, LightBurn can send your machine a homing command, using the Home button in the Move or Laser window (the house symbol).
You can even enable “Auto-home on startup” in the Device Settings window to have LightBurn automatically sent a homing command when it first connects to your machine.
You’ll want to use Current Position or User Origin in combination with Tool layers for positioning.
If you’re working with Current Position or User Origin, positioning is always relative to either the position of the laser or a custom origin you set, so there is no need to place objects at specific coordinates on the LightBurn grid.
You can measure your workpiece and create a rectangle or circle that matches its dimensions, then set it to a Tool layer.
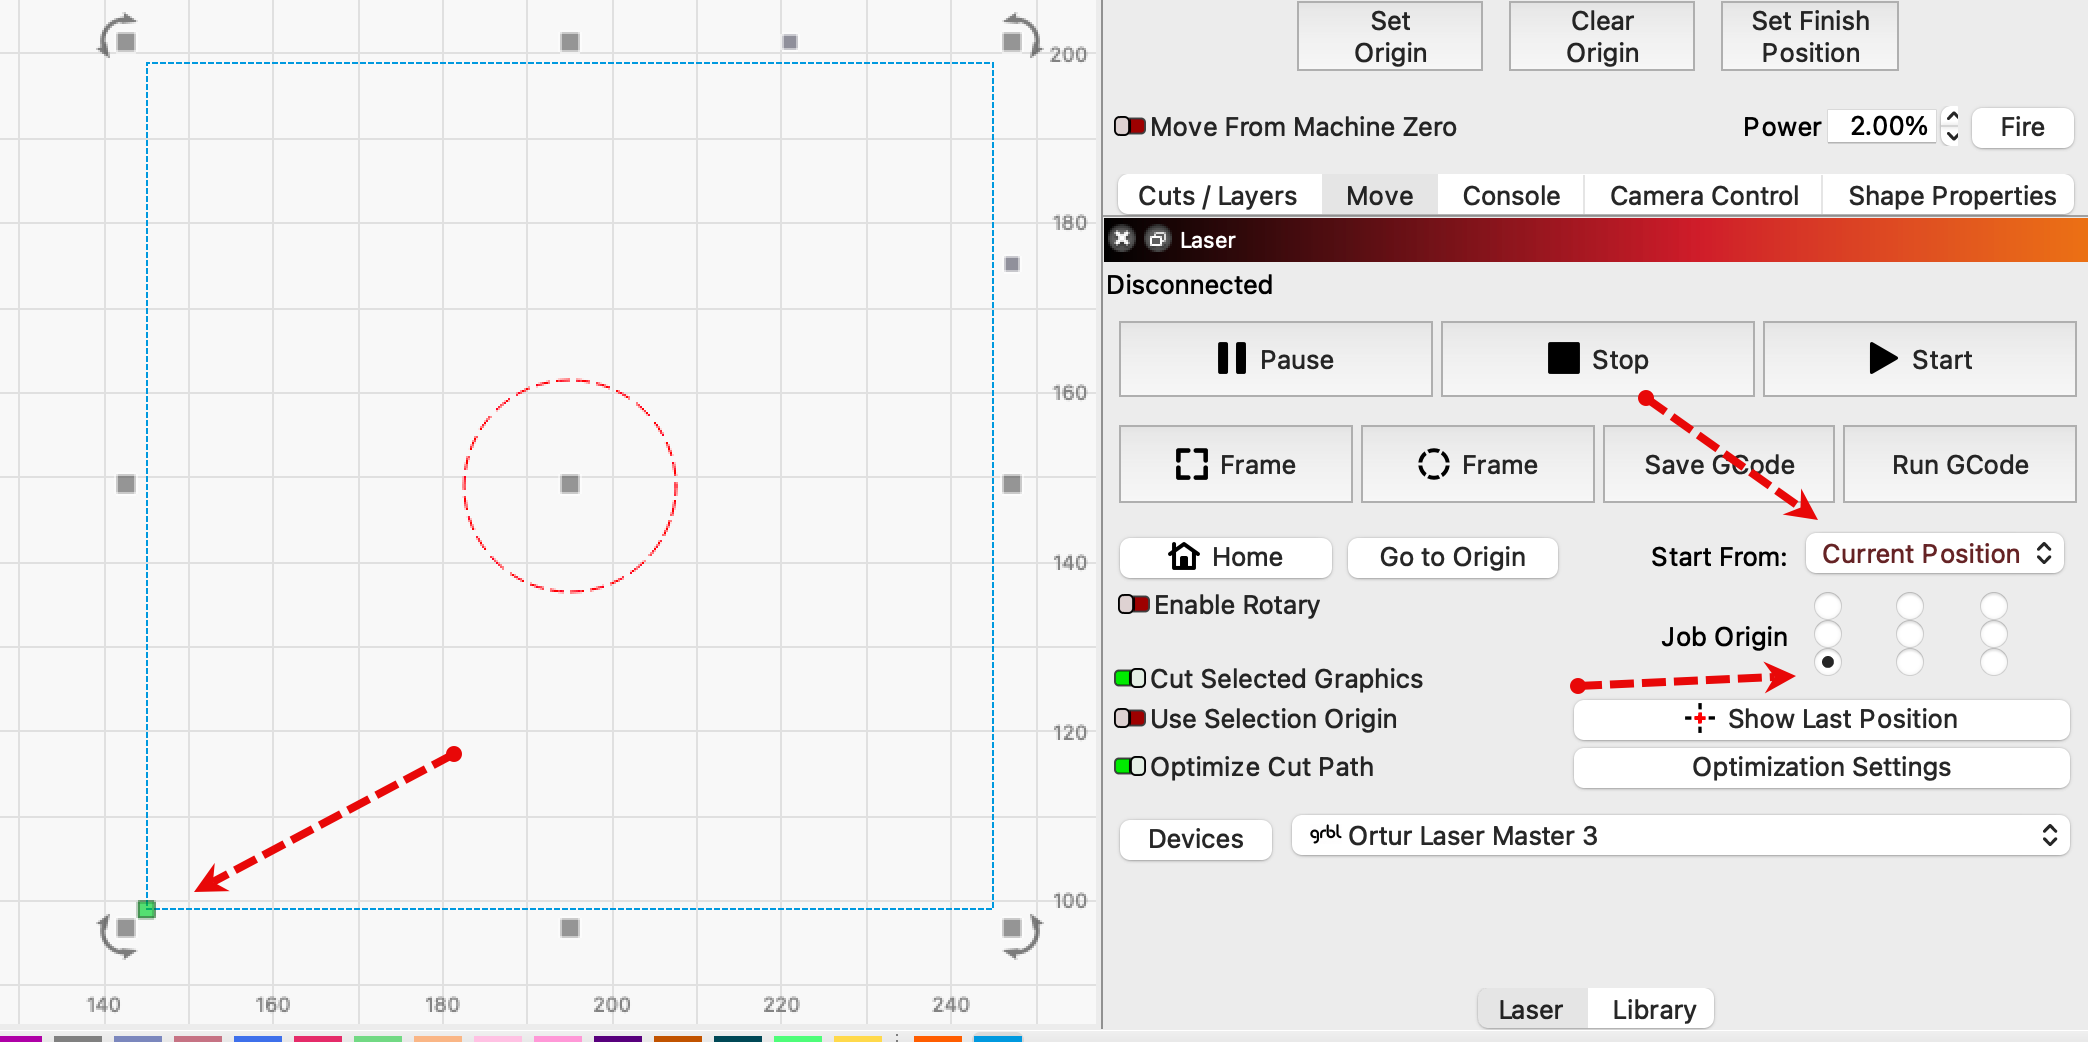
So for instance, here I’ve got an imaginary 100x100 mm workpiece set to a Tool layer, and a 25mm diameter circle set to a Line layer, centered to the center of the square. I used the Align Centers button to make sure the circle was perfectly centered.
My Start From mode is set to Current Position and my Job Origin is set to the bottom left. It’s indicated by the green square, meaning that that green square is the custom “0,0” point for this job.
Just thinking out loud, but could the pointer offset feature be used here to account for the difference between machine axis zero and laser zero?
I’ve never used either pointer offset or a laser-retrofitted spindle machine, so I may be way off.
Is there a workspace offset? I know there are a lot of options under that umbrella for machines with odd configurations. Again, no experience…just brainstorming.
Maybe a macro to move off zero a preset distance? Not that that is notably different from saved position (which I use often).
That could probably work if you could determine the necessary offset between router and laser (that might be a trickier process than determining the offset between a pointer and a laser). It would also be possible to set up a Macro to jog a set distance, or to zero the machine at the saved position. There are definitely more than a couple ways to go about this — I think my suggestion is simplest but it’s not a setup I have personally ever worked with either, so more suggestions are definitely welcome.
Thanks all - I’m getting my head around it - put a square round it so etc then you can use “centre” as the start point and it makes it easy to be in the right place - Still don’t know how origin and home are different or current position and changing where that green do is - but I’ll work it out. It’s definitely a lot more complicated than easel - but hey ho it’s got to work on lots of machines so I’ll just have to deal with it.
Thanks for all the tips - it’s got me moving…
Regards
Andy