
I would like to burn this file but am unsure if there is a proper way to do this to have a good outcome
I have converted it to greyscale the outcome is acceptable but it takes 2 hrs to burn. I tried Jarvis and it started to look pretty good but then it started to shade where it wasn’t supposed to.
I have downloaded files that were labeled 3D and burned excellent and fast. Is there any way of converting this file to something that will burn clean and be reasonable in time. I am at the end of my pay grade. I just thought there may be a way to transform this image into something other than what I can do
Other than saying it takes too long, we do not know what you consider acceptable. There are other modes available to try.
Did you use Preview before burning it? That will usually give you a pretty good idea of how it will burn. Notice I did not say how it will look? That is determined by the material and your speed/power settings. Try using the zoom feature of Preview to examine for unexpected burn patterns.
Trial and error. Use scrap material. Advance Preview and use Start Here to burn select strips to lower your testing time.
1 Like
I posted twice but don’t know how to get rid of the unwanted post
Any help
One of the admins already took care of that.
How are you getting on with this job?
What size is it and what is the material?
9.5 inch dia. Will do the final burn on a circle of bass wood

The outside txt ring is going to be V carved and filled with pearl epoxy and the ring will be walnut> The center will be inlaid flush with the ring
No problem with anything else except the laser part. At this point I am at the top of my pay grade as to a proper way to burn this and it is an image file also.
So far not so great
That’s interesting, if it’s some kind of light coloured plywood in the middle?, then maybe something like this?
I’ve done this in a two part process;
-a plain Fill for the roads & hill (low line interval and defocussed for speed)
-and for a textured effect the remainder of the image has a Halftone dither with a low cell count (18/in).
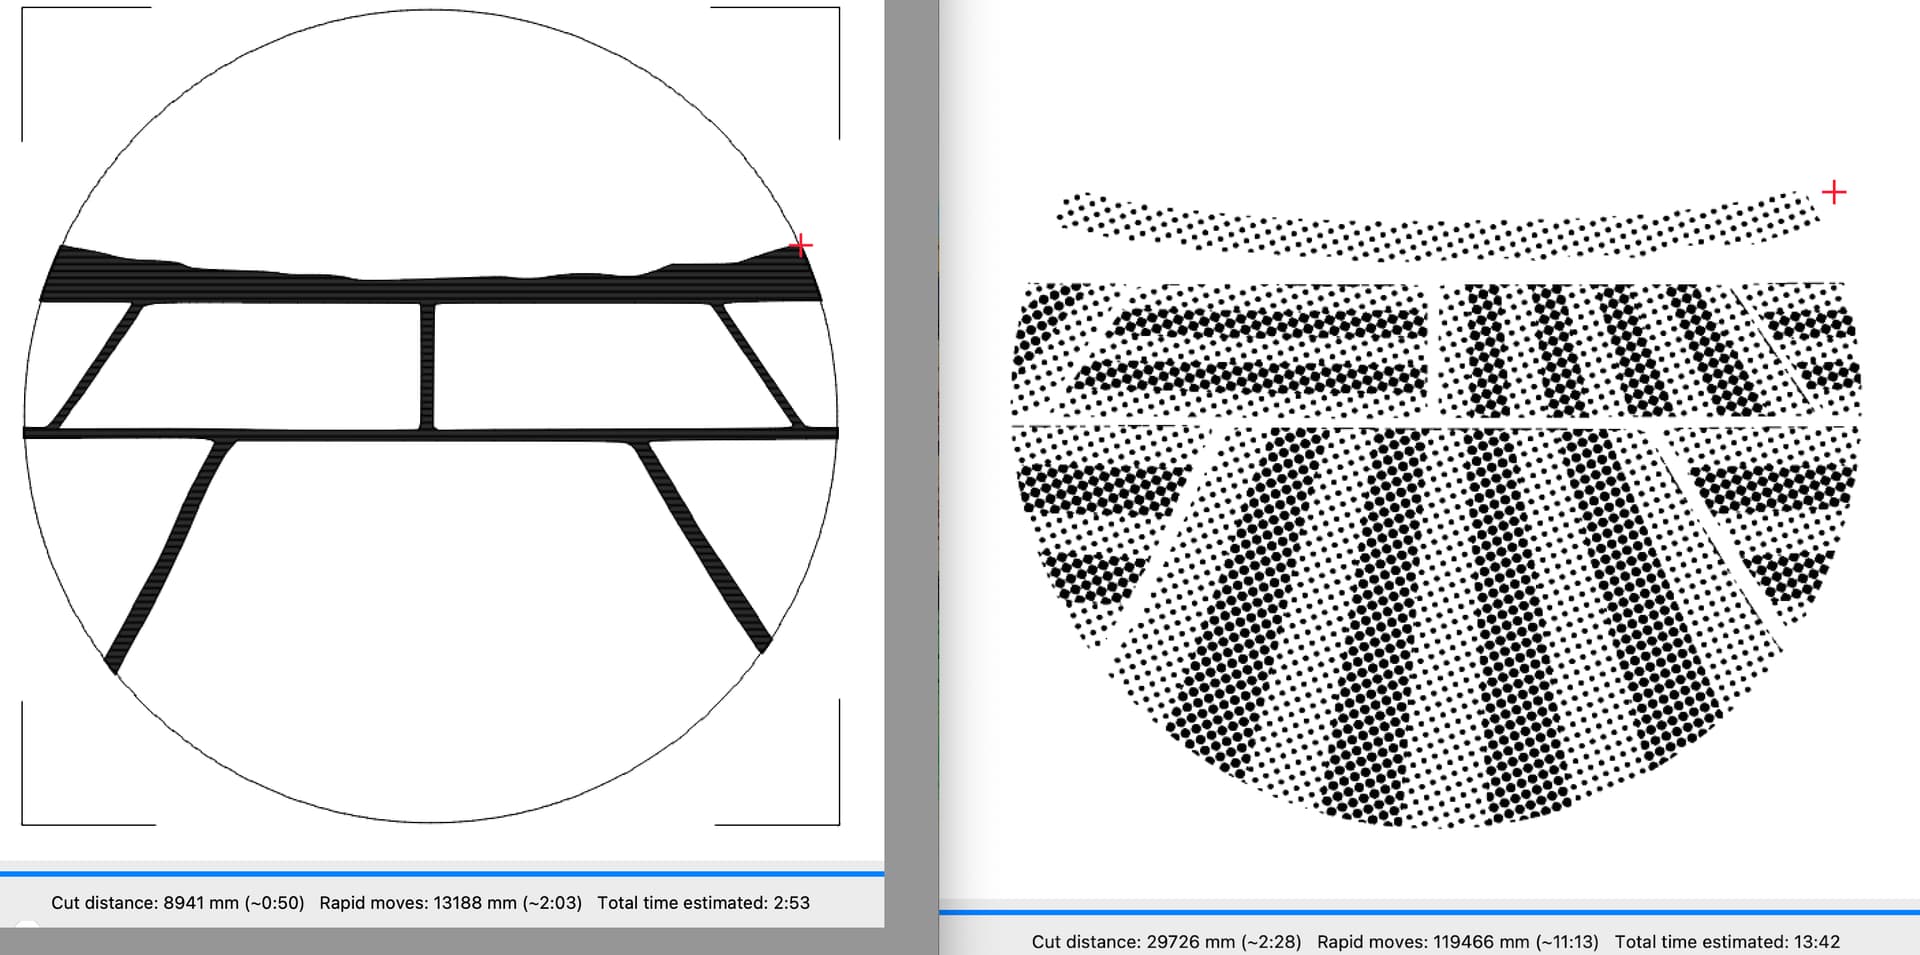
Test on MDF, I gave it a quick sand and light brush just to bring the contrast back a little.
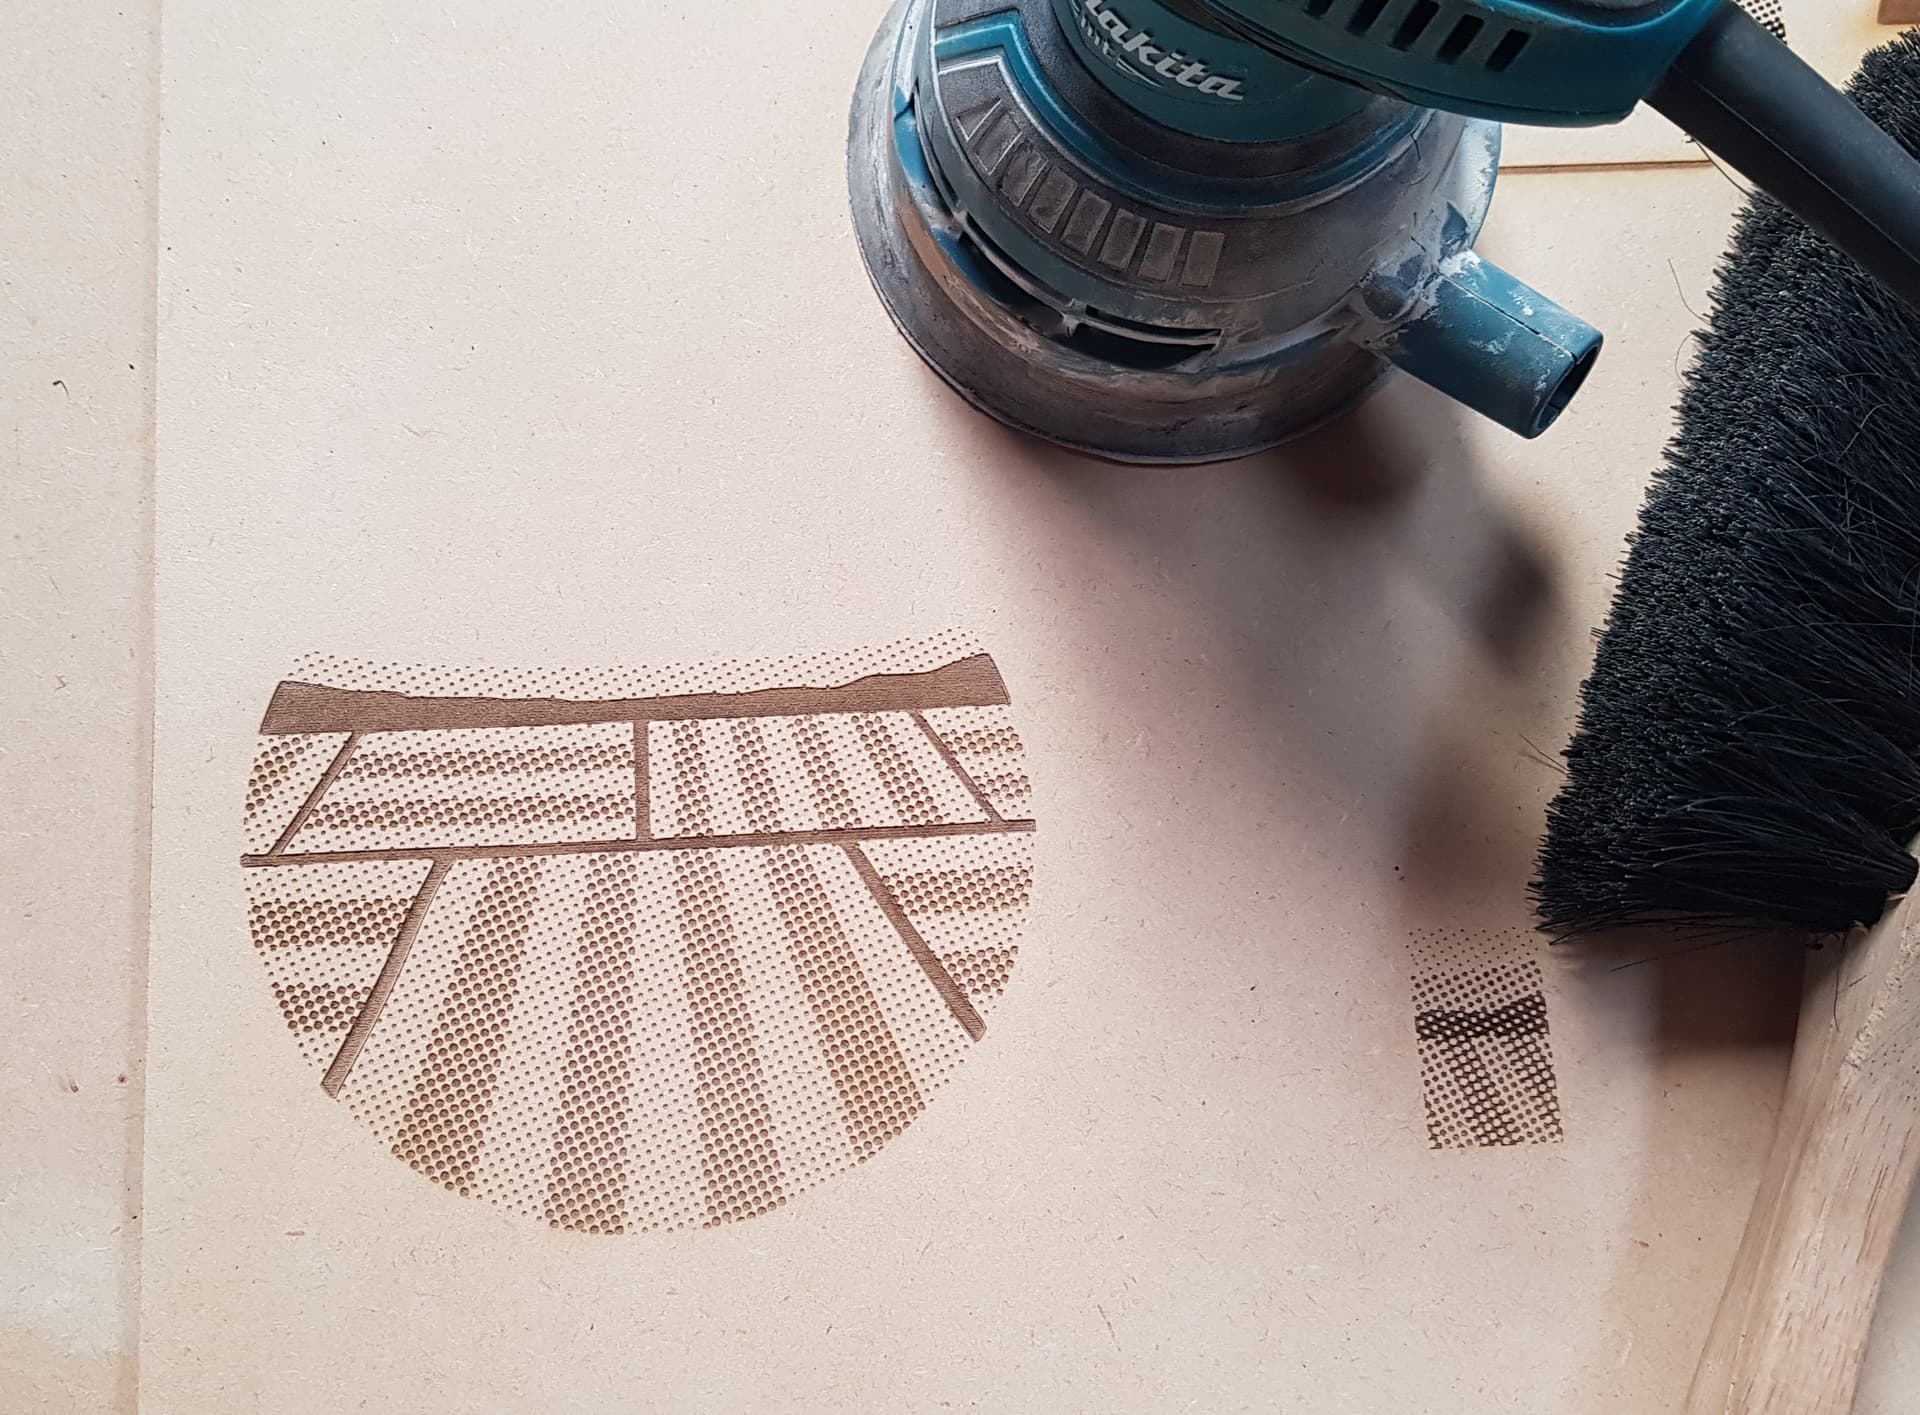
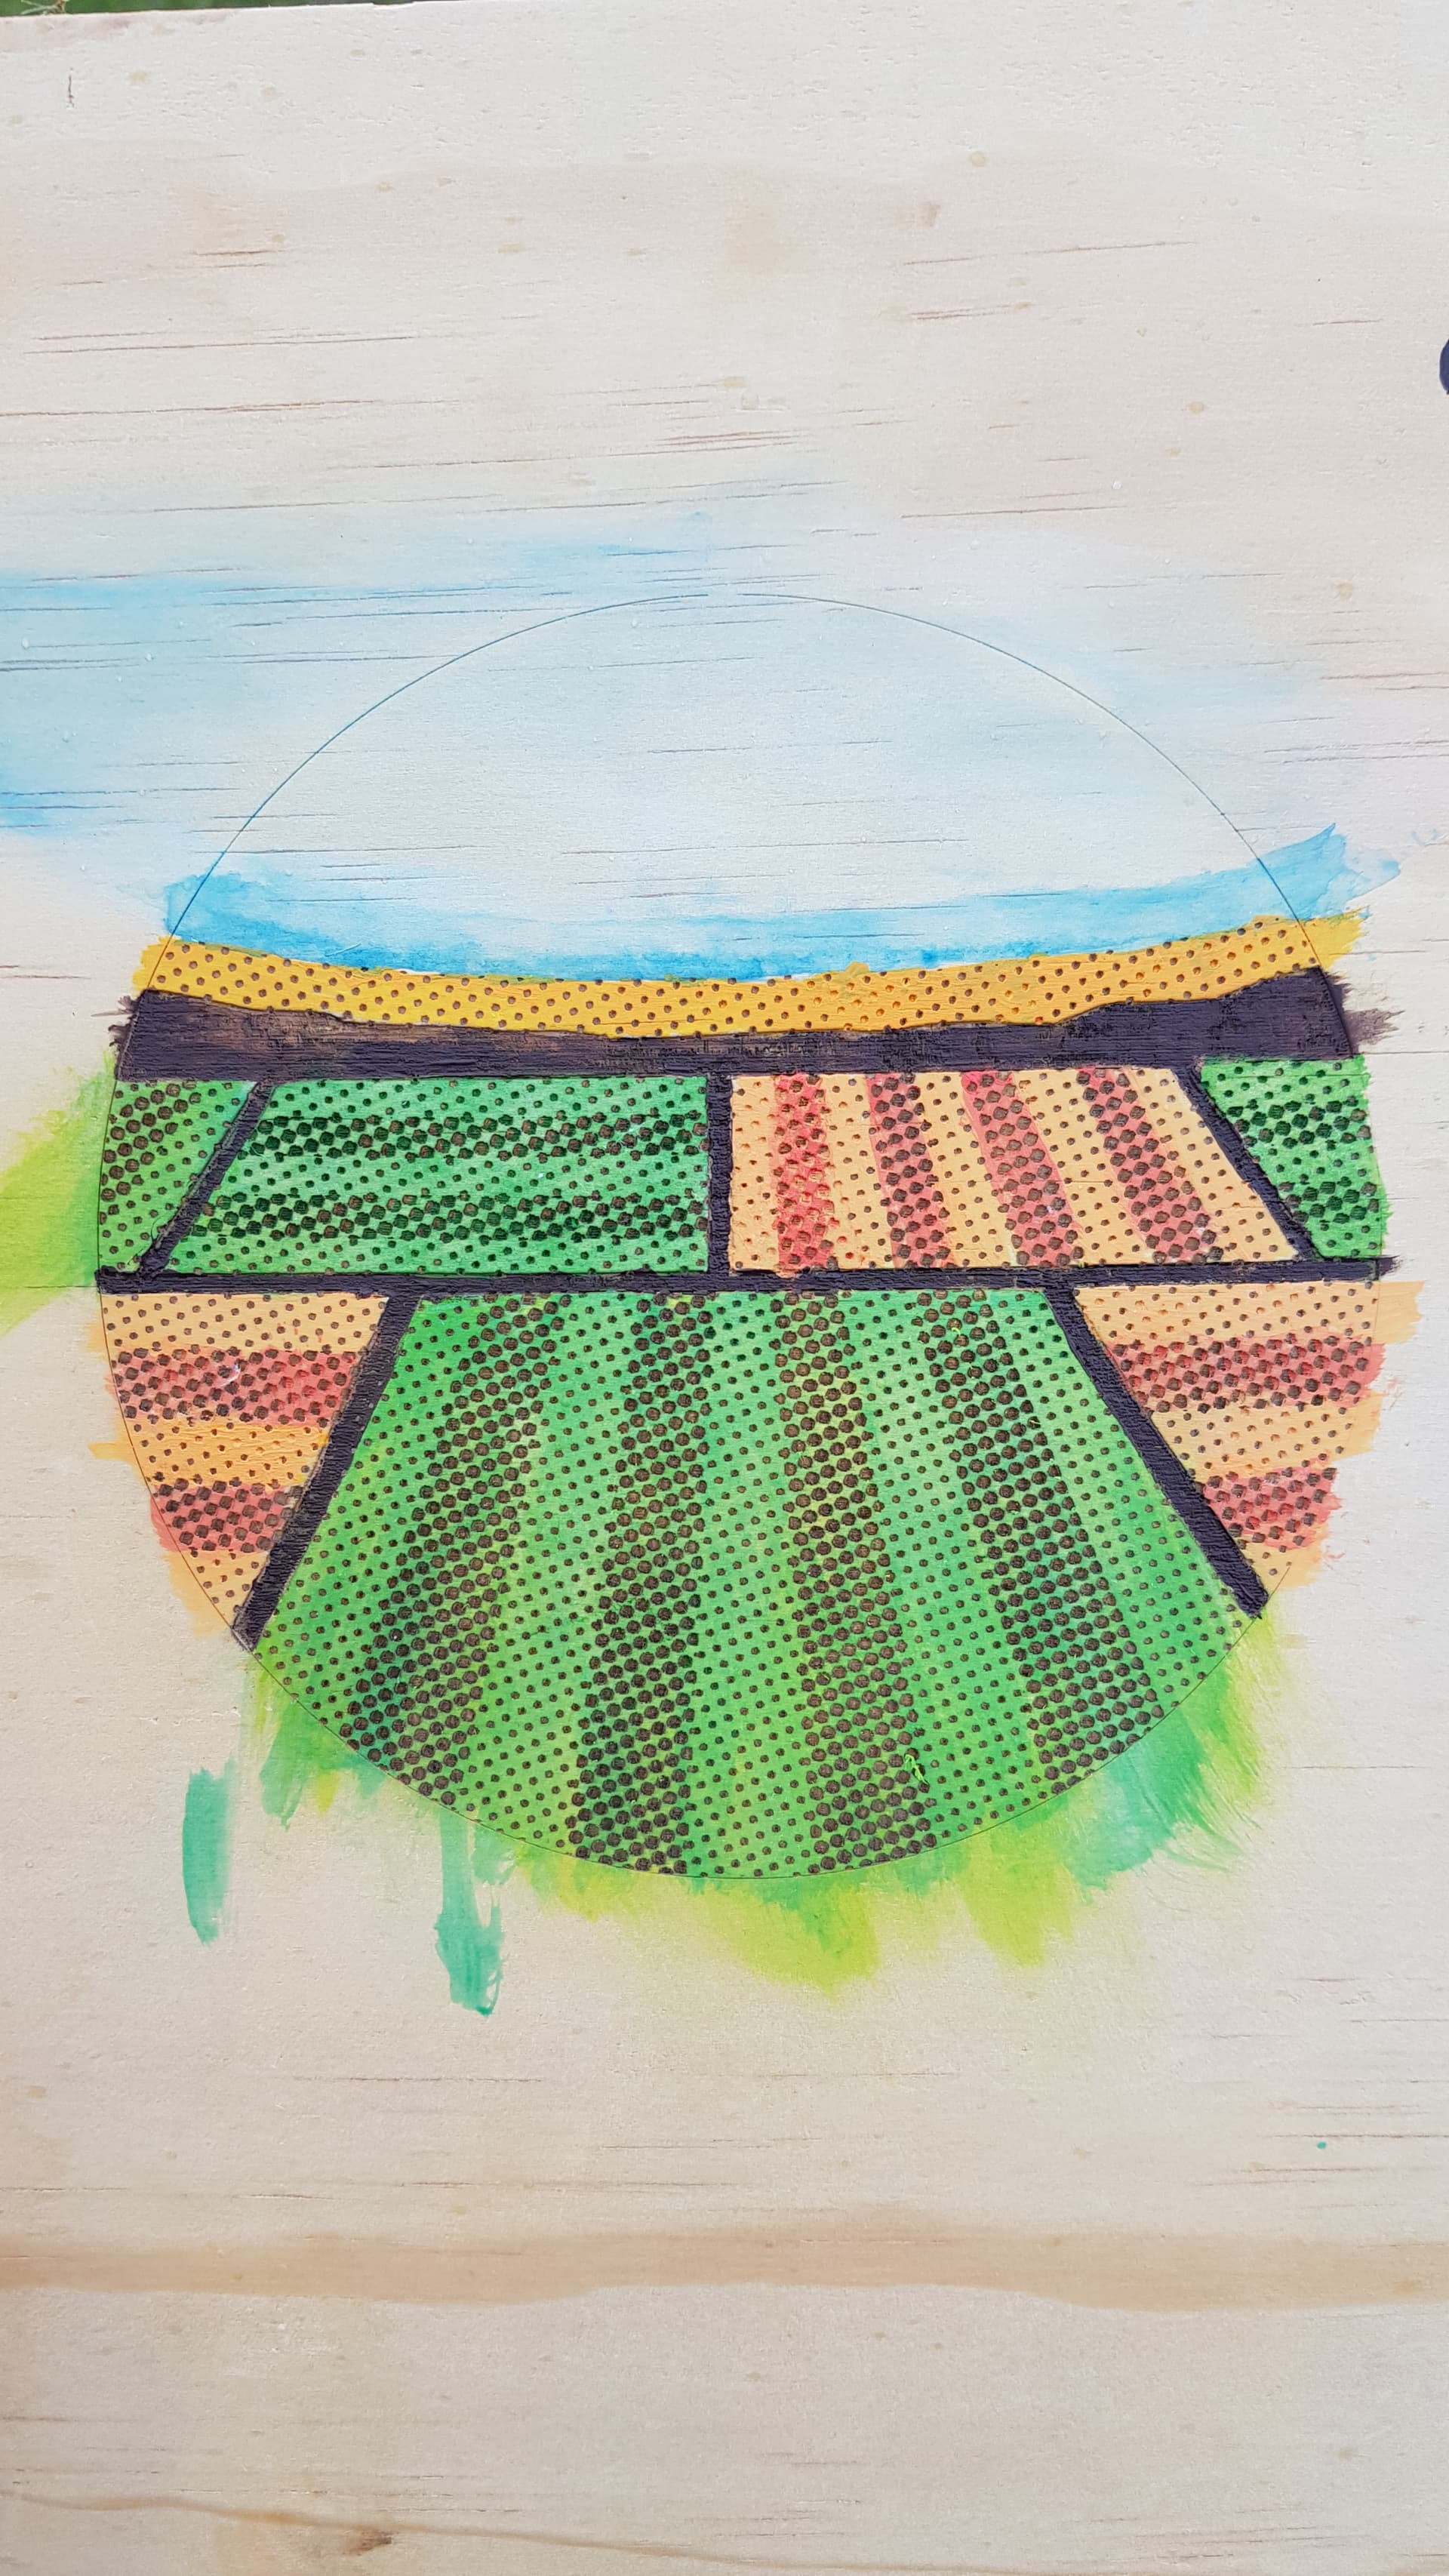
Just wanted to see roughly what it might look like on plywood with a little acrylic paint thrown on with a brush (trying not to get the paint in the halftone cells).
Didn’t get the sky or colours quite right, but hey it’s only a mockup!
HalftoneFields.lbrn2 (631.6 KB)
3 Likes
Not totally up to speed on what you are saying but I will give it a shot
Thanks
You are getting some of the best one on one personalized help here that doesn’t exist elsewhere.
@NicholasL has given you a great opportunity to lean from the people who know how it works.
Myself, @NicholasL and others here want you to to understand what’s going on.
Please don’t hesitate to ask if you’re unclear about something.
Good luck
![]()
4 Likes
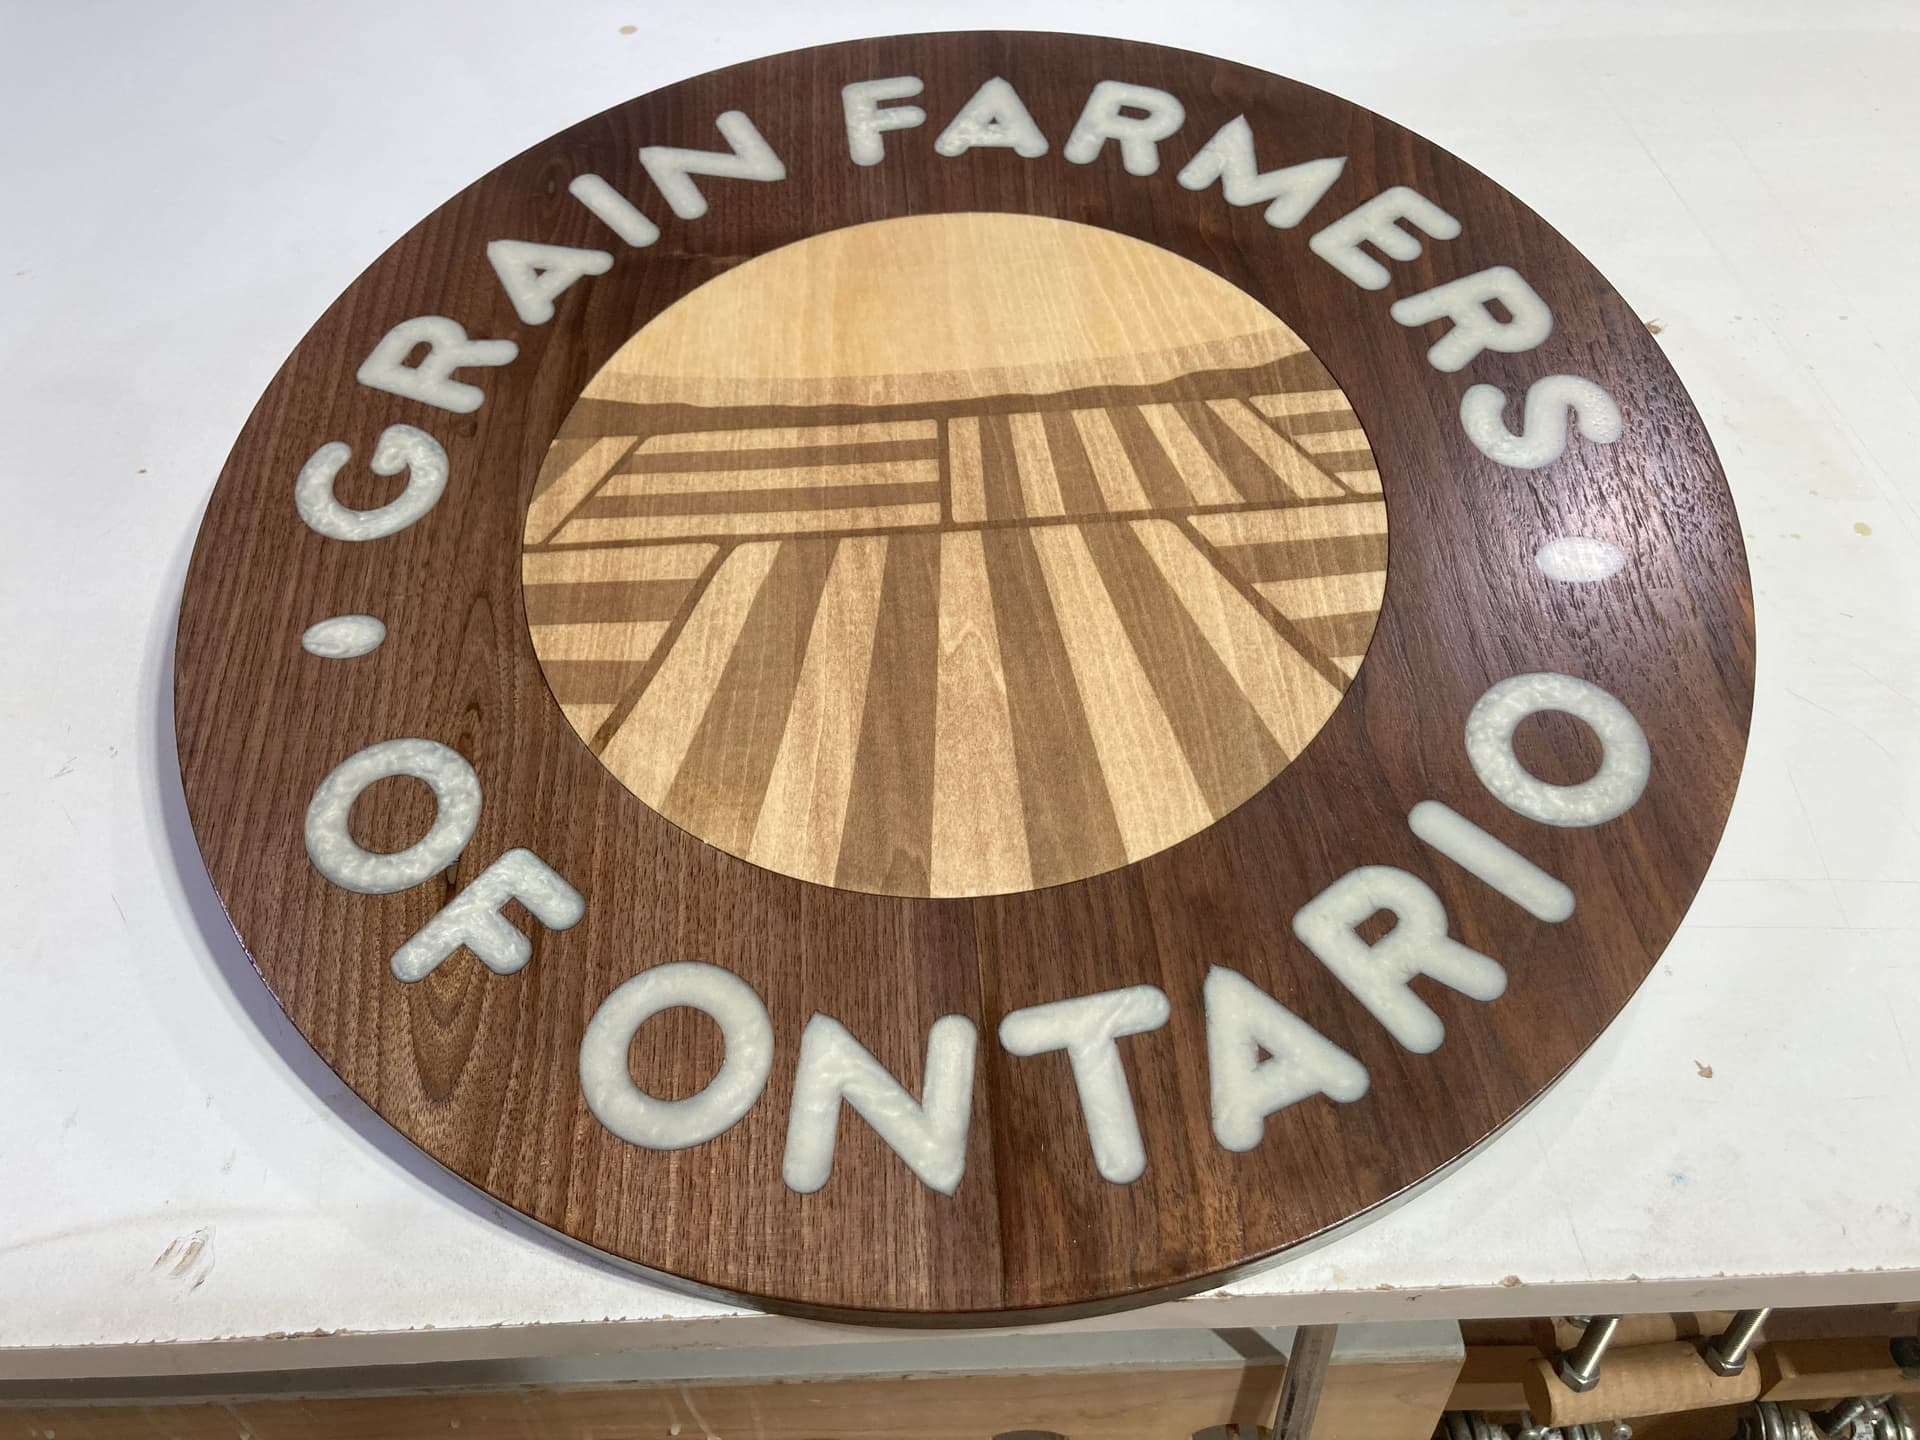
This picture is what I am talking about maybe shouldn’t have posted a colored picture
This the one that I have finished but in the center circle I could not get the second horizon to trace it is very light and would not trace but with the center circle that is the shading or something very close that they want to keep. My question is since this is an image file it takes 2 hrs to burn so I was wondering if there was some way to keep the shading somewhat and reduce the time burning. Could it somehow be converted to another file type that would burn quicker or have layers to apply different heat settings to acquire the proper shading. I hope this is clearer than my first post. But I need to keep the light and darker shading of the center circle
Way above my pay grade
Thanks
Could you make it a Vector and if there are more verticle lines than Horizontal, then turn it 90deg to work more on the X axis.
Can you darken the Horizon that will not trace until it does and darken the rest of the shades respectively so they all show, Or put it on its own layer.
I would do it in two parts like @NicholasL suggested, or maybe even 3 for that horizon.
- For the border lines, use Offset Fill and that will reduce some of your time.
- Use less LPI (larger Interval) and take advantage of the wider charring.
- For the shaded part, defocus a little, crank up the power, and speed it up
You do not say how big that thing is, so 2 hours might be quite reasonable.
1 Like
This is what I am asking how do you break up the the center drawing and keep the shading so they can be put on layers so different settings can be applied I don’t know how to do that
@NicholasL broke it into 2 parts. That was the hard part. The shaded areas are now in separate sections. You should be able to select sections and assign them to different layers.
As for those light and dark stripes next to each other, there is little you can do to split them up. Someone with more drawing program experience than I have may have a solution.
I doubt there is a shortcut that magically does this. Just take your time and remember CTRL-Z is your friend.
Would ‘Show points’ help in this case.
Trace the image - Show points - using the little scissors snip away all unwanted, and assign the remainder to a layer - Apply setting.
If this looks like it will work, do a CTRL-D and assign the copy to a new layer. then take the snip tool to it.
@Pete.IRL thanks for the tip. I am going to download the file and try that. If I can make it work, that will be VERY useful.
Will give it a try
Thanks
I used that method last week while trying to get the outline of a motorbike image so I could cut around it..for a keyring.
I stumbled on the idea quite by accident after pressing Show points during Trace.
It worked a treat and I was able to pull on the nodes to make the handlebars a bit less fragile after cutting and put it on its own layer.
I just happened to press all the right buttons and intuitivly followed along and it was so easy I didnt make a note of how I did it…and cant repeat it since.
Show points with trace, yeah I discovered it once too. Anybody take notes on where it is? ![]()
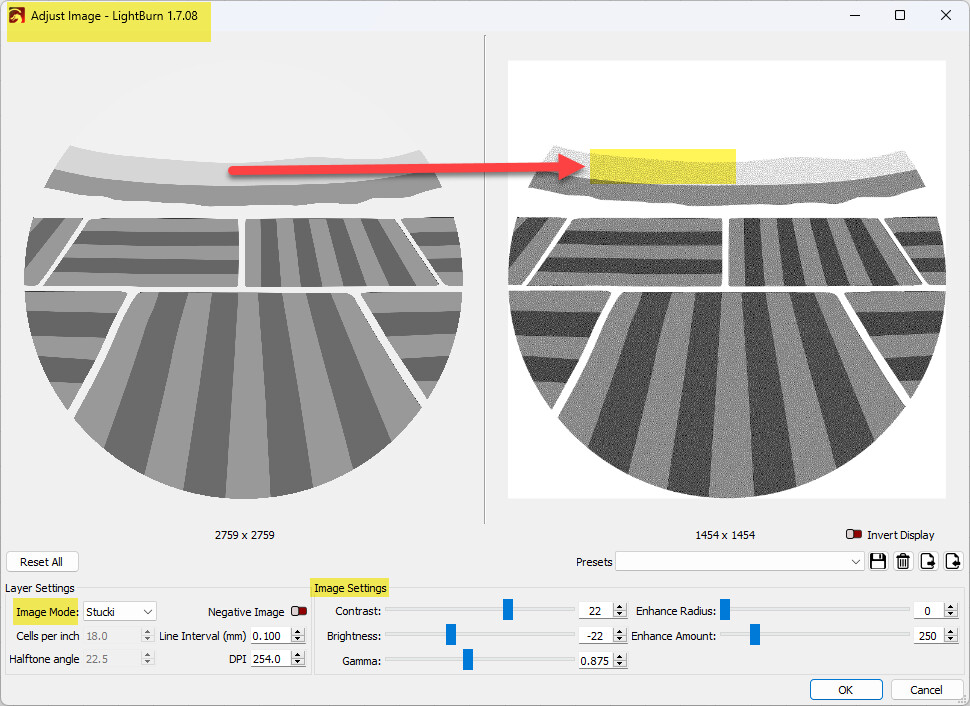
No need to use trace for this, if you right-click on the image and select ‘Adjust Image’, you can adjust both the Image Mode and Settings to bring the second horizon back, since the original bitmap is still present.
(The Adjust Image tool is one of the most useful tools in LightBurn that seems to be often overlooked.)
Lot of stuff here I haven’t got to yet but gotta thank everybody for the help
I will try your ideas out for sure
Thanks
1 Like