I bought this laser almost a month ago but I’ve just not figured it out to where I can use it. There just are no clear, concise directions anywhere to be had and I really cannot follow Lightburn’s directions because they mix in so many things that pertain to different machines that I get lost in the trivia. Which is rather bad considering I went to college and have been following directions for about 60 years, some of which were far more complicated than operation a machine which doesn’t even burn what I want where I want it.
When one sets the position of their laser and sets “user origin” in LightBurn, that is where the laser should start and not move off the piece they’re trying to engrave.
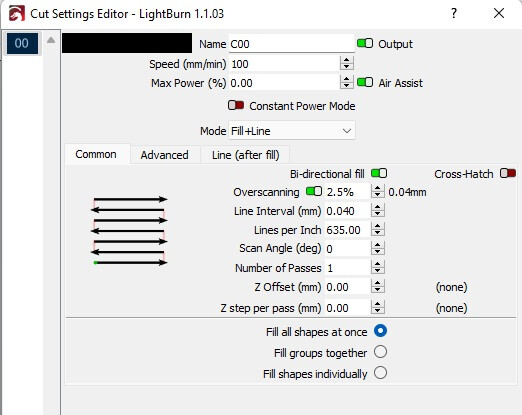
When one tries to “Preview” a job or task for the laser, they should not get a message saying "Layer 0 (C00) has a ‘Line’ speed that is the same or faster than the ‘Fill’ speed. Do you wish to continue? At that point, they should be directed to what settings need to be adjusted and where to make those adjustments!
Another thing for the developers, don’t try to reinvent the wheel, use what has already been used. I note that there are several icons that are used by a majority of graphic creation programs that are accessed by a Ligthburn specific icon here.which is confusing. Also, use different icons for different things, looking at the drop-down menu for edit, the icon for “Select All” and “Invert Selection” is exactly the same! Why wasn’t an arrow put in the “Invert” icon to make it different?
Rant over, I would most appreciate any pointer so I can get started actually using this program and this laser.
One thing I’ll suggest as you work through LightBurn is to keep in mind that while previous knowledge is helpful to relate concepts it can become a hindrance in your understanding of lasers and LightBurn if you rigidly hold to an assumption or conceptual frame. I suggest more of a “in what way is this different than what I expected?” approach. That will also keep the frustration down.
I can tell from your post that a lot of disconnect is from familiarity with terms and where specific functionality is accessed. That will come with exposure relatively quickly. The harder parts are going to be in the actual design process which it sounds like you have some familiarity with.
This is a familiarity thing. The warning message does actually direct you to the required changes and where but it’s not obvious because of familiarity with the jargon.
All layer settings will be found within layer/cut settings Window. The message identified Layer 00 specifically so you’d have to go into the detailed settings for Layer 00. It indicates that the ‘Line’ speed is odd so to adjust the speed you’d find the line speed component of the layer settings and reduce.
The warning is just very dense with information. Every word matters. This is a trend with the documentation as well.
Is there a specific icon that you’re thinking of that breaks major conventions? I haven’t seen that so much. Some of the “Arrange” icons are not obvious to me but tooltips help me there. In general if there’s a unique icon I’ve found that it’s providing something unique to LightBurn but I might be missing some things there.
No, no major problems with design, except as noted some of the icons are not clear. But the design in Lightburn mainly follow what is used in other graphic design programs.
I’ve not explored this program that much, although I did give the one glaring example of an unclear icon, that being that the icon for “Select All” and “Invert Selection” being exactly the same icon.
Okay. Sounds like then it’s mostly about general familiarity. Note that the Invert Selection option is only available in the menu as far as I know so not really ambiguous in that regard.
I’d suggest first starting with the videos to get you quickly acclimated to the concepts and UI. Then using the documentation to fill in more details and to understand some of the nuances as you explore more and take advantage of more capability.
I’m going to explain to you that a laser is nothing more than a printer capable of working on a variety of materials besides paper and needing some different settings to be capable of doing that.
Your explanation of my problem with “Layer 0 (C00) has a ‘Line’ speed that is the same or faster than the ‘Fill’ speed. Do you wish to continue?” is that while the cut/fill layer does indeed allow one to change the line speed, one doesn’t find the fill speed even mentioned or that can be adjusted, so changing the line speed would only also change the fill speed to match it.
I spent 12 years in the Marines right out of high school, where I quickly learned 1) to expect the unexpected, 2) that if anything can possibly go wrong, it will, 3) the KISS principle … When giving instructions, directions, commands, or orders, “Keep It Stupidly Simple” but explain with enough detail that the task can be accomplished without making the person ask for elaboration of the subject later, thereby wasting your time and theirs.
When I first started using computers, I kept a notebook full of DOS commands and what they did. Lightburn is written for a graphic user interface which should preclude any need for that, which is why icons and their usage should be somewhat the same as in Paint, CorelDraw and other graphic design software.
To date, I’ve not been able to do a thing with LightBurn because of unclear instruction and bad responses by the laser to instructions coming out of it. ( I know that is because I don’t know the program well as I can see a lot of people doing amazing things with it which is why it frustrates me to no end when I set my workpiece, set my origin to user, position my laser on my piece, “frame” my laser on the work, then try to burn what I have on the screen, only to have the computer and Lightburn tell the laser to burn at some place where I did not put anything to be engraved!) There can be no disconnect on my end, I put things where I wanted them and positioned my laser where I wanted it to start to do the “printing”, but when I hit the “Start” button to run the job or “Printed Selection”, the thing goes crazy. And, I cannot find out just why that happens and how to correct it.
We have gotten good ‘first time user’ feedback from the learning value of the Simple Project section of our documentation. This is a good place to start.
I suggest you get your head out of the mindset of lasering being a heavily refined and consumer-centric offering like printers. It’s only recently that lasers have entered the realm of hobbyists. It still clearly has the stink of industrial applications attached to it. I would put this closer to 3d-printing with the requisite experimenting and futzing about.
There are offerings meant to be more consumer focused like GlowForge. Those are fine offerings for what they’re meant to do but at the cost of less flexibility and higher price.
LightBurn has done a lot to make the process even more accessible but can’t eliminate all the rough edges of the current state-of-the-art. I can assure you that the balance of ease and power in LB is easily a top contender in this space.
Perhaps it would be better to focus on the specific issues that you’re experiencing as it seems that is where your frustration is derived.
From what you’ve written…
I suggest you start using Absolute Coordinates as that is by far the most intuitive model. Basically the location on your workspace in LB matches your laser frame. So put something in the center of the workscape and the laser will attempt to burn something in the center of your laser bed. This will also prevent running into issues with exceeding boundaries that may not be obvious.
The laser is probably doing what it’s told. However, it may not be obvious what that is either due to a configuration setting or something in the design that’s not fully understood.
Again, assuming your GRBL configuration has not been changed going to Absolute Coords is likely to resolve much of the unpredictability of motion.
I will try your suggestion as to Absolute Coordinates and will look at my Machine Settings for Line+Fill when next I fire up the laser.
As to Glowforge, well, I’m not so caught up in this hobby that I can or would pay for one and I don’t like items that leave the control in the hands of others, they control the application, therefore they control your machine.
I know my movement problem is because of a GIGO problem, I just don’t know how to correct that. I’m telling LB where I want to do the job, but somewhere in LB there are directives telling the laser to start there and I just don’t know how to tell it different, yet. I fully understand that the laser only does what it is told, Lightburn can only with what the user inputs to it, therefore, the problem lies between the chair and the keyboard. That is the problem I’m trying to correct by asking for help.
How does one get the red square, (I think it is Job Origin) to match coordinates with the green square (laser position, I do believe?) I think that is my problem with movement that I cannot find the solution to.
Red square indicates home position. Green square represents laser position with respect to “Job Origin”.
For your laser and setup they should both be stacked on top of each other on the bottom left corner of the work area.
If they are not then it’s because of a setup issue.
To fix the red square - Got to Edit->Device Settings and make sure your Origin is set to the bottom-left dot.
For the green square - When you pick Absolute Coords the green square should be anchored to the bottom left and will never move. This represents that job origin for Absolute Coords is the machine origin and that everything is relative from that position which is what it should be.
Ironically, I’m usually the one who is lobbying vendors to produce better documentation…and I often point them to the Lightburn manual as an example of what they should have! Granted, it’s not a step-by-step tutorial of how to set up a project and run it (that’s what the videos do), but in terms of listing a description for every function, kept up to date with the current release, and giving examples and screen prints of the various tools - I find it to be heads and shoulders above many other products.
In this, and the CNC space, many vendors are Engineers by trade, and many customers are DIY’ers and tinkerers - the lunatic fringe that would rather 3D print 20 parts to test out a concept than to buy a production one. Nothing against Engineers and tinkerers, but there is often a mindset that experimentation, trial-and-error, and “develop your technique on smaller projects before extrapolating them to your real project” is the best way to execute…with the added benefit of a deeper understanding and learning. But the result of that approach is that learning resources become hundreds of YouTube videos and questions/answers in forums, indexed only by a Google search on the technique you’re trying to execute.
Of course, if what you want is to add a Laser or CNC to your production arsenal and use it much the way you would a tablesaw, router, or drill press — in a consistent and repeatable fashion, having learned the safety features and the basics of how to use the tools — then you’re looking for a more concise, systematic approach to using the tool. Most people do not buy a tablesaw, with the assumption that they will be printing different arbor nuts to find the one that has the least wobble. You want to get up and running efficiently and be productive right away, with as little down-time as possible. You’ll develop more skills over time when your needs exceed the basic functions. Many of us think of our Lasers and CNCs as “just another tool” and are used to a very detailed level of standard “How to” instruction for our tools.
Lightburn is actually better than others (I won’t name them here…but anyone who knows me, knows who I consider to be the worst offenders), although I agree there is still room for improvement. A LB for Dummies book is probably still something that would help a lot of people. I’d certainly like to see it!
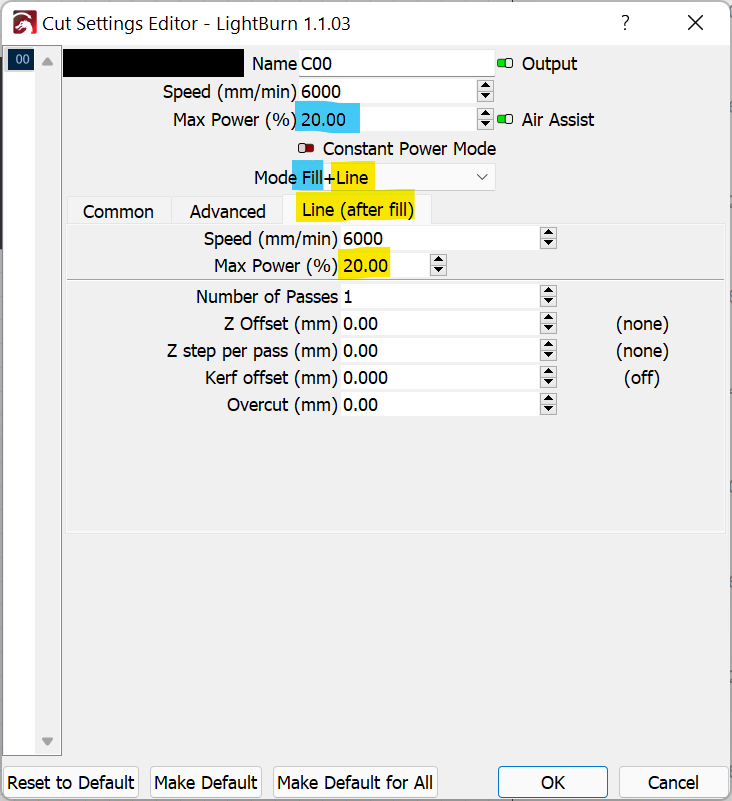
Okay, so line and fill settings have “discreet controls”, you left out the part where you tell me how to get to those discreet controls! What I see is as follows … so where do I go to change this?
In my original post to you I create links that will take you to both the documentation and the tutorial videos.
Home will never change as it represents your machine origin. It’s basically where does the controller and LightBurn identify as 0,0. This is static from the point that your machine completes a homing operation.
Green does not represent your current laser position. It represents the position of the laser with respect to job origin. In the case of Absolute Position job origin is 0,0 so overlapping with machine origin/home. Put another way, it represents the anchor point from which your job positions itself.
One of the reasons I suggested you to use Absolute Coords was so that you didn’t need to concern yourself too much with these nuances. What you see on screen in terms of design placement is where LB it will instruct your laser to burn the item.
I suggest you review my post again. I’ve highlighted the specific location of each type of control by color. I’m not sure your intention but I don’t appreciate the tone here.
Also, is there a reason you’ve chosen to start with Fill+Line? It may be simpler if you started with a straight line or fill operation.
It’s available not in the edit window but in the preview window. This shows to the right of the edit window if you’re on a desktop browser.
The easiest way to understand what is possible, and how to go about doing it is to go to YouTube and look for one particular video maker by the name of Louisiana Laser Guy. Within a few videos, you’ll most likely have a lot of your questions answered. And the ones you don’t, well you can personally ask him yourself and get an understandable answer from. Make sure you subscribe to his channel, it’s free and if you’re so inclined, buy he him a coffee every month and get weekly video presentations and your questions answered.