I have a K40 Co2 40Watt laser.
I have Lightburn 0.9.09. I originally got it for a diode laser I had but upgraded to a K40.
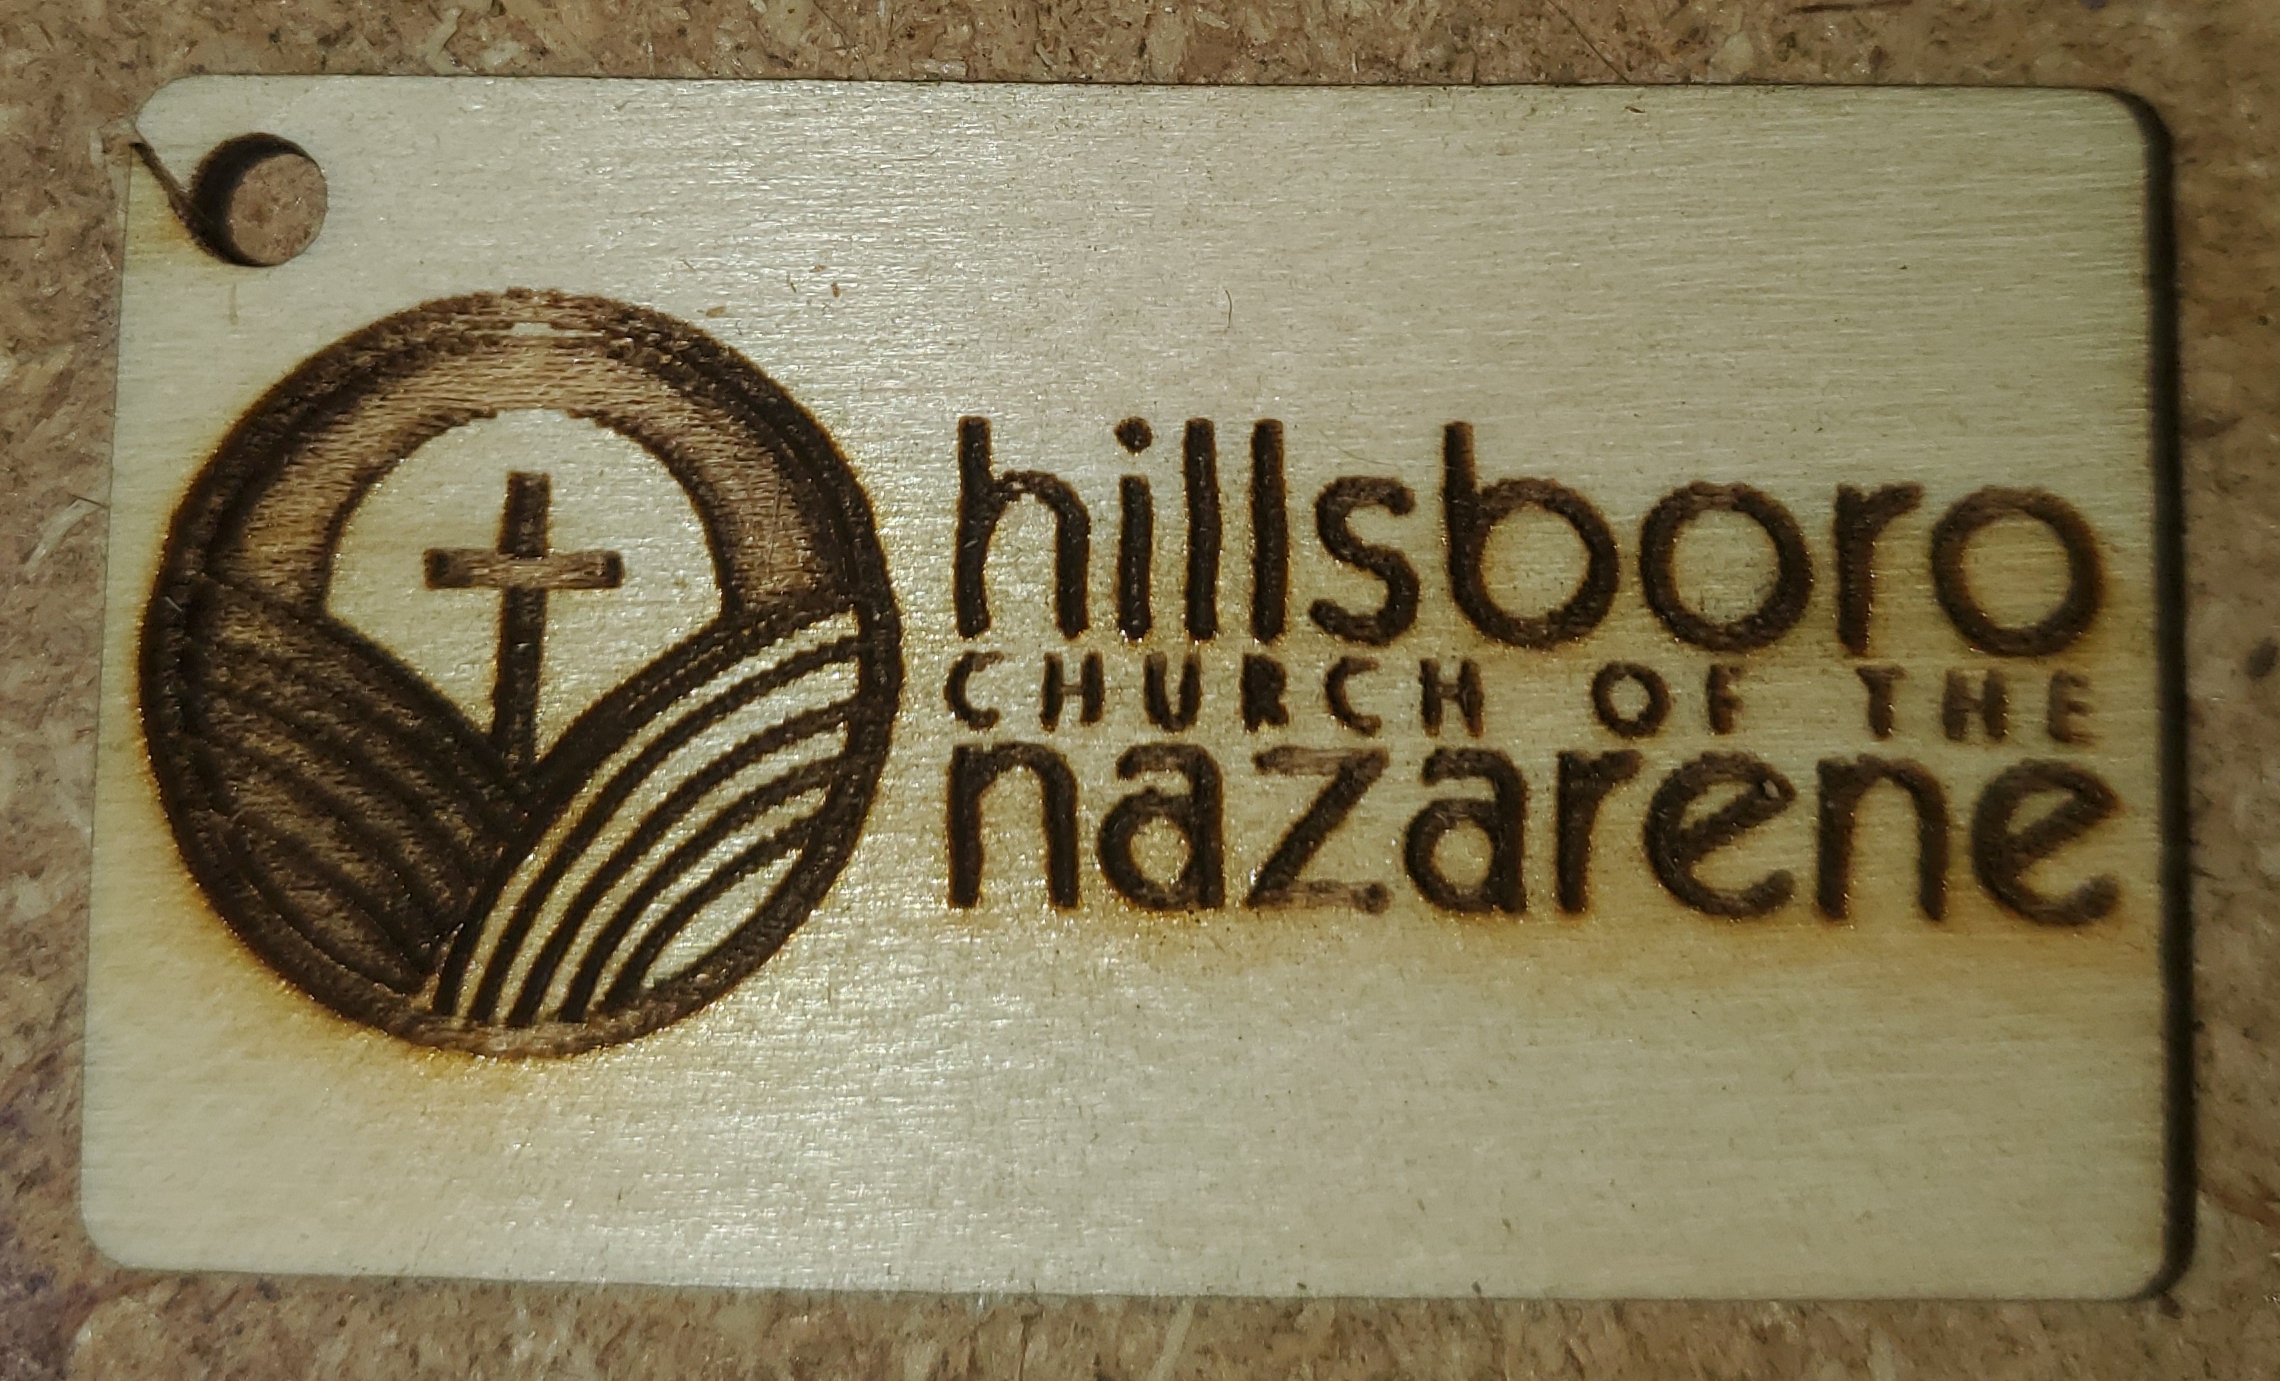
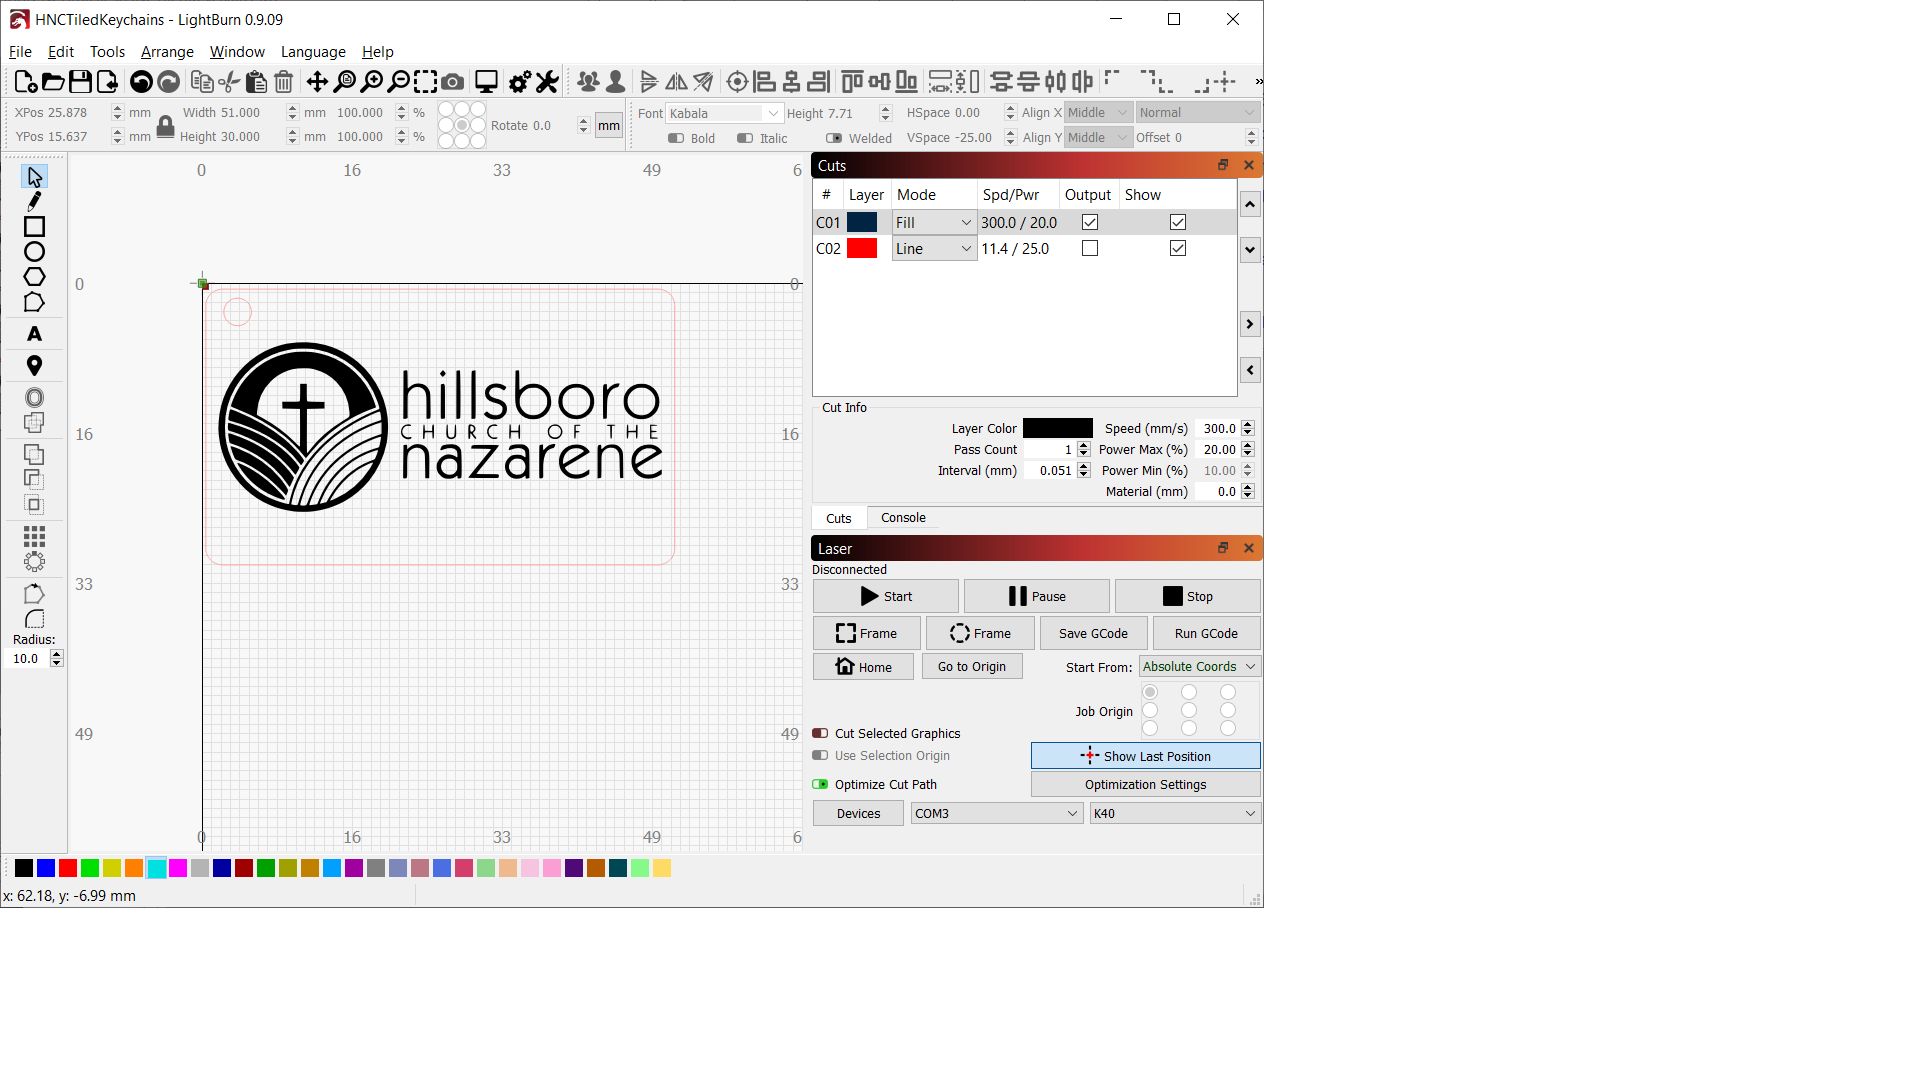
I’d previously used Lightburn to trace an image and then used K40 whisperer to run the laser to engrave the image onto a keychain. There is text that is part of the image and it was traced with Lightburn at the same time as the image. I ran the raster engrave in K40 whisperer at between 250 and 300mm/s and between 8 and 9.5 mA.
With K40 whisperer the text portion of the image was crisp and easy to read, including small text. This is what it looked like. It’s about 50mm wide and about 32mm tall.
I installed a mini-gerbil so that I could use Lightburn directly with the machine and loaded up the same image. I’ve tried a number of speeds (50-400mm/s), power settings, changing $30 to 255 or 1000 and turning laser mode ( $32 ) on and off. Either the text in the middle that says “CHURCH OF THE” becomes nearly illegible, or the image on the left becomes overburned and the definition is lost. The closest I was able to come to matching the older version was when the $32 setting was 0 but that means PWM is off.
I have the cut setting on Fill which I believe is the closest match to what I’d used in K40 whisperer. It was not tracing the lines of the image in K40 whisperer.
This is what the results from the tests in LightBurn with mini-gerbil look like.
If I set it to do Fill + Line I lose some of the definition in the image and the text looks outlined. If I get the text to look solid the image has issues with being overburned.
Can someone point me in the right direction? It seems like it’s something to do with the way PWM is handled but I don’t know what setting to adjust at this point.
You should be able to get comparable results using the Mini Gerbil if using the same settings as you did with K40whisperer. I think the only thing you need to figure out is what value you should set $30 and S-value max in Lightburn (dependent on your tube age). But the default Setting $30=1000 and Lightburn S-value max to 1000 & $32=1 you should be able to run some tests to see what power setting you need to run at to get to the 8mA - 9.5mA range you were satisfied with at the same speeds.
In addition using Fill + Line you can choose the power & speed of both the Fill and the Line in the Cut Settings Editor, So if your Line is causing it to appear outlined you could either speed up the Line or reduce the Power in the lower section of the Cut Setting Editor.
Increase the number of lines per inch in the Fill setting. Double click the name of the fill layer, and increase the Lines per Inch to about 350 or 400. You’re also too high on the power.
Thank you, I’ll try increasing the lines per inch.
Currently I’m running a test pattern I made with speeds from 100mm/s to 250mm/s and power 15% to 25%, both with overscan on and overscan off.
Previously, I had tested several different power levels, I was trying levels from 15% (~6mA) to 25% (~9mA). (That’s the image with a bunch of key chain attempts).
I’ll try it with the higher speed and more lines when the test patterns are done.
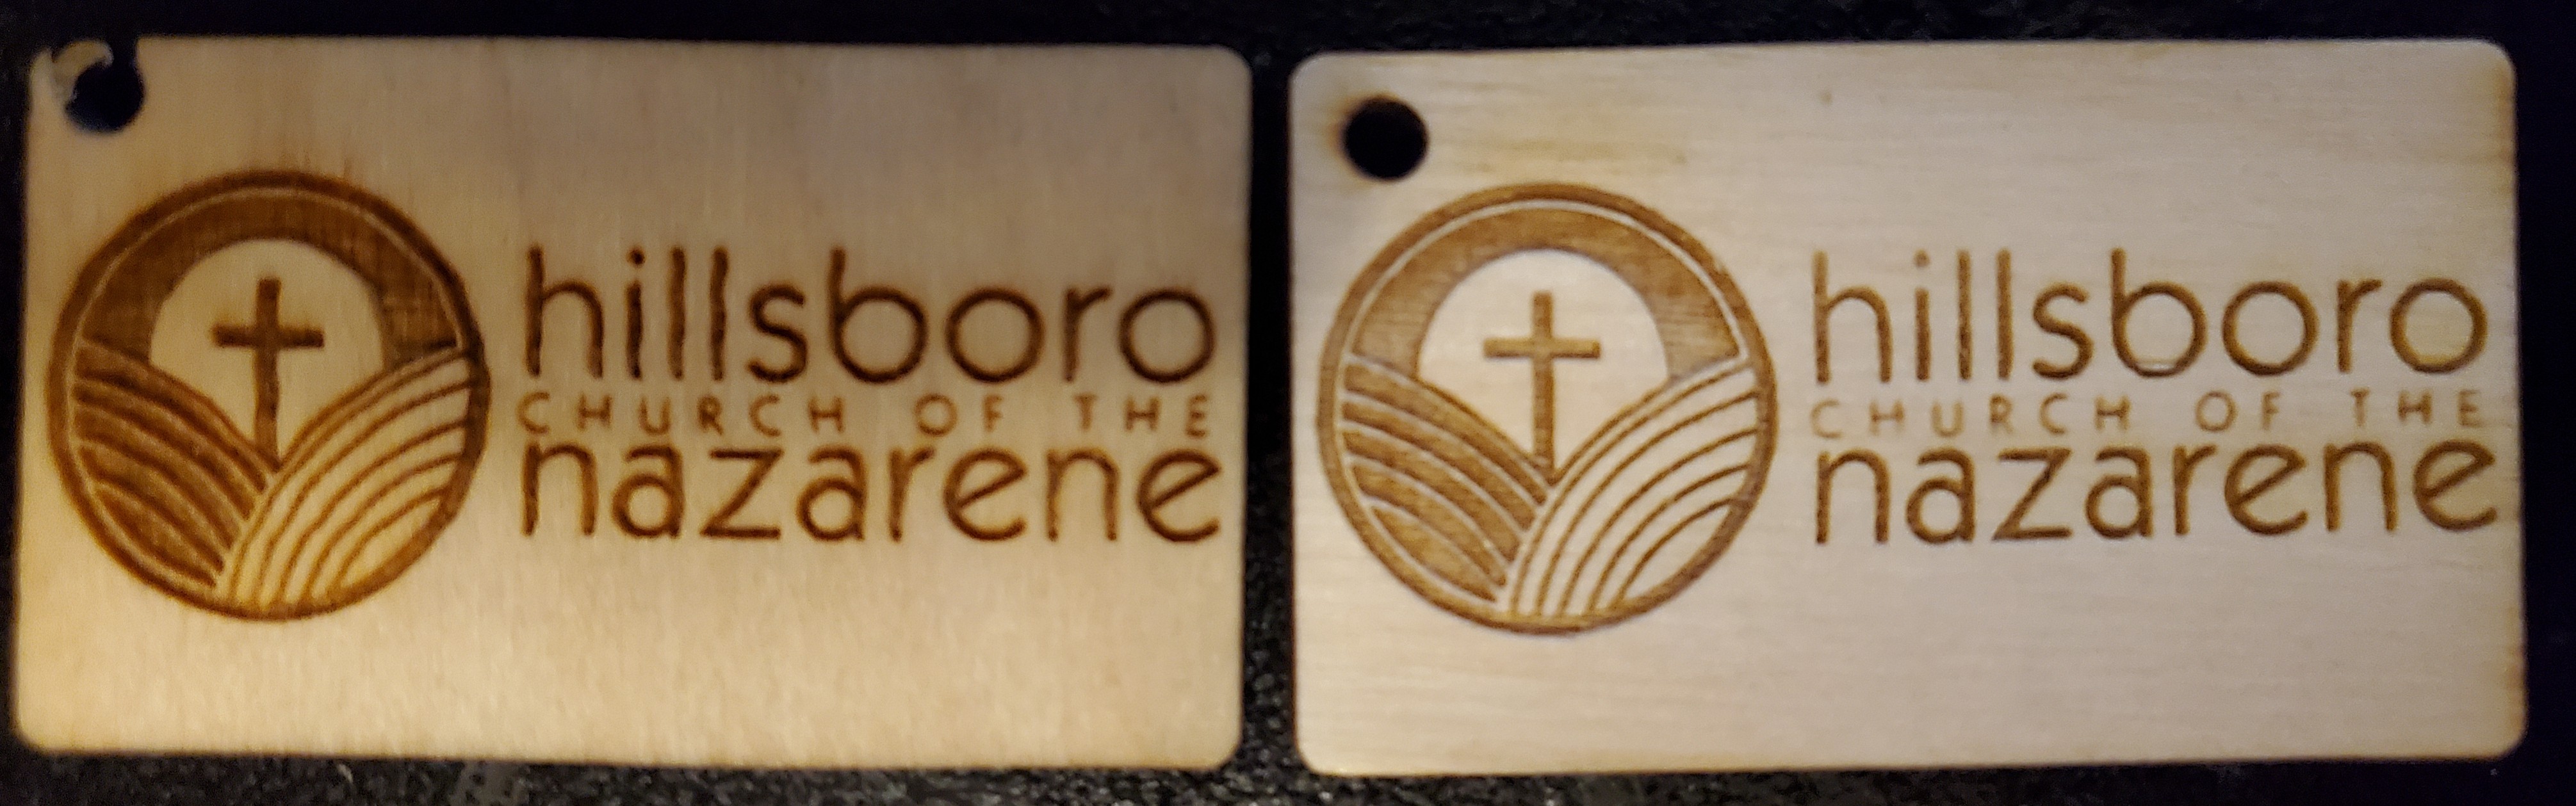
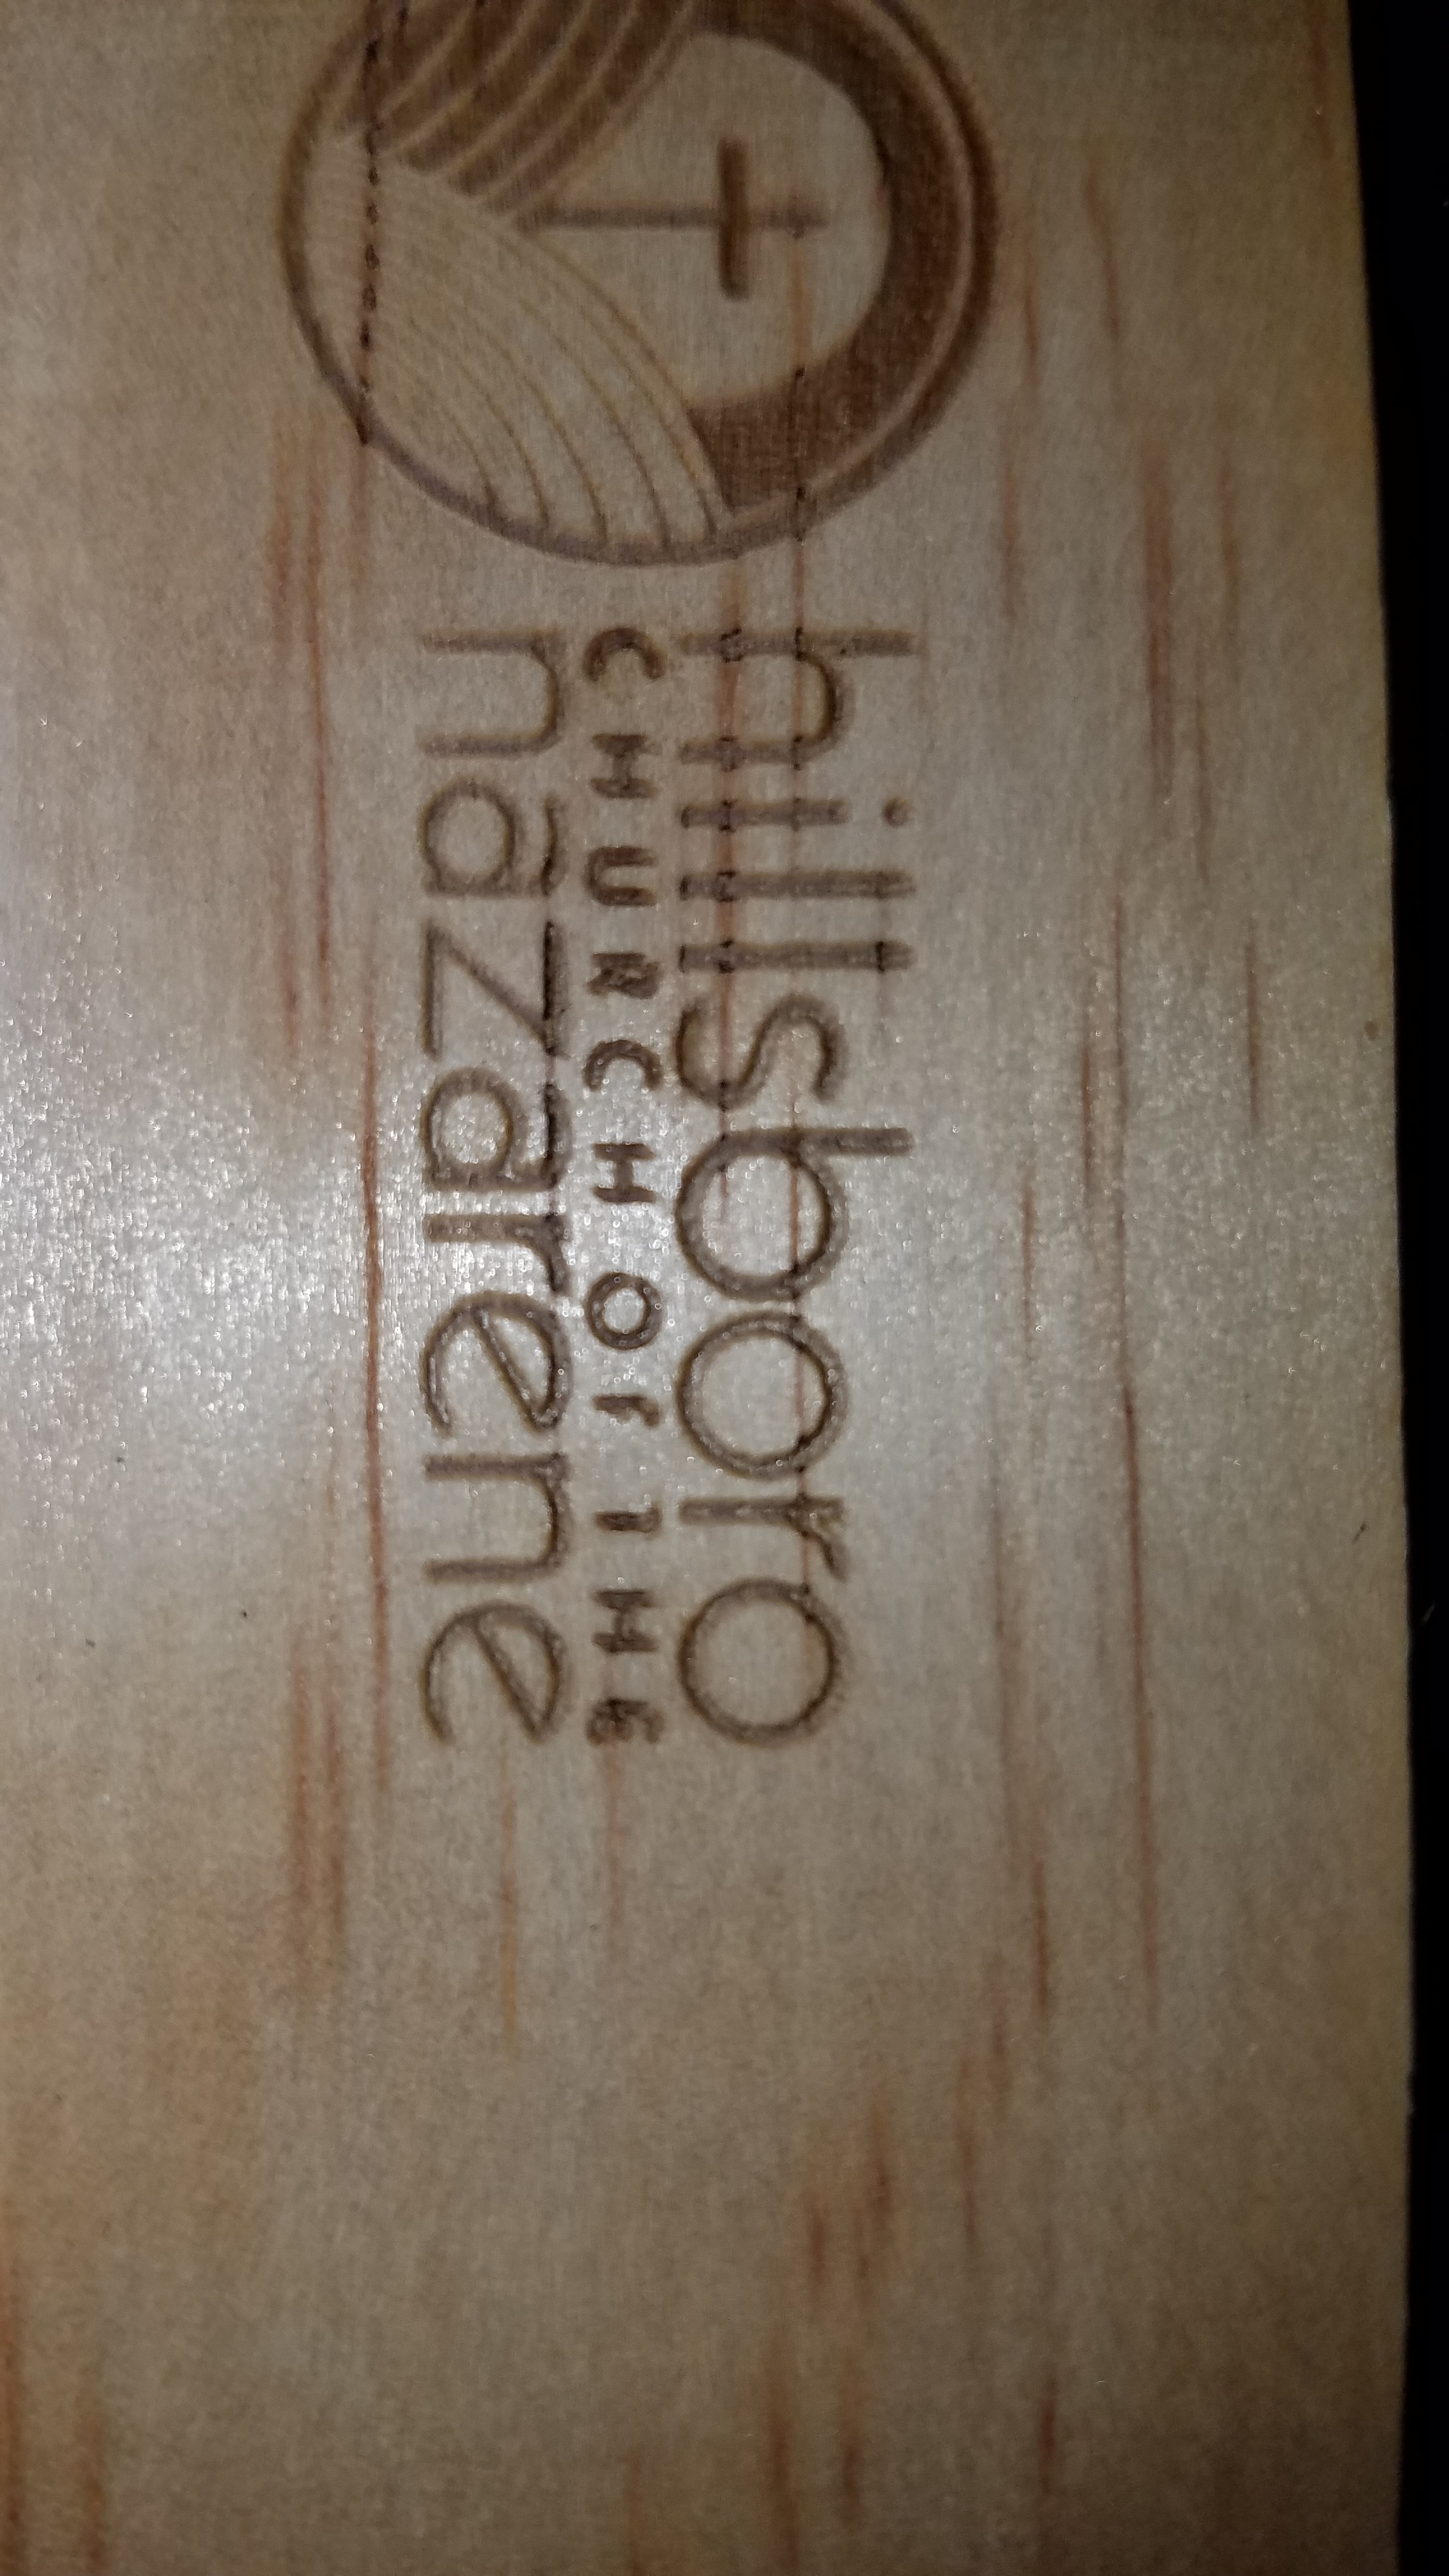
I switched back to the old board and ran the keychain at ~7mA and 300mm/s for the raster. The result is much easier to read that what I achieved with the mini-gerbil run by Lightburn and the letters are straight. (I didn’t do anything to the belts, I just hooked up the old board and ran it with K40 whisperer.) The new keychain is on the right in the image.
In Lightburn I tried a bunch of different lines per inch setting, from 200 to 400 and several in between (including 350 and 375). The small lettering seemed blurred and my wife said she couldn’t read it well. When compared to the older keychain from K40 whisperer, she said the Lightburn/mini-gerbil version looked bad.
I really want to get the mini-gerbil and Lightburn working properly so I can run nice engravings, but it’s getting frustrating.
It seems as if something in lightburn or the board is causing the PWM setting to vary the power when it’s raster engraving such that it’s not fully rendering the lettering properly when I use the mini-gerbil and Lightburn. I tried setting $32=0 to try it without PWM in the mini-gerbil/Lightburn configuration but it ran really rough and seemed like it was running the power at a much higher setting than I’d specified.
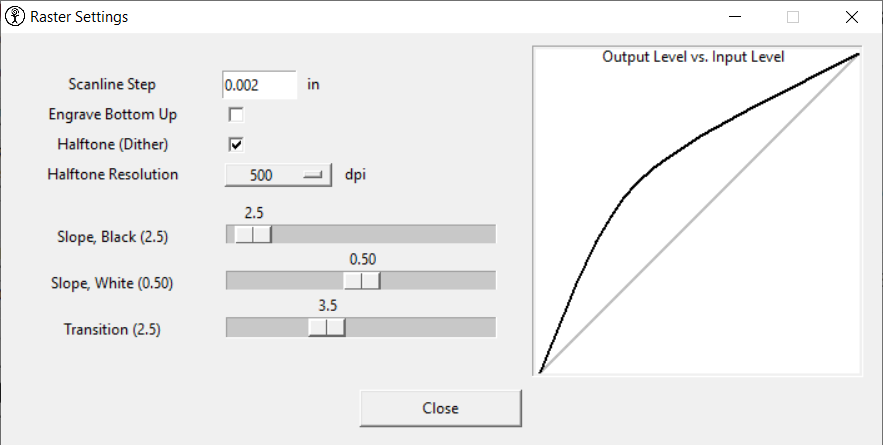
Is there a way to set Lightburn or the grbl settings to treat the raster like it did in K40 whisperer? I’m attaching an image of my current raster engrave settings in K40 Whisperer, which is what I used in the new engraving.
In looking at the comparison of the raster settings, I noticed that Lightburn was set to 0.00307 for Line Interval (in) and K40 Whisperer is set to 0.002 for Scanline step. Are those the same setting? If so, it looks like Lightburn is trying to make the line wider. My Lighburn setting for Lines per inch is currently 325.64 and my dpi setting on K40 Whisperer was 500dpi. When I look at a converter, it looks like I should actually have Lightburn set at 250 lines per inch to match the 500dpi.
I’m going to try working with some of these settings tomorrow to see what happens.
If anyone has input that might help decipher what I’m doing wrong, please feel free to chime in.
DPI (dots per inch) and LPI (lines per inch) are the same value, and Interval is the same as Scanline Step. If you were using 500 lines/inch in Whisperer, you should use 500 LPI / DPI in LightBurn.
You absolutely don’t want to turn off laser mode ($32) as that will make the controller pause every time there’s a power change because it thinks it’s waiting for your spindle to change speed.
I tried setting Lightburn to 300mm/s and 20% power (which comes up on the meter as about 7.5mA when it’s on steadily at that percent).
I set the LPI to 500 and it changed to 498.04 when I selected OK.
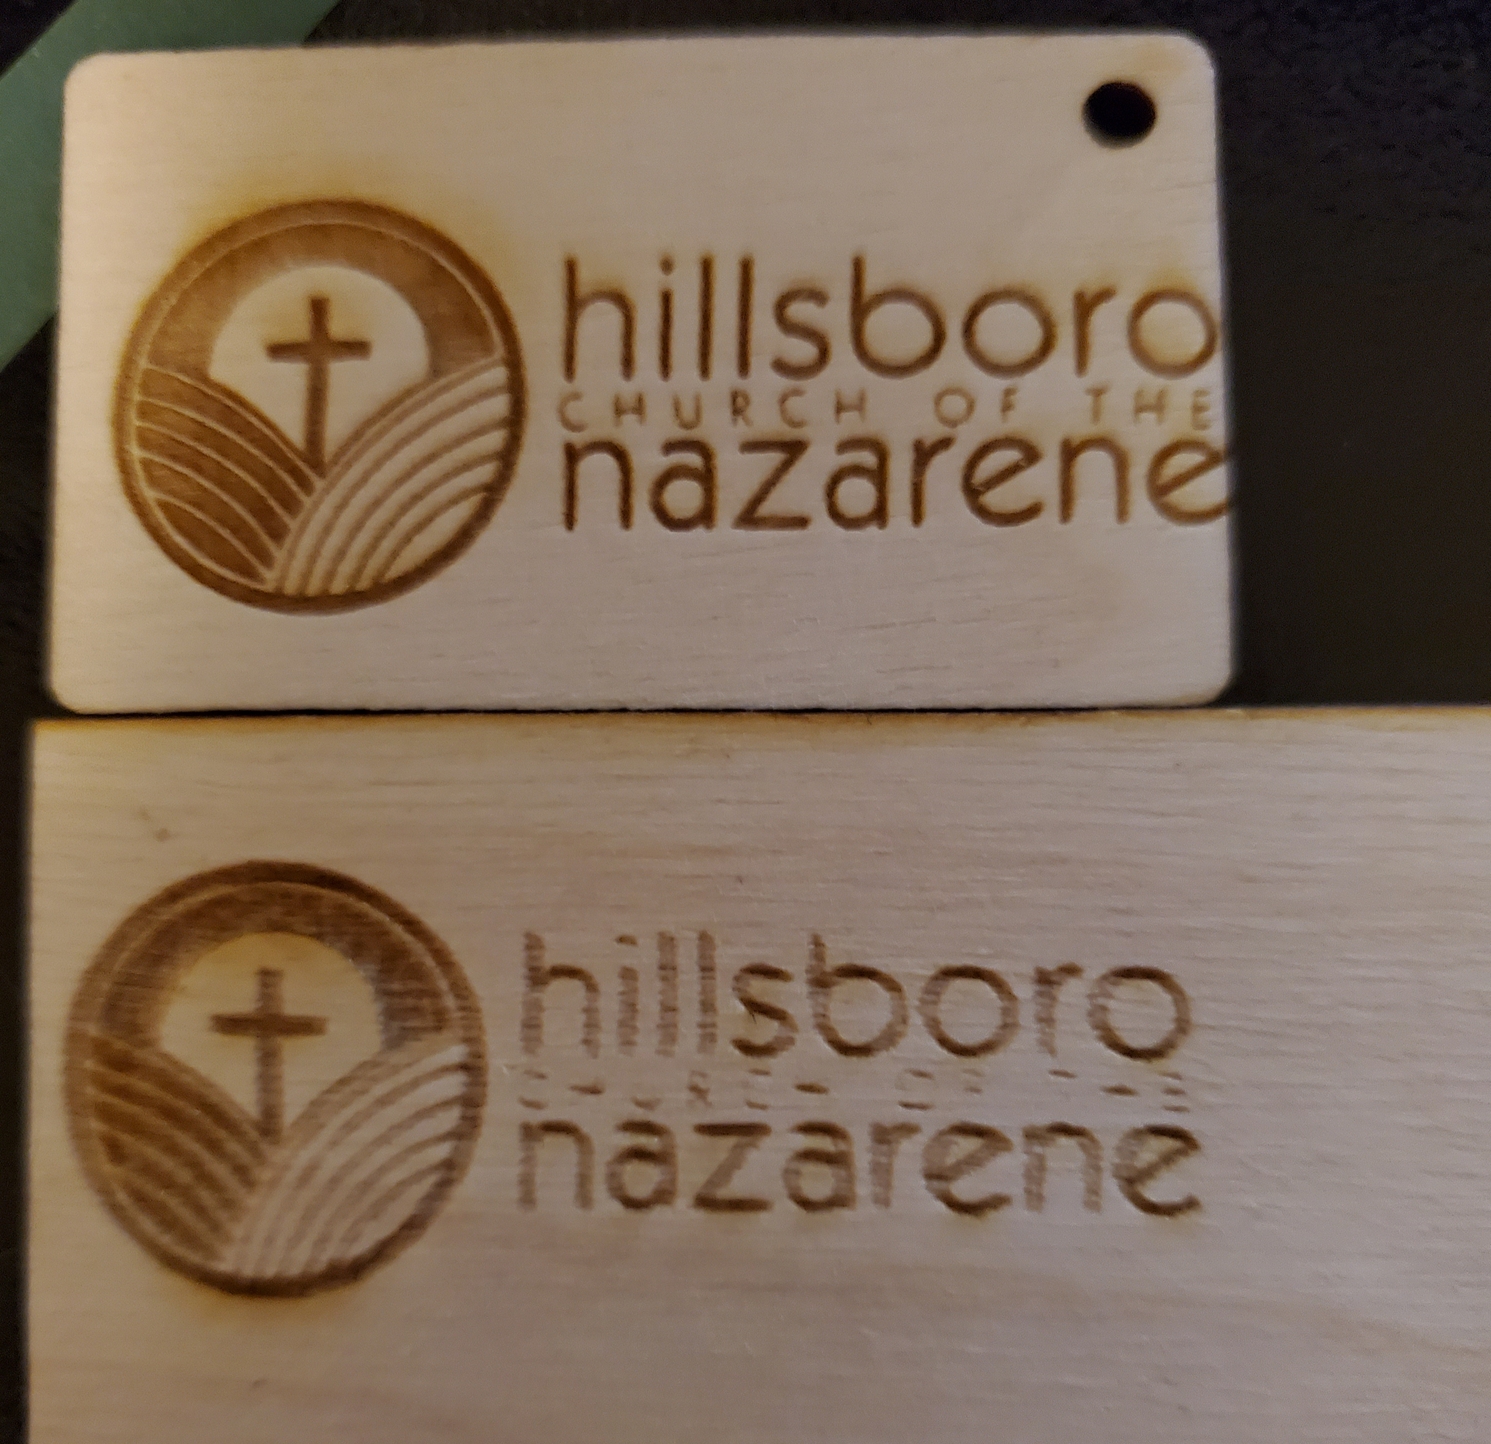
The middle letters almost disappear, the larger text appears to be blurred and the lines that are part of the text seem like they’re wider/less defined than when I ran it with K40 Whisperer and the Nano board. In the image the top is the result of K40 Whisperer and the bottom is Lightburn/mini-gerbil with what should be the same settings.
I imported the svg I’d used for the run in k40 whisperer and set the settings in lightburn to what appeared to match.
I tried slower speeds and different powers, I tried finding the same font and typing in the lettering instead of using the image trace, I also tried rotating the scan angle to 90 degrees so it ran the lines on the Y axis instead of X. The lettering looked similar no matter what I tried and setting it to 90 degrees looked awful (parts of it were missing).
I’m really at a loss as to what to do now. If I go back to the nano and K40 whisperer with the same file, I can read everything and the image looks nice.
If you’d like to post your file I could try to run it on my mini gerbil for comparison. You have a couple different settings than me but it’s mostly the same configuration. You may have a much better focused K40 than I but I think I’m usually engraving plywood at .1 - .17 mm line interval or so. One thing to consider is K40Whisperer is set to Halftone Dither for it’s raster settings while to the best of my knowledge Lightburn only allows Dithering when you have imported an image. So doing Line+Fill even if at the same setting you will be applying more power to the same area than you would with K40whisperer when it’s dithering.
I tried turning off bidirectional-fill and it did seem to help. I attempted following that article (it appears it’s old because it mentions setting the mode to “scan” and I only have Line, Fill, and Fill + Line. I assume “Scan” is the same as Fill.
The lines were slightly off but I had to set my phone to 10x magnification and attempt to look at the points of my micrometer to guess at the offset. It looked to be about 0.6mm at 200mm/s and 0.3mm at 150mm/s. 300mm/s didn’t appear to be different than 200mm/s, but again, I was staring at a tiny difference through my phone’s magnification and trying to see the points of my micrometer, which could have been off slightly. I used .3mm at 200mm/s and .15 at 150mm/s in the scanning offset at first.
At first I tried using a positive scanning offset and the edges of the lines got worse in relation to each other. I then used a negative offset and that seemed to help with getting the lines closer in relation to each other on the edges.
I tried running the keychain again and it was still off like it was attempting to draw lines at an offset for the letters. I tried adjusting the offset to a tighter and tighter offset and the letters in the small text eventually came close to lining up but now it acts as if there is a vertical offset between the lines. I see two lines in the smaller text above and below each other and that small text is nearly illegible.
I moved back to the original controller and I don’t get any of this offset or shadowing, it has clean cut lines.
In the images, the leftmost keychain samples were when I was starting to lower the offset at 200mm/s and the top right one (overlapped with handwriting) is where I stopped with 150mm/s set to -0.12 and 200mm/s set to -0.15. I was running the keychain at 200mm/s and 15% power. I believe that you can see that it appears the horizontal is close to lined up but there appears to be a vertical offset, instead of those lines being part of the same letter.
The lighter wood is when I switched back to the older board and ran it as a test just to be sure nothing odd was going on in the machine. This time I ran it at 200mm/s and about 7mA (it came out dark but the lines are clean).
I don’t understand why it’s taking so much work to attempt to get the mini-gerbil to reproduce what is working with K40 whisperer and the old board nearly out of the box.
I did also attempt running the file at a slower speed and with/without offset and it looked about the same.
One thing I’ve been considering is resetting Lightburn to the defaults and/or uninstalling it and reinstalling it. I had a 5.5watt diode laser before I got the K40 and I had set things up for it before. I’m wondering if something is hanging around that I don’t remember setting, even though the $ settings belong to the board, maybe I’m missing something in Lightburn.
In addition to the images of my progress tonight, I’m including a copy of the lightburn file I used for the svg with K40 whisperer with the original board and I attempted to run in Lightburn with the mini-gerbil.
Sorry I haven’t responded sooner I didn’t get a notification you had posted your .lbrn file. But so you know I had problems with your file, in particular the center text is so small I believe it really needs to be done differently than the rest. Some of that text “CHURCH OF THE” particularly at the ends are very small under .05mm so I’m not sure Fill is the best solution. I’m not sure what font it was originally created with but I recreated the text in a font similar and made some adjustments to the manner it engraves. Give it a try and see if it helps you any, if so you may need to just adjust the power / speed for your material, focus and power that your laser puts out. KeychainHNCModified.lbrn (84.1 KB)
I don’t get why the small text comes out clean and crisp with the old board and k40 whisperer but it needs tinkering with the mini gerbil and lightburn.
I did at one point try typing the text in instead of using the scan from an image, but I used raster and fill on it.
I hope it works for you or at least gets you going in the right direction. I thought it came out alright on my machine with those settings but it could still use some tweaking.
As far as the M2 Nano and K40 Whisperer I think it’s comparing apples to oranges with Lightburn and a variable power controller. I don’t know all the ins and outs but the M2 is always a constant power level (set by potentiometer or digital panel depending on model) and either on or off with K40 Whisperer controlling when to turn it on / off in it’s dithering algorithm. I think the problem here is the text in the center is so small that Fill just won’t char at the speeds the other larger text does since it’s such a small area. You might be able to change that section back to Fill and go over it with multiple pass’s and achieve the results your looking for. Additionally if you wanted to do more comparison you could import an image and use Dither in Lightburn instead of Fill as that’s basically what K40 whisperer is doing I believe.