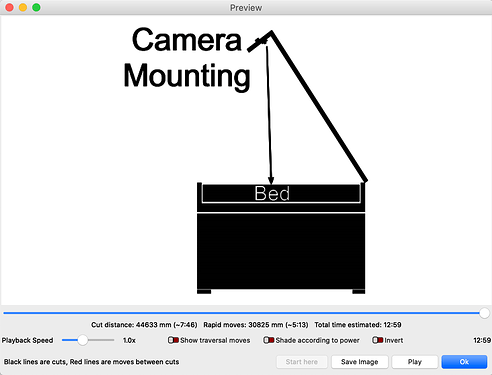
First…I do mount this on the front of the machine above the handle, correct?Most of the videos I watched show it there but I tried the automatic calibration and I can’t see the markings to go further…
I did already…I guess I’m just slow…it says “directly above the center of the bed of the laser, with the bed completely in view (similar to the image shown above)” which I think shows the camera being mounted on the front of the lid, but the pic is not really helpful. Really frustrated, read documentation, watched videos, half the videos show top mount, the other half front mount…
You want to mount as close to directly above the center of the bed as you can when the door is open. In the image in our documentation, Oz is pointing to the camera, already mounted inside the door, located so it points down toward the center of the bed.
I’ll mess with it some more. Thanks anyway.
You are fine, I have not been as clear as I could be. ![]() The disconnect may be the usage / workflow assumptions at play. The most common uses for camera integration are to ease the placement and orientation of artwork on a given material or allow for tracing artwork from some existing item (simple example, think trace of a child’s drawing or a handwritten recipe).
The disconnect may be the usage / workflow assumptions at play. The most common uses for camera integration are to ease the placement and orientation of artwork on a given material or allow for tracing artwork from some existing item (simple example, think trace of a child’s drawing or a handwritten recipe).
The location we recommend for mounting a camera is designed to work with the door open and is not intended to be used as a monitoring of job progression tool. The best location to mount, providing the best view of the entire bed, is inside center-ish of an open door, pointing as straight down as possible.
You may also need to cover the honeycomb with something, so those holes are not confused as targets during calibration.
This topic was automatically closed 30 days after the last reply. New replies are no longer allowed.
