Hello, I was wondering if anyone could suggest settings for using a mopa 60w laser to get white etching on natural (silver) anodised aluminium. Its straightforward to get a crisp finish on black anodising, however to get it on natural is proving challenging. Doing two hatches, one at 45 degrees and another at -45 degrees, works well. I also found running two separate programs helped. Howeve,r its still not exactly white. Any recommendations would be much appreciated. Thank you
Hi Joseph,
Can you post screenshots of your settings and pictures of the outcome?
If you explain your expectations in more detail, we can certainly give you some tips.
At times, I like the look of a larger Line Interval on alu. For example, 0.1mm seems to refract the light differently and can result in it appearing whiter.
You may still need to do some Material Tests
Okay, so you’re trying to get that clean white mark on natural anodized aluminum with your MOPA 60W, right? Yeah, black’s easy—you hit it, it pops. Natural? That’s the pain in the rear. It reflects more, doesn’t grab the beam the same way, and you end up with this milky gray when what you really want is crisp white.
You’re already doing the 45° and -45° double hatch thing—good move, that definitely helps fill it out and level the texture. Running two passes separately? Yeah, sometimes that gives better control. But if it’s still not hitting that white, here’s where I’d tweak it:
Start by backing your power down a bit. You want that oxide to pop but not char. Try like 20–25% power, pulse width around 220 ns, and freq up at 150–200 kHz. Fast speed, too—like 1200 to 1500 mm/s. And keep that line spacing tight—0.03 to 0.05 mm, no wider.
Now here’s the sneaky part—if it’s still dull, add a third hatch at 0°. Yeah, sounds like overkill, but that uniform stroke sometimes gets rid of the streakiness and balances out the tone.
Also, surface finish matters—if the anodizing is glossy or uneven, it’ll scatter the beam weird and mess with your results. Try it on a matte-finish version if you can.
Last thing—don’t run that sucker hot. If you’re getting a chalky look, you’re already past the point of “white” and into cooked oxide. Less is more here.
Thank you i will send it over shortly
I really appreciate you taking the time to respond and share your findings. I will try it now!
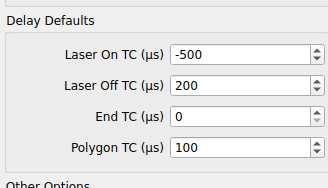
Hello, Would you mind advising what would buse a good Laser On tc (US) mine is currently -100 Laser off is 150 End tc is 100 and polygon is 100. Thank you
What each one does:
- Laser On tc (Time Compensation):
This is a delay before the laser fires, to give the galvo a second to get into motion. Too low = clipped starts. Too high = burns a dot at the beginning. - Laser Off tc:
This is a delay after the laser shuts off—helps prevent the beam from burning while the galvo is still slowing down. - End tc:
Similar to Off tc, but more about timing right before lift-off—can reduce scorch on tight corners or curves. - Polygon tc:
Delay applied at corners or sharp angles. Helps reduce overburn or flaring on corners if you’re doing logos or text with tight geometry.
Good starting values (US-based galvo fiber, EZCAD-compatible board):
- Laser On tc:
10–20
Try 15 to start. If you’re seeing clipped beginnings, raise it a little. - Laser Off:
5–10
10 is usually solid. You don’t need much. - End tc:
5–15
Helps soften the end. Try 10 as a middle ground. - Polygon:
10–30
If corners are burning too hard, bump this up. Try 20 and tweak from there.
Right now, you’ve got Laser On at -100—which probably means you’re getting clipped or missing the start of your mark. That negative number is usually not ideal unless you’re compensating for something really specific. Try swapping it to +15 and work from there.
I believe every galvo is different and these delays need to be tuned for your galvo.
This is a good video from Laser Everything on setting your delays.

![]()
It’s the other way around.
A negative Laser On TC means: The laser turns on before the galvos start moving. Too low of a value will lead to a burn-in at the start of a line.
A positive Laser On TC means: The Galvos start moving and then turn on the Laser source.
The Laser Everything video is a great resource!
There’s also this one on the topic by MakrTheory. His calibration file makes it easy to calibrate the values.
No problem. The Laser Everything video is a great resource with more detailed explanations.
The MakrTheory one just makes it easier to calibrate with the linked calibration files.
Yup I was backwards when I replied, my apologies