High School best practices?

Hi folks, I have a few questions about managing Lightburn and a Thunder Laser with students, and will share a few of my own practices.

  1. Right now I have everyone design in InkScape or Illustrator, and then LightBurn is only on the laptop connected to the laser cutter.
    Any ideas different than this? I would prefer if everyone had LightBurn on their computer for design purposes, and then still saved on a USB to bring to the single laptop connected to the laser cutter. It seems like a bit of a waste of licenses though.

  2. Currently we spend several weeks designing, and then laser cut the results. During those weeks Iā€™ll demonstrate the laser cutter, but students donā€™t cut their own designs until the end.
    Suggestions on that? I would love a lesson plan where we cut stuff a LOT more frequently. Like every day the laser cutter is running so students can learn by doing. Materials are expensive, maybe I can cut up a bunch of trash? Would have to figure out whatā€™s safe. Or paper?

  3. any other great classroom tips or ideas? even if you arenā€™t a student or teacher, stuff youā€™d love to see in a class of 24 students.

Just a toss in here. I use food product boxes that have been emptied in normal use and would otherwise end up in the recycle bin (and sometimes still do.) The material is usually structurally strong. Cheerios boxes have bags inside, while pancake mix is usually dusted with powder. It doesnā€™t make it unsuitable, but does require a bit of work to remove the powder. Other foods may be more or less suitable.

1 Like

I was a part time teacher at the local community college. I taught computer programming languages.

Iā€™ve take a couple of these ā€˜laserā€™ classes. The ones I had the pleasure of access were very much targeted at the ā€˜laserā€™ not the basics of a generic cnc machine, this was just skipped.

I find a lot of questions here where the image is mirrored some way. They seem to be ignorant of the coordinate system wherein these machines work. The concept of a home position is important to how the machine will interpret the artwork.


What can you cutā€¦ In simple terms a co2 machine is useful on natural materials. Iā€™d stay away from man made materials with the exception of acrylic and polycarbonate, which doesnā€™t cut cleanly for me.

I have a co2 extinguisher that is stationed at the laser, Iā€™d suggest something similar. Avoid powder types as they are a disaster for the electronics, bearings and rails. Cheap insurance you probably wonā€™t need, unless you donā€™t have it.

This leaves lots of materials. I keep a couple of dog food cans around for testing my rotary, the paper label is low power cut/engrave material for test on a nice round holder.

I also mark/cut paper targets for alignmentā€¦ I use watercolor paper, allows marking and cuttingā€¦ low cost. Cardboard is also a good medium for engravingā€¦

Old pieces of wood from the wood shop, especially solid woods.

The more time on the laser the better learning experienceā€¦

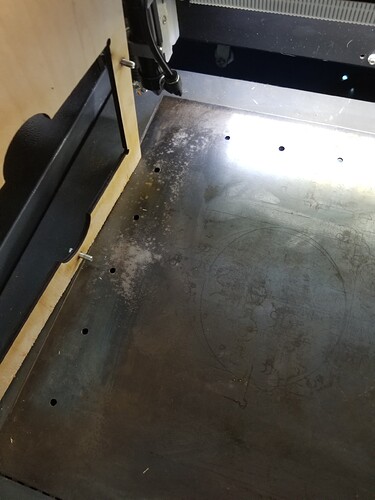
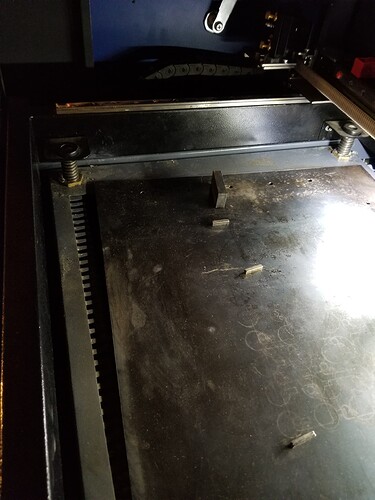
Iā€™ve replaced the honeycomb with a sheet of rolled steel. It makes holding down thin objects relatively easy with a few magnets and is much easier to clean than the honeycomb.

Might be nice to show them alternatives to the supplied bedā€¦

Good luck

:smile_cat:

1 Like

interesting about the rolled steel, we are often working with small enough objects that this would be useful. I might look for a thin metal plate that I can easily insert on top, thanks for the tip!

Iā€™ve never put things with powder in before, but as you and Fred both recommended against it, Iā€™ll have to think about that for recycled materials! I would not have thought about cleaning a pancake box interior.

Mine came with the honeycomb and I found it difficult to use. Went to the local steel supplier and paid them $12 to cut it out to size. Fitā€™s where the honeycomb and angled aluminum were.

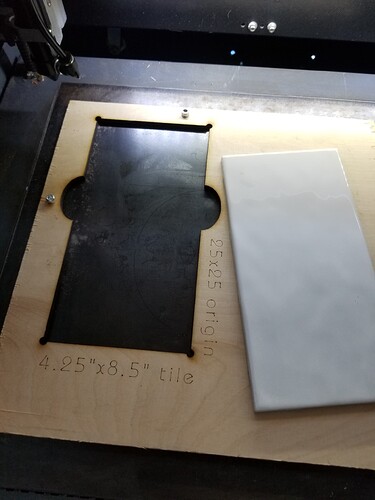
I use the little magnets to raise it above the bed for air flow, if cutting. You will notice holes in the plate for jig alignment. It cleans up much more easy than the honeycomb and doesnā€™t have the residual odor.

Russ Sadler has a video on the honeycomb beds. Dry Brit humor but worth the effort. I thought they were great until I got a little time with them and some alternatives. Mine was aluminum so it was useless for magnets.

Itā€™s a good to be aware of and it illustrates how they honeycomb bed actually performs.

Good luck

:smile_cat:

1 Like

Former high school teacher here - the laser was one of the most popular tools with my students!

Materials
Cardboard is going to be your friend. I had ~100 students a year using the laser, and even designs that would eventually be made from other materials were tested in cardboard first.

Chipboard is the non-corrugated cardboard youā€™ll find on the back of notebooks, and itā€™s great for making higher quality parts than corrugated cardboard. Itā€™s not free like breaking down corrugated cardboard boxes, but itā€™s pretty cheap and very consistent.

I also had families bring in large cardboard boxes to break down for material. Corrugated cardboard is good for fit checks on larger parts (we made a lot of robot prototypes out of it), and for anything that doesnā€™t really need to look nice when done. When we could get the double-thick or triple-thick cardboard boxes for larger appliances, they got broken down and saved for cardboard chairs or other designs requiring physical strength.

Projects
Every year Iā€™d have students engrave a keychain. Anodized aluminum tags work well on a CO2 laser, and the students had to learn to work with a jig to get everything lined up.

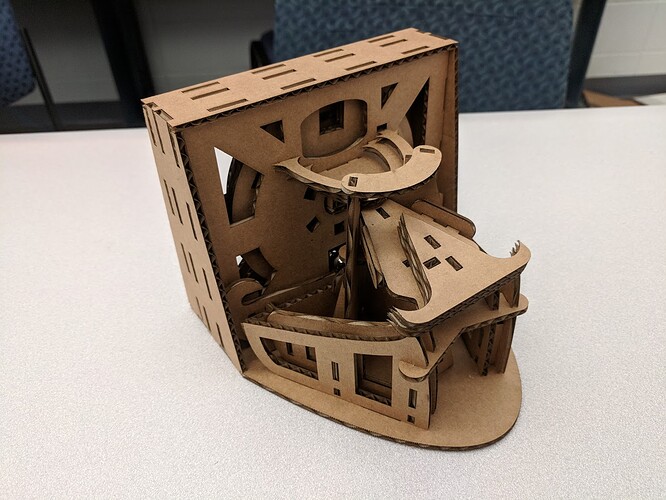
Depending on the nature of your class and your studentsā€™ design skills, it can be a lot of fun to look at how furniture or other three dimensional designs are made from sheet goods and have students design their own. For more advanced students, you can try challenging them to design something to be cut out of a single sheet of chipboard/cardboard and assembled into a 3D object. Trebuchets/catapults are a lot of fun if your students can be trusted with that level of potential disruption. The picture Iā€™ve included here is an example from one of my former students - he challenged himself to see how complex a mechanism he could build from a single 18x24 sheet of cardboard with no glue or fasteners.

If your class ties into architecture at all, lasers are also really good for making models of architectural designs.

3 Likes

My reference to powder was regarding the minor mess of pancake dust, not any real danger. Jackā€™s reference was to a fire extinguisher, with which I agree. Cleaning up after using a CO2 extinguisher is merely time and debris, while an ā€œordinaryā€ extinguisher will nearly bury you in that deviceā€™s dust.

1 Like

interesting!! loved the video and seeing the smoke through the clear plate. Iā€™m excited to have a close look at ours to see what results I get.
If I were to cut a lot of white printer paper, as a cheap material to test student designs with, do you think a steel plate would work well?

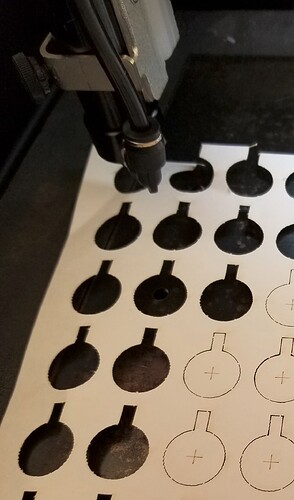
I cut parchment paper circles to fit under my bread to bake on. I also cut and mark target for alignment from watercolor paper. The photo above is with watercolor paper and itā€™s targetsā€¦ mark them then cut them outā€¦

It shows how a little power change can effect the material. Itā€™s a delicate material and you have to pay more attention.

I just stick stuff down with magnets. I have some little 5mmx2mmx14mm bar magnets the strong type, I use them for hold down on small material and also to hold the material 5mm above the place. I have some larger magnets for outer edge of the materialā€¦

Something like scrap 2x4 or anything is good for practice. If itā€™s cheap they can practice moreā€¦

:smile_cat:

1 Like

ooh, awesome! if you have any other student projects posted, Iā€™d love to show to my students.

Do you mind if I ask about student flow to the laser cutter? Like, was there a 1:1 device ratio, and did the students work inside laser cutting software, or was it vector editing software and then they would export to a single computer with the laser cutting software on it?

I want to figure out a good way of getting lots of kids to use the laser cutter without using much teacher time. I think there are several small steps to solve, even after establishing an moderately independent learning/problem-solving culture in the class.

The issue is that most of the parts in there that move, such as all exposed bearing surfaces are lubricated, at least mine are. ANY dust will ā€˜stickā€™ in the lubricant or any other part that requires lubrication. Itā€™s inevitable that it will just accumulate over time and will lead to a failure.

I wouldnā€™t stick anything in there that has any kind of ā€˜dustā€™ from anything, just asking for mechanical troubleā€¦ You will get dust, itā€™s inevitable. Thatā€™s why weekly cleaning is a good idea if you are in certain areas of the country that could be more ā€˜dustyā€™ than others. Maybe a list for the students, of what they canā€™t put in thereā€¦ including arms, legs, head, eyesā€¦ :crazy_face:


@boomtown001 did you think about asking @LightBurn if there is some option available to allow a more ā€˜liberalā€™ use of the software for your students.? Maybe a version where the output is actually disabled or something.? They could move the artwork to one of the regular machines to actually use the laser.

If it could not ā€˜writeā€™ anything to the machine, they really couldnā€™t use it for anything but academia. It would allow reading of the controllers configuration for those that can connect but they couldnā€™t modify it.

Itā€™s worth a try, they are pretty smart people and an ā€˜academiaā€™ version doesnā€™t sound like a bad ideaā€¦


It would be nice to cover laser wavelengths and how that effects the material damage.

Get them on the machine as soon as you can, even if itā€™s for artwork they didnā€™t create. Ensure they have to set it up from how another user would have left itā€¦ basically worst caseā€¦ Great use of paper to get them used to operating the machine.

@JackieG has some great ideas, Iā€™m sure you can add to itā€¦

Good luck, take care

:smile_cat:

1 Like

Iā€™ll see what projects I can dig up!

My setup changed a bit over the years as my district moved to 1:1 Chromebooks, but I pretty much always had a single computer running the laser software and students working in vector editing software on separate computers.

Originally I had a full computer lab across the hall from the laser and the other tools, so students worked in Adobe Illustrator or Fusion 360 and exported their file to load into the laser software.

Around the same time the school built me a bigger, better workshop we went 1:1 with Chromebooks. I still had students working in vector editors and exporting. At various times, I used combinations of:

  • Browser-based vector editors on the Chromebooks
  • A few old Windows computers Iā€™d begged the IT department for set up in the back of the classroom
  • Having students remote into Windows environments from their Chromebooks (Depending on your schoolā€™s IT setup, this can be accomplished in multiple ways, your IT department will know more about what they can/canā€™t do)

After the first year, I didnā€™t really need to put much of my own time into running the laser after the initial lessons. Iā€™m happy to share what I did, but with an acknowledgement that my school environment was atypical (STEM-focused magnet HS with a group of students who also played with the laser and other tools at lunch and after school), so hopefully some of what worked for me can be of use to you.

I always handled the actual lessons on safety, proper use, vector vs raster, determining appropriate settings, etc. myself. I demonstrated appropriate use, and for the first laser assignment, I would generally walk each student through the process myself. Starting in the second assignment, I would help the first student run their part, and then each student would help the next student run their part (with me nearby, listening and watching more closely than the students probably realized). After that, students would set up their own parts, with help from me or a more experienced student if needed. Before they were allowed to run the part, they had to show me their setup, and then they were required to watch the machine themselves while their part was running. I had a protocol for flareups (press stop, leave the door closed, shout for me), and kept a CO2 fire extinguisher right next to the laser.

For extra-curriculars and during lunch, I had a few students whoā€™d practiced a lot with the laser, and I let them use the laser as much as they wanted, but the price for that access was helping less experienced students whenever they showed up to use the laser. It worked out well, but really depended on having some students who were motivated to master using the laser cutter.
1 Like

Thanks for the insight and example. Iā€™m going to make a teacher-training video that shows a laser cutter being used in class. I tried filming some of my classes, but they are not succinct and too boring. So next Iā€™m going to try and make an animated classroom using something like ā€œanimakerā€ (youtube animation software).

Following an exact formula in a real class of course doesnā€™t work, but showing an example of a well-functioning class and process would be very valuable I think. If I have questions or am looking for a review, Iā€™ll post here and see if yā€™all are available =D

That sounds really interesting, Iā€™d personally love to see it.