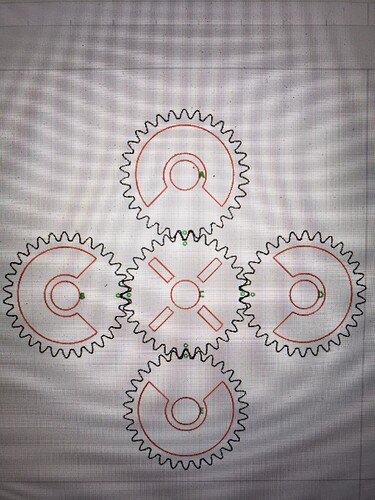
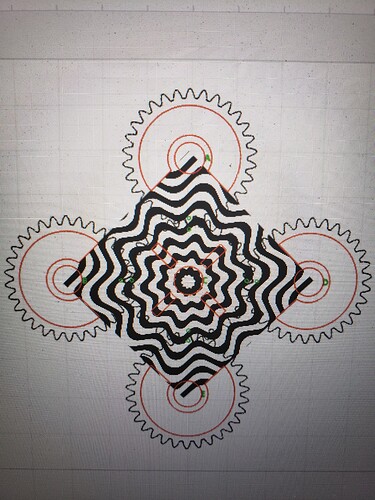
Ambitious newbie here. Sorry if my terminology may not be correct. I wasn’t even sure how to search for how to do what I’m trying to do. Basically, I have a project involving several gears that I want to engrave with an image that will be readable once the gears have made a full rotation. I have arranged the gears with the precise placement they will have in the finished project so I could lay the image on top of all of them at the same time in order to get the placement and proportion correct. My trouble now is, can I merge the image with the cut files for the gears? Basically, I mean so that the portions of the engraved image outside of the cut lines will go away and the gears will be seperate with the image layered on them? I could just engrave and then cut them in this arrangement but the teeth are so close, I’m afraid of the kerf cutting into the adjacent piece’s teeth. Is this possible with a raster image for the engraved image or should I try to find a vector image? Any help would be much appreciated!
Aye, learning the vocabulary is the first challenge!
The key piece (I think) you’re missing is that a LightBurn “layer” is a collection of parameters that define how the laser will operate on the geometry in that layer.
That’s not quite how “layers” work in programs intended for drawing or painting or mechanical design or … anything else.
So you must think of what you want the laser to do for each piece of geometry. A pattern to engrave goes on a Fill layer with laser settings appropriate for engraving: shapes scanned at a constant laser power with lines separated by small increments at a particular speed. An outline to cut goes on a ‘Line’ layer with settings to cut through the material: lines traced at a particular speed and higher laser power.
Aaaand then there are photographic images with their own complications, about which the less said right now, the better. ![]()
If I understand the upper image correctly, both the red and the black shapes will be cut completely through the material, so they sould go on the same Line layer, set for cutting. You can use separate layers with different colors and identical settings, but that way lies madness: you will eventually change one of the layers and not the other, then wonder why thing stopped working.
If the tiny irregular green shapes are intended as holes for actuating pins, then they should be redrawn as circles of the proper size and put on the same layer as the other shapes to be cut. If they’re just locating marks for the drawing, then put them on one of the Tool layers; I favor T2 because it’s not reddish.
In the lower image, the black outline should cut entirely through to form the gears, but (I think) the red lines should either be engraved on the surface or not present at all. To engrave, the settings for this red layer must be different than the other red layer in the top image; choosing a different layer (and color) will make that distinction obvious. If the circles are layout guides, they go on a Tool layer.
The wavy pattern goes on a Fill layer, set to mark the surface as needed. Arrange the layers so the engraving happens before the cutting!
Try it and see!
If it turns out to be a problem, use copes of the gear outlines to cut out the section of the pattern that lies on each gear, then select the gears individually and move them apart. You should duplicate the original layout, move it aside, and work with the copy to recover from finger fumbles without heartache and confusion.
That’s a quick sketch of what’s needed; check back in again so we can fill in the details.
Thank you so much for taking the time to explain this to me with the detail I need as a beginner! I’ve been using xtool’s creative space software that came with my laser, and it has a feature to unite shapes, so I was assuming this could be done using a feature like that. I’ve recently started trying to learn to use lightburn as it has so many more functions for editing and design but I’ll admit I was very confused about the layers. I was thinking of it in terms of drawing software. Your explanation clears that right up in my mind! Thank you!!! I will follow your directions later today when I get home.
A couple other thoughts …
If you haven’t yet found the LightBurn doc:
It’s more “what” than “how”, but with a bunch of detail and vocabulary you must become familiar with.
Whatever material you were thinking of using, stop right now and get a stack of chipboard. For twenty bucks you can make a tremendous number of mistakes (pronounced “have a lot of learning experiences”).
Kraft chipboard lets you get the process right:
And white chipboard plus rattlecan spraypaint looks surprisingly classy:
Well, for small values of “classy”, but you get the idea.
A disturbing number of folks wash up on the shores around here crying “HELP! LightBurn just ruined ten pieces of priceless wood from my sainted grandmother’s bridal chest! FML!” Don’t be that person; practice on cheap stuff first. OK? ![]()
Also: eye safety. Generally a tragic accident requires two events, the second of which might be “My toddler just looked at the shiny”. You’re now running an industrial process with very few guardrails: think carefully about what’s going on and take appropriate precautions.
Oh, and enjoy what you’re starting to do: it’s wonderfully satisfying!
This topic was automatically closed 30 days after the last reply. New replies are no longer allowed.


