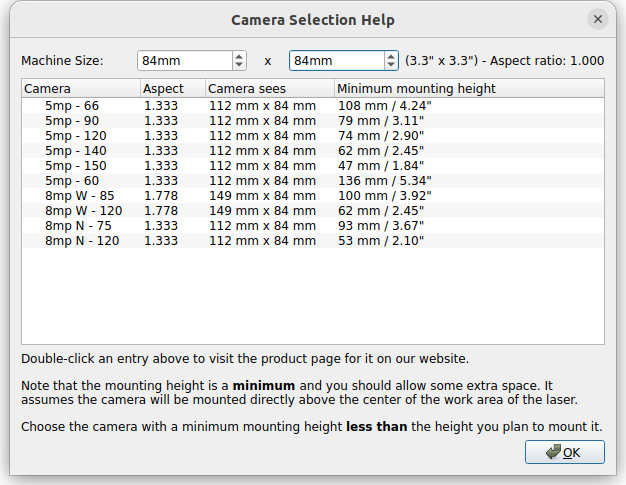
How to calculate minimum mounting height for cameras purchased elsewhere

How do I determine the minimum mounting height and compatibility for cameras not purchased through Lightburn?

Xtool D1 pro 20w, and I’m very new to Lightburn, just downloaded and really want to take advantage of the camera feature. Thanks in advance.

First of all, a recommendation: if you are new to LightBurn, don’t start with the camera feature. It’s an advanced feature that is often tricky to set up, prone to errors and needs a very careful system tuning.

Get started with the general concepts, the different starting modes and you will see that a camera is only useful in very few use cases. In most cases, you are much faster and more precise by using manual methods.

Regarding the camera, just take a $10 webcam and do your first steps. Those work exactly the same as all others. After you managed the process a few times, you will know the limitations and requirements you have for your system.

3 Likes

Melvin is right in everything he writes/recommends but not in this specific statement. (in my opinion)

With a correctly set/adjusted camera system you get a tool that saves a lot of time and material in the daily work with a laser machine.
I think I can claim that my material waste is reduced by 20-25% just because I can easily use all the leftovers that were normally thrown away, for smaller items. Without a camera it takes too long to place new items on the leftovers, with a camera I can go very close to the edges, .5mm is not a difficult task.
There are quite a few nice examples on YT that explain and show the use of an LB camera system.

But it requires, as Melvin writes, patience and good knowledge of your machine.

3 Likes

I agree with Melvin. Unless you are maybe doing real production work with a camera, it is not worth the hassle. Any new material thickness is a new setup.

Leftover scraps reuse is typically a one-off operation, unless you have a lot of scraps the same shape. With one-off, I am sure my setup time cannot be reduced by using a camera. Don’t get trapped into thinking you have to use a camera just because you bought it.

I am not against cameras. I am considering adding a tiny one to my laser heads so I can better observe the burn/cut process while the enclosure is sealed.

1 Like

Not on a (min)CO2 laser machine, here the material surface is always the laser and camera focus point. After I have set up and fine-tuned my camera, which takes about 30 min for a complete new calibration, I do not touch my camera setup anymore. My camera is statically mounted in the machine lid and there is no measurement inaccuracy from one day to the next…
Regarding precision, I can write text on a hexagonal pencil very precisely at any position of my 600x400 machine bed, setup time-about 10 seconds.

Lift table?

Yes Mike, it is a height adjustable table, on all (?) CO2 machines I know. Some manual, others semi and still others fully automatic focusing, therefore the laser head and camera area are static, always on the surface of the material.

Ps. on some industrial machines it is however the Z axis (laser head) which can also adapt to uneven material, but they mostly run with laser head mounted cameras.

1 Like

Except when you have multiple focal length lenses, then you have to have a calibration for each lens setup.

2 Likes

That’s correct! I have 3 lenses and 3 profiles, made once and for all, but still use almost only 50.8mm.

1 Like

Hi.

Welcome to the LB forum @Cain147 .

Disclaimer:
I only use the camera for observation, not for the advanced LB features.
I did try to calibrate two, but… a bit about that later on.

While that can be calculated, the Q&D method I used was to raise the camera by hand until the full bed was in view.
The fact that I wanted to use my ATA style enclosure, and wanted to keep the enclosure height reasonable, didn’t make things any easier.

As a fellow xTool D1 Pro owner, I’d say that Melvin was very PC and polite -as he always is- when telling You not to start with the camera feature.
I’ll be a bit more blunt, with anything xTool it’ll be an uphill battle with everything, especially in the beginning, no sense to complicate things even further.

When You have all the quirks and minor issues that more likely than not You’ll encounter with Your D1 Pro ironed out, by all means dive into the camera calibration.

I did try to calibrate the cheap webcam I purchased for the task, as well as an older one I had lying around, I couldn’t get either of them to calibrate properly.
Since that was more of a “neat thing to have” rather than something I really, really wanted, I gave up pretty quickly.
And didn’t even think of trying with an more expensive one.

I may be wrong once again, but back when I compared the LB camera specs (and user experiences) to the general webcams on the market, I’d say that while their camera may not be the best option for everyone and most definitely not the cheapest one, it’ll be the most likely to work with the least amount of hassle.

Since I don’t see the advantage of the LB camera functions in my workflow -what very little there ATM is for various reasons- at some point I’m planning to install a head mounted camera (PC endoscope) with a custom crosshair laser to aid with precision positioning.

Regards,
Sam

:finland:

1 Like

I’d suggest the help → camera selection help as the best guideline.


My machine lives in the garage, so everything is networked out there.

Had this running via a PI bridge and a camera I picked up on the Internet. Retired, fixed budget, so I went with a generic camera. Although worked fine, I found I used it very little and it kept my network very busy with it’s high streaming rate when I was or was not using it.

For the kind of stuff I do, it’s of no real advantage to me, so it’s history.

As @bernd.dk mentioned it’s a real handy thing to have in most circumstances. Just didn’t really help me the way I use the machine. I mostly use jigs of some type to align things.

:smiley_cat:

2 Likes

Me too, just recently researched them, but without the crosshair. I just want to better see if the Framing stays on the material, especially in the back where I cannot see it. The SF-A9 laser module looks like a brick in there. :joy:

1 Like

I agree with what others have said about camera being an advanced feature and can be a pain to have it working and calibrated, but what I did was to raise the height till i had full framed view, i lightly taped a protactor with centred on zero and then tried to get as close to 30 degrees which is what the main tolerance for my camera, best thing is to read through all of your instructions, if you dont have any instructions do some good research first. I have a sculpfun cam500 and the engraver is twotrees tts55 pro. Completely different brands but work well for my needs.

1 Like

I have to disagree with that first statement. I use my camera all the time in watching the progress of engraving. Sometime things will get bumped and the camera is some what helpful in realignment.

This still implies a margin of error. If the part is moved, and a secure fixture is not used, it is pretty difficult to realign no matter what method is used.

My honeycomb is a “fixture” because it is secured in position relative to the laser frame.

1 Like

I find a laser cross hair works well. I bought a camera but the focal length was wrong and I couldn.t get it to work within the enclosure for consistent results. So I went with the cross hairs and that did the trick.

I’ve been watching videos and reading the LB documentation about camera use but the ONE thing that I have yet to see mentioned…What’s the camera for???

Hi.

:smiley:

I have to admit that it took me longer than I’d expect to actually find it (had to use Google search :slight_smile: ), but the advanced features most of us are referring to are:

Position artwork on material/objects
Trace designs from the camera image

For those features one needs a camera that can be calibrated accurately, otherwise it’s a hit and miss.
And based on the forum posts -and limited personal experience- about the subject, more likely a miss than a hit.

OTOH, for observation/monitoring, any webcam will do.

As for the head mounted camera I previously mentioned, I also found this 1.7 onwards version beta feature:

So at least in theory, one doesn’t necessarily need the crosshairs.
Which is actually very neat, finding line lasers that have a more hair like beam width rather than the regular matchstick width, has proven somewhat difficult.
At least on the low price point I’m aiming at.
Not to mention getting rid of the added inertia of two line lasers and their fine tuning capable sturdy enough mounts.

Regards,
Sam

:finland:

I have quite a few different cameras and lenses from 5mp up to 20mp which I purchased for other things over the years.

My machines are DIY GRBL open frame which also run a very small 3 phase esc type cnc spindle motor which is swapped out for cnc work ,mainly PCB creation .

If you use a longer lens and mount the camera as high and as solidly as your space will allow ,the parallax error ,being one of the main problems that happens with material height change, is much less.
This creates another issue where any camera movement is amplified by the longer lens.
In my case 10mm material height change is less than .5mm when 200mm from the center which gets worse and worse the further away from center the target is.
This where having different profiles labeled with the material height is very accurate as long as
nothing moves.
I also agree that it can seem to be a black art setting it up.
Lighting,more or sometimes less was the main issue I faced
It is much better now that the setup makes more sense than the early 1.7 versions

But its a powerful feature when calibrated and lit correctly. Be patient and methodical with the setup.