How to find what the latest firmware is for my ruida controller?

How to find what the latest firmware is for my ruida controller ? I have a 12 year old 30 watt RF co2 laser with a RDLC320-A controller.
LightBurn tells me that it is running firmware version: RDLC-V5.00.15

I’m coming to this machine having never used it or indeed any other laser cutter before; so am learning on the job. It was working a while back but before the colleagues that were using it gave it to me with a vague warning of “I don’t think it’s working but can’t remember why” !!! So I’m bug hunting unknown problems. Argggh!

The machine originally used proprietary software aps- ethos (the machine is an Apollo 600 made by CAD/CAM technology) and clearly lightburn is wayyy nicer software hence being on this forum as expect to be using it going forwards.

It’s been quite a struggle even getting lightburn and the controller to talk. Annoyingly the machine does not have a ruida control panel so my options are limited. I can’t currently enable Ethernet for instance to try connecting via an IP address, which would be my natural next step. At the moment I can’t get Rd works to connect, but lightburn does.

Lightburn moves the nozzle around, and homes (all correctly) but only when in packet usb mode will it turn the laser on. (When in serial mode it moves around correctly but the laser won’t turn on !?!?!) A simple test circle will only just mark a piece of paper even with power at 100, moves at 1mm/ sec. So clearly something odd Is going on and I suspect firmware / the communication protocol.

Given how old this is it feels like getting a ruida controller panel is a “must do” but maybe only once I’ve ruled out firmware bugs / other problems, as if the controller is itself somehow pooped I don’t want to buy a new panel for it to then throw it away when I buy a new inevitably upgraded controller that is bound to be incompatible with the panel I’ve just bought … So - to start it would be great to check if the firmware on the ruida controller is up to date - but I have no idea where to get firmware files from, nor how to install if I can’t get Rd works to talk to it. This feels a chicken and egg.

Dumping the controller and starting afresh is an extremely expensive way of updating firmware however !

Is there a website out there that lists what the latest firmware versions are for the various ruida controllers out in the wild?

Any suggestions ?

Thanks hive mind!

IMHO, the last thing you want to do is mess with the firmware. Only when you have a known firmware bug to correct. Don’t do it unless there is some known advantage for upgrading… The firmware likely is not why it isn’t performing.

You can find these updates from the vendor and sometimes the Ruida site… Many users here have copies on their google drive or equivalent storage.


You need to do an alignment of the laser to ensure it’s tube is working correctly and that all the optics are aligned and clean.

  1. properly working tube
  2. clean and aligned optics
  3. proper focus

If you have these three, it will work… so one or more of these is not right.


Ethernet is the best way to connect… does your controller support Ethernet? Most of these default to a 10.0.3.3 ip address. You could use something like arp-scan to determine the ip.

:smile_cat:

2 Likes

Thank you !

I’ve been loathe to touch the optics so far as I wanted to ensure I didn’t introduce problems as I can imagine it’s easy to a screw stuff up but the machine has been in storage for a few years - so cleaning optics seems eminently sensible.

Given I know it all powers on and must be “roughly” right - I shall heed your advice so shall hunker down to cleaning optics (mirrors and lens) - checking the mirrors are all aligned, and then checking focus.

It’s not implausible for instance that the last users cut a whole load of stuff without xtract / air assist on and fried the lens I guess for example … I haven’t looked yet. my tests have been extremely short so I haven’t been blasting more than a few seconds of power through it at a time, and I wanted to establish a base line of function before fiddling too much …

The laser unit itself is a co2 universal laser systems ulr-30 (air cooled ).

Thank you for the arp scan and default ip address suggestions.

I read somewhere whilst googling last night - that often the controllers if set with too
Low an ip address (the last number below 30?)) don’t turn on their Ethernet connectivity ?

Anyway not withstanding clearly worth a go - getting that going might well rule out communication issues via usb, and as you say I need to ensure the topics are all working properly which I haven’t touched at all as yet.

The parts of a IPV4 address are 8 bit values, hence the name of each is an octet… much like 4 singers is a quartet.

I guess that means the ip is can be described as a quartet of octets :face_with_spiral_eyes:

I would doubt that there is some relationship to the last octet, although possible, my Ruida is at 10.0.3.3… and I run it over Ethernet.

The Ruida seems pretty dumb when it comes to communications over Ethernet… it only talks UDP.

Also the Ruida is a static ip. If you have a router or some type of dhcp server that issues ip addresses, it needs to know the Ruida has a static address so it doesn’t assign it to another device.

Most of us can’t afford and don’t have an rf excited laser… you bum :wink:

Good luck…

:smile_cat:

Ha ha. Thank you ! I will report back - likely to be the end of next week - as I have to snatch hours late at night to work on the laser which isn’t at my home but in a warehouse …

Well - 2 evenings of work later - I know a little more.

  1. All the mirrors and lens were horribly dirty -
    But cleaned up well. Phew. The lens was upside down (Ie was flat side up not convex side up). All corrected.

  2. On reading some help files I realised when I’d installed lightburn I hadn’t told it to install its dsp drivers . -
    So I hit “install” again and did so.

Yippee ! It made more definite marks on my test paper (an old envelope!) but still didn’t cut it. Mmmm. But at least this means the laser turns on … and with a little more gusto.

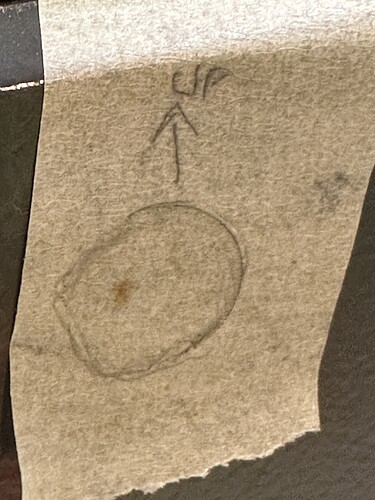
I put some masking tape over the hole to the mirror above the nozzle and
Moved it around and as you can see from the uploaded picture I got after a LOT of exposure time (like
10 seconds or so … in each place by drawing very small circles at max power ) and moved the head to the 4 corners and tried again -
all the brown “burn” marks seem coincident .
Phew. However - they are very non central. Makes me go mmmm some more

I fired up the old software that came with the machine (aps-ethos) couldn’t get it to do anything other than move around. (I thought I’d borrow the original cut settings and throw them into lightburn).

Went back to lightburn and arrrrgggghhh ! The laser turns on for the odd spot - but isn’t even tracing a simple circle now . What the flip ?!?!?!

I restarted the computer / laser controller - behaved the same. Tried reaintalling lightburn, in case the drivers got messed up still the same . What the flip ?!?!

Though I’d give up and go the route of using Ethernet /
But errrrr I was wrong ! No Ethernet port on my ruida controller. So arghhh! That possibility is off the table .

It still feels to me like an odd software problem.

I tried device manager and found Microsoft wanted to update the ftdi driver that lightburn installs (a 2017 one : 212.28.0) to a 2021 one … but seems like a red herring as behaviour remained the same.

I tried removing the bottom cone off the nozzle -
In case my beam not coming dead centre might mean the focussed light wasn’t going through the hole in the nozzle - but nahhh that hunch didn’t work either . Nothing.

Since lightburn is so swift to install I tried uninstalling it and reinstalling - didn’t help.

I’m really running out of ideas here.

Needless to say Rd works won’t talk to the controller, when I ask it to read the vendor settings (which ironically lightburn does and look very sensible eg it knows the size of the bed 691 x 402mm, which implies there has been dialogue between the computer and the controller In Lightburn).

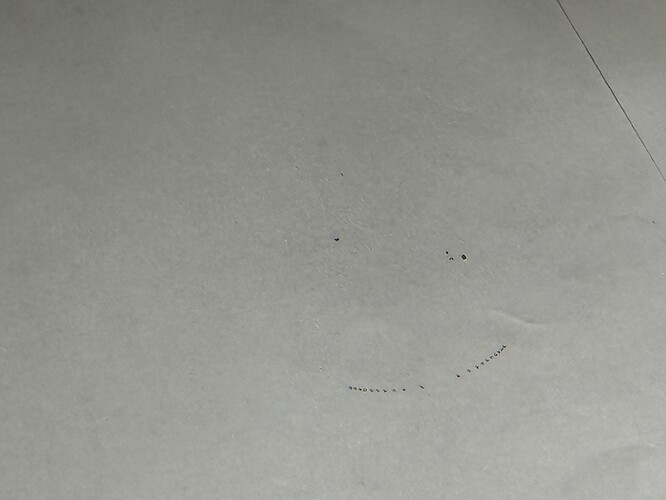
I’ve also uploaded a couple of pictures of my “test” bit of white envelope, and you can see it’s “trying” to do things, but oddly and feebly. Each of my test “cuts” tends to be a small,
Simple circle. And as I’ve been doing this on the same piece of paper the marks are increasing - of oddly partially successful ones occasionally …

The faint rectangle and circle were from my previous evening, and tonight you can see an odd pixelated arc, which was produced when I asked it to laser a small circle using fill mode - and it just produced dots on the circumference … for some of it - which implies to me it’s not turning the laser on and off properly - but when asked the laser comes on (in that the laser precisely traced some of the circumference -
But not the bit in the middle !) which again feels like a software / protocol issue to me …

Any suggestions what to try next ?

Help !!

And thank you!

Do a proper alignment starting at m1 (mirror 1) to the table.


This video by Russ Sadler is very good on how to align these beasts… I suggest you watch it… if you continue to have issues, sing out…

He’s got a different head configuration, but the process is the same.

Good luck

:smile_cat:

Ok …will do ! just watched one of his from 8 months back - where he makes the point about getting the beam parallel with the table, (which I’ve got) but also the importance of hitting the lens in the middle too. (Which I’m not) I think I’ve got to wrap my head round how I get he movement I require to get there given actually I’ve only got to move the beam above the nozzle in one horizontal axis.

Nontheless - I can see that will improve the optic side of things - but that’s not going to change how and when the laser is switched on … any thoughts on that ? Indeed if I can’t get the laser to turn on with some decent power to start with this will be super difficult to do.

If only I had a controller panel on this set up i could hit the pulse button and see if it pulsed ! Buying a panel from China looks like it’s £100 -
Which is quite a punt if I end up having to dump the controller anyway due to software issues (Ie not talking reliably to lightburn) …. As it looks like a replacement new model controller and panel is £300-£600 (haven’t wrapped my head round what would be a sensible model replacement - though it doesn’t have to be all singing and dancing given this
Machine
Doesn’t have a motorised z)

I’ll come back another evening to do the mirror adjustments .
May be Friday. It feels like it will be a full evening given it’s my first time.

Thank you for your encouragement!

Mmmmm as I’ve locked up
My warehouse to go home (it is past midnight now and tomorrow beckons!) I’ve realised one way of progressing things - is to remove the SSD I’ve installed in the controlling computer and plug back in the original hard drive - which is till running windows 7 - that the machine came with. I cloned the original hard drive prior to upgrading to windows 10.

It has had windows updates installed since it was last operated, but … in case it’s something to do with migrating to windows 10, the original software may work when driven by that- and then I could tell if it’s something To do with windows 10 drivers /
Lightburn software issues … also then if I can turn the laser I can adjust the mirrors…

Definitely worth a try !

Will report back …

If there’s some kind of optics issue, it could be very misleading.


You need to take this one step at a time… first step is to ensure the tube has output and that it’s in TEM00 mode or resonance. These all have to be correct… it should hit the center of the m1 mirror…

Post a photo of the mark of the tubes output for your machine so we can examine it…

Should be dark in the center and get lighter as it goes outward…

:smile_cat:


Start at the beginning and when you get to the end, you’ll have a working machine…

1 Like

Thank you for the link.

I have seen various videos of russ’s. They are an amazing resource- this is the best I’ve seen so far to help
Me as a
Beginner with mirror alignment, and I hadn’t seen it before, so thank you.

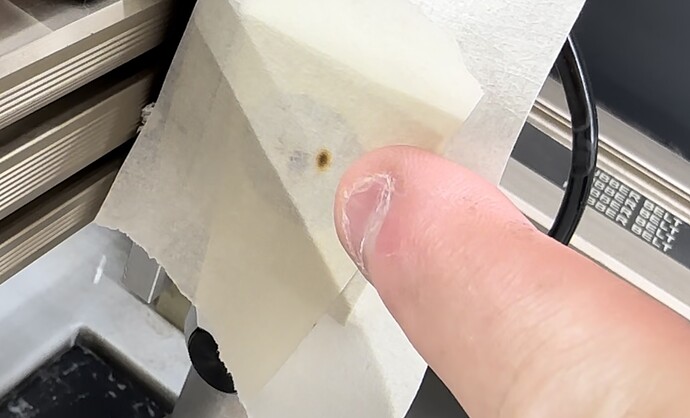
Well … I went back yesterday got some parameters to be able to “burn” masking tape and found the dots are spread over perhaps 5mm as I move the nozzle head to the corners of the bed. So - not aligned at all.

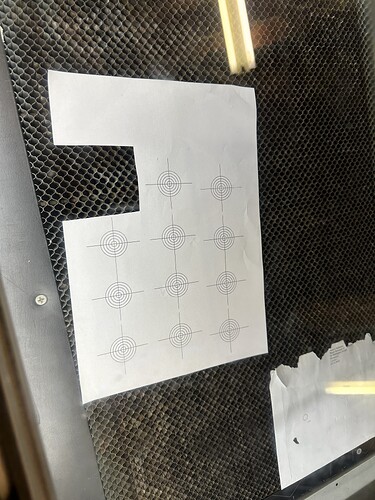
I’ve coreldrWd some targets for myself , watched the video and will return.

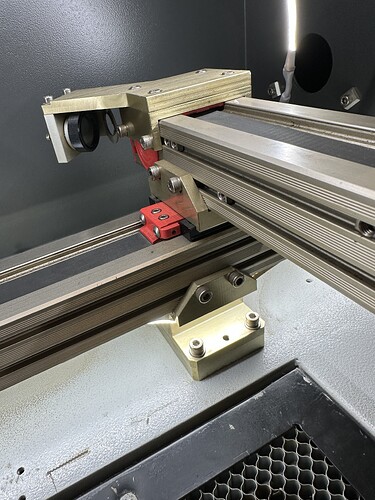
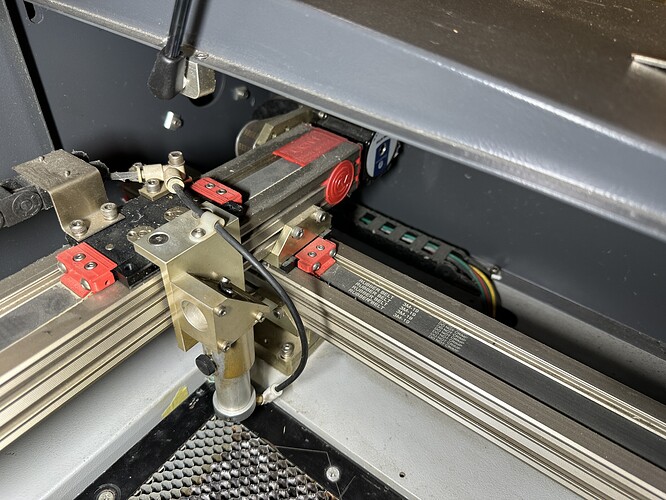
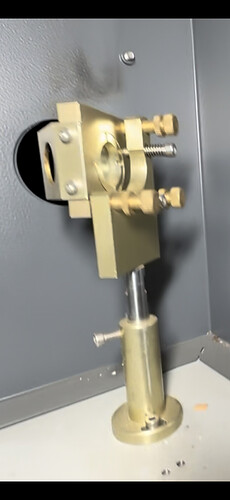
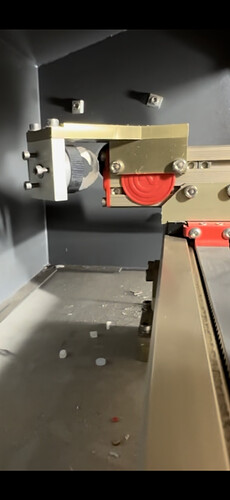
Watching his video - he has many more opportunities for adjustment than me. I seem to have 3 adjustment screws on mirror 1 and 2 and nothing adjustable for mirror 3/
The nozzle.

Is it worth buying a new nozzle assembly so I can adjust that all precisely ?

I’ve attached pictures of what I’ve got … (th

I seem to be able to change angle of mirrors but not translate any of them - so if I end up
Missing reg mirror centres once collimated - I won’t have any options, but I guess I should set it up as is and see how near I get. If I’m lucky it’ll be pretty. Lose to the centres …


e machine is manual focus by way of a thumb screw holding the laser nozzle in place which can slide up and down)


this picture shows 3 layers of masking tape as I was producing dots from different corners of the bed on subsequent layers - you can see they don’t line up at all !

Well - not being a good evening.

I can’t get the laser to fire (again) . Yesterday - it did fantastically for a good hour or so (whilst showing my dad what I’d been up to) to my surprise - resulting in the masking tape burn picture above. Today came in fired up the computer, lightburn, loaded the file I’d saved yesterday as my test design (4 circles to cut - 100 speed 100 power, 1 pass,
One per corner …)

And …. Nothing . It moves around but not so much as a faint brown mark on paper nor masking tape. Yesterday it blasted through paper and masking tape every single time.

Literally - all I’ve done is shut the computer down (in a controlled fashion Ie closing lightburn first) , today fired it up opened lightburn, opened the last file (with my 4
Circles) . And …. No cutting !!! Arrrggghhh.

Yesterday I did just the same powered up the computer fired up lightburn etc. I didn’t run any other software for example …

So there clearly is a software issue I’ve got. If I can’t turn the laser on I can’t possibly calibrate the optics.- and I know the laser was working because it worked fine yesterday at exactly the same powers and speeds - the same file !!

I’m getting ready to throw it out of the door …!

Clearly not a software issue.

You stated you changed nothing… software doesn’t modify itself overnight with the power off…

It’s more than likely something in the configuration or you have a hardware issue… quit fooling around with software …


I stated a few posts back that you needed to start at the beginning. You’ve posted a photo of the 4 burns on the head…

Lets start at the beginning and I’ll help you… I can’t jump all over the place, especially switching hardware of the os … It will never get fixed if you keep adding variables to the equation…

What does the beam look like at m1?

:smile_cat:

Thank you for your support and clear thinking. My grumpy post wasn’t helpful ! I’m sorry if you felt despairing and leaving me to it given how I have apparently been unwilling to listen. Lol I was listening honestly - I was intending to get the mirrors and optics dialed in first as you suggested.

I was trying to Align the mirrors (having cleaned them and the lens the previous session) and sort out the optical side of things as you’d suggested, before AnYTHInG else .

Sadly that plan for this evening was derailed as this evening I found it impossible to put a mark on a piece of masking tape anywhere - even where the beam should exit the laser unit prior to any mirrors incl M1.
Sadly when it did work yesterday - I only marked masking tape at the entry to the nozzle mirror, (when I was trying proof of concept that I had speed /
Power for a simple circle that would consequently turn the beam on for an appropriate time to mark the masking tape) and delighted as I was from yesterday - this evening I was planning to start at M1 and work through methodically having inwardly digested russ Sadlers video…indeed I’d made some targets for myself and printed them out on the inkjet printer …

So sadly I can’t tell you what the beam looks like at M1 as yes - I did put masking tape there to see if I could mark it).

I also agree that this feels like a hardware thing.

I did look and the laser unit has a red light on it - (which I think simply indicated power), and its fan spins.

I’ve given the wiring around it a good wiggle in case of loose connections… but then ran out of time.

I’m intending to print out the circuit diagram which I have found on it’s hard drive, and check terminal choc block are all screwed firmly down … check the safety micro switch operated by the cover is operating correctly electrically with an ohm meter (I can hear it clicking but who knows …) - I believe there is a fuse inside the laser unit from its manual so will check that … ie the obvious electrical stuff…

But not too sure how to check the hardware for faults re operating the laser beyond these obvious things.

All the Ruida manuals usually have how they interface to an rf machine.

Do you have a voltmeter?

You can check the signals to see if the controller is working and if it is, then it must be the rf module.

They don’t look to complicated… mos seem to have a pwm for control.

Might want to go here and see what you can find as far as documention goes…

:smile_cat: